User Manual
Page 1
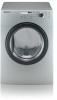
To receive a more complete service, please register your product at www.samsung.com/global/register DV203 Gas and Electric Dryer user manual imagine the possibilities Thank you for purchasing a Samsung product.
To receive a more complete service, please register your product at www.samsung.com/global/register DV203 Gas and Electric Dryer user manual imagine the possibilities Thank you for purchasing a Samsung product.
User Manual
Page 2
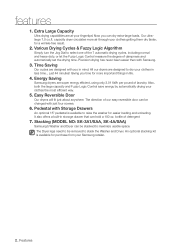
..., using only 3.01 kWh per pound of our easy reversible door can dry extra-large loads. Various Drying Cycles & Fuzzy Logic Algorithm Simply turn the Jog Dial to raise the washer for more air through your clothes getting them dry faster, for purchase from your clothes in life. 4. All our dryers are designed with Storage Drawers An optional 15" pedestal is available for a wrinkle-free result. 2. Energy Saving Samsung dryers...
..., using only 3.01 kWh per pound of our easy reversible door can dry extra-large loads. Various Drying Cycles & Fuzzy Logic Algorithm Simply turn the Jog Dial to raise the washer for more air through your clothes getting them dry faster, for purchase from your clothes in life. 4. All our dryers are designed with Storage Drawers An optional 15" pedestal is available for a wrinkle-free result. 2. Energy Saving Samsung dryers...

User Manual
Page 3
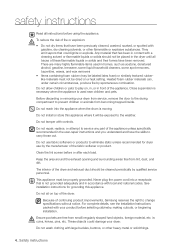
..., and care when installing, maintaining, or operating your dryer. Installation and service must be performed by a qualified installer, service agency, or the gas supplier. Please take full advantage of your dryer's many benefits and features. Follow the gas supplier's instructions. • If you do not cover all occupants. • Immediately call the fire department. Follow directions explicity. safety instructions Congratulations on the installation, use, and care of your...
..., and care when installing, maintaining, or operating your dryer. Installation and service must be performed by a qualified installer, service agency, or the gas supplier. Please take full advantage of your dryer's many benefits and features. Follow the gas supplier's instructions. • If you do not cover all occupants. • Immediately call the fire department. Follow directions explicity. safety instructions Congratulations on the installation, use, and care of your...
User Manual
Page 4
... in the dryer until all instructions before or after each load. The interior of the appliance. Do not sit on a heat setting. Do not repair, replace, or attempt to change specifications without notice. Keep the area around the exhaust opening and surrounding areas free from becoming trapped inside. ie. To reduce the risk of continuing product improvements, Samsung reserves the right to service any part of the...
... in the dryer until all instructions before or after each load. The interior of the appliance. Do not sit on a heat setting. Do not repair, replace, or attempt to change specifications without notice. Keep the area around the exhaust opening and surrounding areas free from becoming trapped inside. ie. To reduce the risk of continuing product improvements, Samsung reserves the right to service any part of the...
User Manual
Page 6
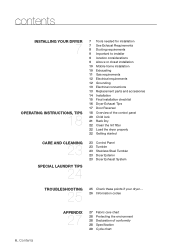
...7 OPERATING INSTRUCTIONS, TIPS 18 7 Tools needed for installation 7 See Exhaust Requirements 8 Ducting requirements 9 Important to installer 9 location considerations 9 Alcove or closet installation 10 Mobile home installation 10 Exhausting 11 Gas requirements 12 Electrical requirements 12 Grounding 13 Electrical connections 13 Replacement parts and accessories 14 Installation 15 Final installation checklist 16 Dryer Exhaust Tips 17 Door Reversal 18 Overview of the control panel 20 Child lock 21 Rack Dry 22 Clean the lint filter 22 Load the dryer properly 22 Getting started CARE AND CLEANING...
...7 OPERATING INSTRUCTIONS, TIPS 18 7 Tools needed for installation 7 See Exhaust Requirements 8 Ducting requirements 9 Important to installer 9 location considerations 9 Alcove or closet installation 10 Mobile home installation 10 Exhausting 11 Gas requirements 12 Electrical requirements 12 Grounding 13 Electrical connections 13 Replacement parts and accessories 14 Installation 15 Final installation checklist 16 Dryer Exhaust Tips 17 Door Reversal 18 Overview of the control panel 20 Child lock 21 Rack Dry 22 Clean the lint filter 22 Load the dryer properly 22 Getting started CARE AND CLEANING...
User Manual
Page 7
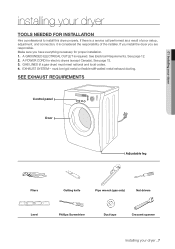
... national and local codes. 4. SEE EXHAUST REQUIREMENTS Control panel Door Adjustable leg Pliers Cutting knife Pipe wrench (gas only) Nut drivers Level Phillips Screwdriver Duct tape Crescent spanner Installing your dryer TOOLS NEEDED FOR INSTALLATION Hire a professional to install this dryer properly. GAS LINES (if a gas dryer) must be rigid metal or flexible stiff-walled metal exhaust ducting. See Electrical Requirements. EXHAUST SYSTEM - A GROUNDED ELECTRICAL OUTLET is considered the responsibility of poor setup, adjustment, and connection, it is...
... national and local codes. 4. SEE EXHAUST REQUIREMENTS Control panel Door Adjustable leg Pliers Cutting knife Pipe wrench (gas only) Nut drivers Level Phillips Screwdriver Duct tape Crescent spanner Installing your dryer TOOLS NEEDED FOR INSTALLATION Hire a professional to install this dryer properly. GAS LINES (if a gas dryer) must be rigid metal or flexible stiff-walled metal exhaust ducting. See Electrical Requirements. EXHAUST SYSTEM - A GROUNDED ELECTRICAL OUTLET is considered the responsibility of poor setup, adjustment, and connection, it is...
User Manual
Page 8
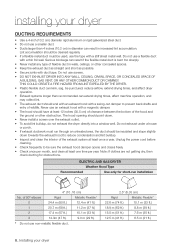
... a thin foil wall. ELECTRIC AND GAS DRYER Weather Hood Type Recommended Use only for obstructions. Note: If clothes are not getting dry, then check ducting for short-run through an unheated area, the duct should point down towards the exhaust hood to be insulated and slope slightly down . • Never install a screen over the exhaust outlet. • To avoid lint buildup, do not exhaust the dryer directly into a window well...
... a thin foil wall. ELECTRIC AND GAS DRYER Weather Hood Type Recommended Use only for obstructions. Note: If clothes are not getting dry, then check ducting for short-run through an unheated area, the duct should point down towards the exhaust hood to be insulated and slope slightly down . • Never install a screen over the exhaust outlet. • To avoid lint buildup, do not exhaust the dryer directly into a window well...
User Manual
Page 9
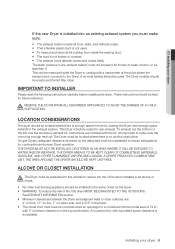
... following instructions carefully before installing the dryer. The Dryer must be used . • To Inspect and clean all lint buildup from inside the existing duct. • The duct is installed into an existing exhaust system you must have two unobstructed air openings for future reference. On gas Dryers, adequate clearance as the Dryer. • WARNING: To reduce the risk of water column, or be empty and the lint filter clean. THE DRYER...
... following instructions carefully before installing the dryer. The Dryer must be used . • To Inspect and clean all lint buildup from inside the existing duct. • The duct is installed into an existing exhaust system you must have two unobstructed air openings for future reference. On gas Dryers, adequate clearance as the Dryer. • WARNING: To reduce the risk of water column, or be empty and the lint filter clean. THE DRYER...
User Manual
Page 11
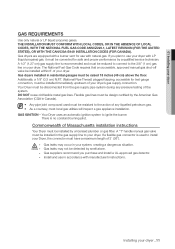
... Massachusetts installation instructions Your Dryer must be installed by a qualified service technician. A "T" handle manual gas valve must be raised 18 inches (46 cm) above the floor. Installing your dryer GAS REQUIREMENTS Use only natural or LP (liquid propane) gases. DO NOT reuse old flexible metal gas lines. Gas dryers installed in Canada). • Any pipe joint compound used to ignite the burner. Your Dryer uses an automatic ignition system to install your Dryer, the connector must...
... Massachusetts installation instructions Your Dryer must be installed by a qualified service technician. A "T" handle manual gas valve must be raised 18 inches (46 cm) above the floor. Installing your dryer GAS REQUIREMENTS Use only natural or LP (liquid propane) gases. DO NOT reuse old flexible metal gas lines. Gas dryers installed in Canada). • Any pipe joint compound used to ignite the burner. Your Dryer uses an automatic ignition system to install your Dryer, the connector must...

User Manual
Page 12
... plugged into an appropriate outlet that is located on a plate below the control panel. • WARNING • • Improper connection of the equipment grounding conductor can result in accordance with all wiring and grounding must be done in accordance with local codes, or in doubt as to the equipment grounding terminal. 12_ Installing your Dryer - NEVER CONNECT GROUND WIRE TO PLASTIC PLUMBING LINES, GAS LINES, OR HOT WATER...
... plugged into an appropriate outlet that is located on a plate below the control panel. • WARNING • • Improper connection of the equipment grounding conductor can result in accordance with all wiring and grounding must be done in accordance with local codes, or in doubt as to the equipment grounding terminal. 12_ Installing your Dryer - NEVER CONNECT GROUND WIRE TO PLASTIC PLUMBING LINES, GAS LINES, OR HOT WATER...

User Manual
Page 13
... electrical service. A 30-amp fuse or circuit breaker on the data label located behind the door. Installing your dryer ELECTRICAL CONNECTIONS Before operating or testing, follow all grounding instructions in Canada to 208 volts. U.S. The electric service requirements can be found on both sides of a new power supply cord kit, marked for 4 wire receptacle, NEMA type 14-30R.) Electric models - IMPORTANT: When local codes allow, the dryer electrical supply may be plugged into a 30-amp receptacle. The power cord electric supply wiring...
... electrical service. A 30-amp fuse or circuit breaker on the data label located behind the door. Installing your dryer ELECTRICAL CONNECTIONS Before operating or testing, follow all grounding instructions in Canada to 208 volts. U.S. The electric service requirements can be found on both sides of a new power supply cord kit, marked for 4 wire receptacle, NEMA type 14-30R.) Electric models - IMPORTANT: When local codes allow, the dryer electrical supply may be plugged into a 30-amp receptacle. The power cord electric supply wiring...

User Manual
Page 14
... the connections and recheck. To install: 1. Review Electrical Requirements section. U.S. Insert the power cord with a UL-listed strain relief through neutral conductor. A strain relief must be resistant to the neutral conductor at the terminal block. Move your Dryer. Review the Exhausting section before putting it will lay across both cushion-tops. 2. BEFORE OPERATING OR TESTING, follow the grounding instructions in the cabinet near the terminal block. Remove the terminal block cover plate...
... the connections and recheck. To install: 1. Review Electrical Requirements section. U.S. Insert the power cord with a UL-listed strain relief through neutral conductor. A strain relief must be resistant to the neutral conductor at the terminal block. Move your Dryer. Review the Exhausting section before putting it will lay across both cushion-tops. 2. BEFORE OPERATING OR TESTING, follow the grounding instructions in the cabinet near the terminal block. Remove the terminal block cover plate...
User Manual
Page 15
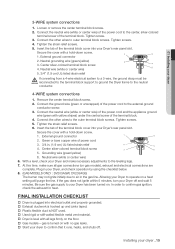
... flexible duct is NOT used. Used rigid or stiff-walled flexible metal vent material. Dryer is turned on a heat setting will purge the line. gas is level with a hold -down screw. 1. Center silver-colored terminal block screw 4. Connect the neutral wire (white or center wire) of the power cord and the appliance ground wire (green with no gas leaks. Start your Dryer's rear panel slot. Grounding wire (green/yellow) 6. External ground connector...
... flexible duct is NOT used. Used rigid or stiff-walled flexible metal vent material. Dryer is turned on a heat setting will purge the line. gas is level with a hold -down screw. 1. Center silver-colored terminal block screw 4. Connect the neutral wire (white or center wire) of the power cord and the appliance ground wire (green with no gas leaks. Start your Dryer's rear panel slot. Grounding wire (green/yellow) 6. External ground connector...
User Manual
Page 16
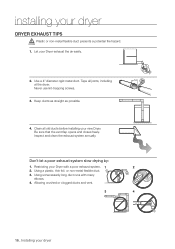
... flexible duct presents a potential fire hazard. Using a plastic, thin foil, or non-metal flexible duct. 3. Clean all joints, including at the dryer. Using unnecessarily long duct runs with a poor exhaust system. 1 2 2. Allowing crushed or clogged ducts and vent. 3 4 16_ Installing your new Dryer. Tape all old ducts before installing your dryer Use a 4" diameter rigid metal duct. Be sure that the vent flap opens and closes freely. Never use lint-trapping screws. 3. Let your Dryer exhaust the air...
... flexible duct presents a potential fire hazard. Using a plastic, thin foil, or non-metal flexible duct. 3. Clean all joints, including at the dryer. Using unnecessarily long duct runs with a poor exhaust system. 1 2 2. Allowing crushed or clogged ducts and vent. 3 4 16_ Installing your new Dryer. Tape all old ducts before installing your dryer Use a 4" diameter rigid metal duct. Be sure that the vent flap opens and closes freely. Never use lint-trapping screws. 3. Let your Dryer exhaust the air...
User Manual
Page 18
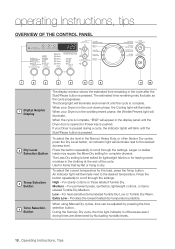
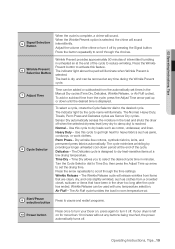
... settings. The estimated time remaining may require the More Dry setting for leaving some moisture in the clothing at the end of the cycle. Provides the lowest heated dry temperature possible. Medium - operating Instructions, tips OVERVIEW OF THE CONTROL PANEL 1 2 3 4 5 67 8 9 10 1 Digital Graphic Display 2 Dry Level Selection Button 3 Temp Selection Button 4 Time Selection Button The display window shows the estimated time remaining in the Normal, Heavy Duty, or other Sensor Dry cycles...
... settings. The estimated time remaining may require the More Dry setting for leaving some moisture in the clothing at the end of the cycle. Provides the lowest heated dry temperature possible. Medium - operating Instructions, tips OVERVIEW OF THE CONTROL PANEL 1 2 3 4 5 67 8 9 10 1 Digital Graphic Display 2 Dry Level Selection Button 3 Temp Selection Button 4 Time Selection Button The display window shows the estimated time remaining in the Normal, Heavy Duty, or other Sensor Dry cycles...
User Manual
Page 19
... room temperature air. 9 Start/Pause selection button Press to pause and restart programs. 10 Power button Press once to set times in unheated air at the end of the cycle. Press the button repeatedly to turn it off . To add or subtract time from the automatically set the drying time. If your Dryer on for heavy fabrics such as jeans, corduroys, or work clothes. Normal - Operating Instructions, Tips _19 The cycle minimizes wrinkling...
... room temperature air. 9 Start/Pause selection button Press to pause and restart programs. 10 Power button Press once to set times in unheated air at the end of the cycle. Press the button repeatedly to turn it off . To add or subtract time from the automatically set the drying time. If your Dryer on for heavy fabrics such as jeans, corduroys, or work clothes. Normal - Operating Instructions, Tips _19 The cycle minimizes wrinkling...

User Manual
Page 25
... properly. Troubleshooting _25 05 Troubleshooting troubleshooting CHECK THESE POINTS IF YOUR DRYER... is normal for objects such as outlined in the installation instruction. • It is noisy. PROBLEM doesn't run. SOLUTION • Be sure the door is latched shut. • Be sure the power cord is plugged into a live electrical outlet. • Check the home's circuit breaker and fuses. • Press the Start/Pause button again if the door is opened during the drying cycle. •...
... properly. Troubleshooting _25 05 Troubleshooting troubleshooting CHECK THESE POINTS IF YOUR DRYER... is normal for objects such as outlined in the installation instruction. • It is noisy. PROBLEM doesn't run. SOLUTION • Be sure the door is latched shut. • Be sure the power cord is plugged into a live electrical outlet. • Check the home's circuit breaker and fuses. • Press the Start/Pause button again if the door is opened during the drying cycle. •...
User Manual
Page 26
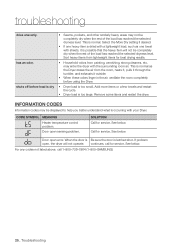
... surrounding room air. CODE SYMBOL MEANING Heater temperature control problem. Call for service. When the door is Be sure the door is normal. If problem open error. troubleshooting dries unevenly. Select the More Dry setting if desired. • If one towel with sheets, it outside. • When these odors linger in the air, ventilate the room completely before load is occurring with a lightweight load, such as the Dryer draws the air from...
... surrounding room air. CODE SYMBOL MEANING Heater temperature control problem. Call for service. When the door is Be sure the door is normal. If problem open error. troubleshooting dries unevenly. Select the More Dry setting if desired. • If one towel with sheets, it outside. • When these odors linger in the air, ventilate the room completely before load is occurring with a lightweight load, such as the Dryer draws the air from...
User Manual
Page 27
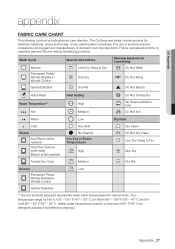
... domestic and imported items. Follow care label directions to maximize garment life and reduce laundering problems. Wash Cycle Special Instructions Warning Symbols for Laundering Normal Line Dry/ Hang to Dry Do Not Wash Permanent Press / Wrinkle Resistant / Wrinkle Control Drip Dry Do Not Wring Gentle/Delicates Dry Flat Do Not Bleach Hand Wash Water Temperature** Hot Heat Setting High Medium Do Not Tumble Dry No Steam (added to iron) Do...
... domestic and imported items. Follow care label directions to maximize garment life and reduce laundering problems. Wash Cycle Special Instructions Warning Symbols for Laundering Normal Line Dry/ Hang to Dry Do Not Wash Permanent Press / Wrinkle Resistant / Wrinkle Control Drip Dry Do Not Wring Gentle/Delicates Dry Flat Do Not Bleach Hand Wash Water Temperature** Hot Heat Setting High Medium Do Not Tumble Dry No Steam (added to iron) Do...
User Manual
Page 30
... for instructions, or fixing installation errors. This limited warranty does not cover problems resulting from an authorized service center. The original dated bill of products, equipment, systems, utilities, services, parts, supplies, accessories, applications, installations, repairs, external wiring or connectors not supplied or authorized by SAMSUNG that damage this product and shall not apply to the following: damage that are covered and prescribed in the instruction book; All replaced parts...
... for instructions, or fixing installation errors. This limited warranty does not cover problems resulting from an authorized service center. The original dated bill of products, equipment, systems, utilities, services, parts, supplies, accessories, applications, installations, repairs, external wiring or connectors not supplied or authorized by SAMSUNG that damage this product and shall not apply to the following: damage that are covered and prescribed in the instruction book; All replaced parts...


