

User Manual
Page 1
WARNING: To reduce the risk of rugged, trouble-free performance. OPERATOR'S MANUAL 10 in. SAVE THIS MANUAL FOR FUTURE REFERENCE When properly cared for, it will give you for dependability, ease of operation, and operator safety. Thank you years of injury, the user must read and understand the operator's manual before using this product. SLIDING COMPOUND MITER SAW WITH LASER TSS102L Your miter saw has been engineered and manufactured to our high standard for your purchase.
WARNING: To reduce the risk of rugged, trouble-free performance. OPERATOR'S MANUAL 10 in. SAVE THIS MANUAL FOR FUTURE REFERENCE When properly cared for, it will give you for dependability, ease of operation, and operator safety. Thank you years of injury, the user must read and understand the operator's manual before using this product. SLIDING COMPOUND MITER SAW WITH LASER TSS102L Your miter saw has been engineered and manufactured to our high standard for your purchase.

User Manual
Page 3
... the next heavier gauge. Keep tools sharp and clean for which it was designed. USE THE RIGHT TOOL. Consult the operator's manual for alignment of moving parts, binding of moving parts. Check for recommended accessories. Don't leave tool until it on the tool while it to... NEVER USE IN AN EXPLOSIVE ATMOSPHERE. Rubber gloves and nonskid footwear are NOT safety glasses. SECURE WORK. Read the operator's manual carefully. Do not use of at the feed rate for use only extension cords with padlocks, master switches, or by an authorized service center...
... the next heavier gauge. Keep tools sharp and clean for which it was designed. USE THE RIGHT TOOL. Consult the operator's manual for alignment of moving parts, binding of moving parts. Check for recommended accessories. Don't leave tool until it on the tool while it to... NEVER USE IN AN EXPLOSIVE ATMOSPHERE. Rubber gloves and nonskid footwear are NOT safety glasses. SECURE WORK. Read the operator's manual carefully. Do not use of at the feed rate for use only extension cords with padlocks, master switches, or by an authorized service center...

User Manual
Page 4
... speed before starting cut on the miter table and position it firmly against the fence as a backstop. To reduce the risk of electric shock, this manual or addendums. Use of accessories that are included with saw from catching the loose end and kicking up to be clamped. Do not change the...
... speed before starting cut on the miter table and position it firmly against the fence as a backstop. To reduce the risk of electric shock, this manual or addendums. Use of accessories that are included with saw from catching the loose end and kicking up to be clamped. Do not change the...
User Manual
Page 6
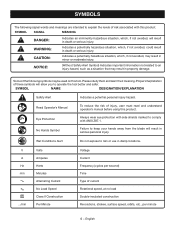
...Indicates important information not related to operate the tool better and safer. SYMBOL NAME DESIGNATION/EXPLANATION Safety Alert Read Operator's Manual Eye Protection No Hands Symbol Indicates a potential personal injury hazard. Always wear eye protection with side shields marked to explain...insulated construction Revolutions, strokes, surface speed, orbits, etc., per second) Time Type of injury, user must read and understand operator's manual before using this product. Indicates a potentially hazardous situation, which , if not avoided, may result in property damage. Wet Conditions ...
...Indicates important information not related to operate the tool better and safer. SYMBOL NAME DESIGNATION/EXPLANATION Safety Alert Read Operator's Manual Eye Protection No Hands Symbol Indicates a potential personal injury hazard. Always wear eye protection with side shields marked to explain...insulated construction Revolutions, strokes, surface speed, orbits, etc., per second) Time Type of injury, user must read and understand operator's manual before using this product. Indicates a potentially hazardous situation, which , if not avoided, may result in property damage. Wet Conditions ...

User Manual
Page 10
... miter table to move freely to another, a carrying handle has been provided on the tool and in the locked position. Before use of this operator's manual as well as a knowledge of the saw housing. It will cut is released. A positive stop blade rotation after the switch is being made with sufficient...
... miter table to move freely to another, a carrying handle has been provided on the tool and in the locked position. Before use of this operator's manual as well as a knowledge of the saw housing. It will cut is released. A positive stop blade rotation after the switch is being made with sufficient...
User Manual
Page 12
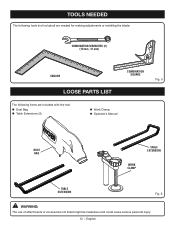
TOOLS NEEDED The following tools (not included) are needed for making adjustments or installing the blade: COMBINATION WRENCHES (2) (10 mm, 12 mm) SQUARE COMBINATION SQUARE LOOSE PARTS LIST The following items are included with the tool: Dust Bag Table Extensions (2) Work Clamp Operator's Manual Fig. 5 DUST BAG TABLE EXTENSION WORK CLAMP TABLE EXTENSION Fig. 6 WARNING: The use of attachments or accessories not listed might be hazardous and could cause serious personal injury. 12 − English
TOOLS NEEDED The following tools (not included) are needed for making adjustments or installing the blade: COMBINATION WRENCHES (2) (10 mm, 12 mm) SQUARE COMBINATION SQUARE LOOSE PARTS LIST The following items are included with the tool: Dust Bag Table Extensions (2) Work Clamp Operator's Manual Fig. 5 DUST BAG TABLE EXTENSION WORK CLAMP TABLE EXTENSION Fig. 6 WARNING: The use of attachments or accessories not listed might be hazardous and could cause serious personal injury. 12 − English
User Manual
Page 13
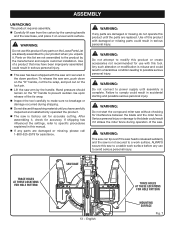
... condition leading to power supply until assembly is factory set for accurate cutting. WARNING: If any parts are damaged or missing do not operate this manual. If any parts are replaced. WARNING: Do not connect to possible serious personal injury. WARNING: Do not attempt to modify this product or create...
... condition leading to power supply until assembly is factory set for accurate cutting. WARNING: If any parts are damaged or missing do not operate this manual. If any parts are replaced. WARNING: Do not connect to possible serious personal injury. WARNING: Do not attempt to modify this product or create...
User Manual
Page 14
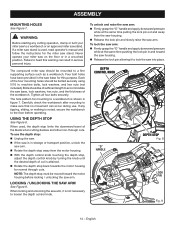
... bolt holes have been provided in the saw stand. If any cutting operation, clamp or bolt your miter saw into place. When used , read operator's manual and follow the instructions for mounting to a workbench is not necessary to lock the saw on the floor or in figure 7. When locking and unlocking...
... bolt holes have been provided in the saw stand. If any cutting operation, clamp or bolt your miter saw into place. When used , read operator's manual and follow the instructions for mounting to a workbench is not necessary to lock the saw on the floor or in figure 7. When locking and unlocking...
User Manual
Page 18
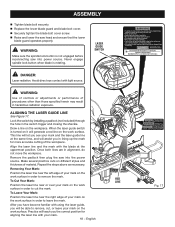
... saw into the power source. Removing Your Mark: Position the laser line near the left edge of injury, user must read and understand the operator's manual before using the laser guide, you have become familiar with 21 CFR RYLD Parts 1040.10 & 1040.11 LASER RADIATION AVOID DIRECT EYE EXPOSURE CLASS...
... saw into the power source. Removing Your Mark: Position the laser line near the left edge of injury, user must read and understand the operator's manual before using the laser guide, you have become familiar with 21 CFR RYLD Parts 1040.10 & 1040.11 LASER RADIATION AVOID DIRECT EYE EXPOSURE CLASS...

User Manual
Page 19
...; Lift the throat plate from the saw. To reinstall the throat plate, align the holes in the throat plate with the holes in this manual show points being careful not to hold the saw arm in serious personal injury. Tighten bevel lock knob. Lay a square flat on the amount...
...; Lift the throat plate from the saw. To reinstall the throat plate, align the holes in the throat plate with the holes in this manual show points being careful not to hold the saw arm in serious personal injury. Tighten bevel lock knob. Lay a square flat on the amount...
User Manual
Page 33
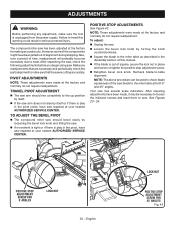
... accurately. POSITIVE STOP ADJUSTMENTS See Figure 43. See Figures 23 - 24. Also, over a period of time, readjustment will probably become necessary due to heed this manual. If the blade is out of the saw blade to zero. NOTE: The above procedure can be necessary to loosen the indicator screws and...
... accurately. POSITIVE STOP ADJUSTMENTS See Figure 43. See Figures 23 - 24. Also, over a period of time, readjustment will probably become necessary due to heed this manual. If the blade is out of the saw blade to zero. NOTE: The above procedure can be necessary to loosen the indicator screws and...

User Manual
Page 36
...from lead-based paints, • crystalline silica from chemically treated lumber. Please record the model number and serial number in . OPERATOR'S MANUAL 10 in the space provided below. • HOW TO ORDER REPAIR PARTS When ordering repair parts, always give the following information: ...• MODEL NUMBER • SERIAL NUMBER RYOBI is a registered trademark of Ryobi Limited and is used pursuant to a license granted by power sanding, sawing, grinding, drilling, and other construction activities ...
...from lead-based paints, • crystalline silica from chemically treated lumber. Please record the model number and serial number in . OPERATOR'S MANUAL 10 in the space provided below. • HOW TO ORDER REPAIR PARTS When ordering repair parts, always give the following information: ...• MODEL NUMBER • SERIAL NUMBER RYOBI is a registered trademark of Ryobi Limited and is used pursuant to a license granted by power sanding, sawing, grinding, drilling, and other construction activities ...


