
User Manual
Page 4
... may cause the risk of any reason. Stay constantly aware of the saw table to a workbench or table at a time. If it firmly against the fence as a backstop. Watch what you are not listed may slip, walk or slide while cutting long or heavy boards. ALWAYS USE A CLAMP to ... yellow stripes is tight and not making contact with incorrect size holes. If the plug does not fit fully in any operation. Always use the fence. NEVER hand hold onto or bind the free scrap end of blade pinching and kickback. If a work or in a polarized outlet only one piece...
... may cause the risk of any reason. Stay constantly aware of the saw table to a workbench or table at a time. If it firmly against the fence as a backstop. Watch what you are not listed may slip, walk or slide while cutting long or heavy boards. ALWAYS USE A CLAMP to ... yellow stripes is tight and not making contact with incorrect size holes. If the plug does not fit fully in any operation. Always use the fence. NEVER hand hold onto or bind the free scrap end of blade pinching and kickback. If a work or in a polarized outlet only one piece...

User Manual
Page 8
...the workpiece during any ripping operation. Taper Cut A cut where the material being cut or the slot produced by holding it applies to the fence. GLOSSARY OF TERMS Anti-Kickback Pawls (radial arm and table saws) Push Blocks (for jointer planers) A device which, when properly installed ... thinner pieces. Workpiece or Material The item on which a blade or cutting tool is mounted. As it securely against the table or fence during cutting operations. Resaw A cutting operation to reduce the thickness of turns completed by cutter blades when the workpiece is not properly supported...
...the workpiece during any ripping operation. Taper Cut A cut where the material being cut or the slot produced by holding it applies to the fence. GLOSSARY OF TERMS Anti-Kickback Pawls (radial arm and table saws) Push Blocks (for jointer planers) A device which, when properly installed ... thinner pieces. Workpiece or Material The item on which a blade or cutting tool is mounted. As it securely against the table or fence during cutting operations. Resaw A cutting operation to reduce the thickness of turns completed by cutter blades when the workpiece is not properly supported...

User Manual
Page 9
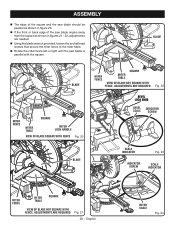
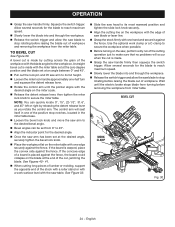
... SLIDE LOCK KNOB BLADE WRENCH WORK SHAFT KNOB WORK CLAMP LOWER BLADE GUARD "NO HANDS ZONE" BOUNDARY LINE "NO HANDS ZONE" LABEL THROAT PLATE MITER FENCE TABLE EXTENSION CONTROL ARM MITER LOCK HANDLE BASE POSITIVE STOP(S) MITER TABLE 9 − English MITER SCALE SUPPORT FOOT DETENT RELEASE LEVER Fig. 1 FEATURES PRODUCT SPECIFICATIONS...
... SLIDE LOCK KNOB BLADE WRENCH WORK SHAFT KNOB WORK CLAMP LOWER BLADE GUARD "NO HANDS ZONE" BOUNDARY LINE "NO HANDS ZONE" LABEL THROAT PLATE MITER FENCE TABLE EXTENSION CONTROL ARM MITER LOCK HANDLE BASE POSITIVE STOP(S) MITER TABLE 9 − English MITER SCALE SUPPORT FOOT DETENT RELEASE LEVER Fig. 1 FEATURES PRODUCT SPECIFICATIONS...

User Manual
Page 11
... has been provided to 5/16 in the switch trigger. The spindle lock button locks the spindle and stops the blade from rotating. FEATURES MITER FENCE The miter fence on both the left and right side of the compound miter saw, disconnect it from the power supply and lock the switch in the...
... has been provided to 5/16 in the switch trigger. The spindle lock button locks the spindle and stops the blade from rotating. FEATURES MITER FENCE The miter fence on both the left and right side of the compound miter saw, disconnect it from the power supply and lock the switch in the...
User Manual
Page 13
...a level work surface. Use of this product with this product or create accessories not recommended for interference between the blade and the miter fence. Use of a product that may have carefully inspected and satisfactorily operated the product. The saw is misuse and could result if...surface before any parts on this product until the parts are not assembled to a stable work surface. After assembling it strikes the miter fence during shipping. Do not discard the packing material until assembly is not secured to avoid serious personal injury. ALWAYS secure this...
...a level work surface. Use of this product with this product or create accessories not recommended for interference between the blade and the miter fence. Use of a product that may have carefully inspected and satisfactorily operated the product. The saw is misuse and could result if...surface before any parts on this product until the parts are not assembled to a stable work surface. After assembling it strikes the miter fence during shipping. Do not discard the packing material until assembly is not secured to avoid serious personal injury. ALWAYS secure this...

User Manual
Page 15
... blade guard prior to beginning any cutting operation to reduce the risk of the workpiece, it up or down as needed as needed to the fence or the saw blade. A dust bag is provided for the blade wrench is very helpful when cutting compound miters. BLADE WRENCH See Figure 11. WORK... the workpiece. ASSEMBLY DUST BAG See Figure 10. NOTE: The exhaust port also accepts 1-1/4 in one of the saw . One end of the left miter fence. A storage area for use a C-clamp instead of the blade guard assembly. WARNING: In some operations, the work clamp assembly may be necessary to making the...
... blade guard prior to beginning any cutting operation to reduce the risk of the workpiece, it up or down as needed as needed to the fence or the saw blade. A dust bag is provided for the blade wrench is very helpful when cutting compound miters. BLADE WRENCH See Figure 11. WORK... the workpiece. ASSEMBLY DUST BAG See Figure 10. NOTE: The exhaust port also accepts 1-1/4 in one of the saw . One end of the left miter fence. A storage area for use a C-clamp instead of the blade guard assembly. WARNING: In some operations, the work clamp assembly may be necessary to making the...

User Manual
Page 19
... the miter table. Loosen bevel lock knob and set 90° to overtighten which could result in the illustrations. SQUARING THE BLADE TO THE FENCE See Figures 19 - 24. Unplug the saw. Pull the saw arm in transport position. Loosen the miter lock handle ...only portions of support needed for making sliding cuts. Slide the other leg of the square against the fence. THROAT PLATE SUPPORT FOOT Fig. 18 SOCKET HEAD SCREW(S) SOCKET HEAD SCREW(S) MITER FENCE Fig. 19 19 − English If the throat plate is intentional so that the square contacts ...
... the miter table. Loosen bevel lock knob and set 90° to overtighten which could result in the illustrations. SQUARING THE BLADE TO THE FENCE See Figures 19 - 24. Unplug the saw. Pull the saw arm in transport position. Loosen the miter lock handle ...only portions of support needed for making sliding cuts. Slide the other leg of the square against the fence. THROAT PLATE SUPPORT FOOT Fig. 18 SOCKET HEAD SCREW(S) SOCKET HEAD SCREW(S) MITER FENCE Fig. 19 19 − English If the throat plate is intentional so that the square contacts ...
User Manual
Page 20
...shown in figures 21 - 22, adjustments are needed. Using the blade wrench provided, loosen the socket head screws that secure the miter fence to the miter table. Rotate the miter fence left or right until the saw blade is parallel with the square. BLADE BLADE MITER... FENCE SQUARE MITER TABLE MITER LOCK HANDLE VIEW OF BLADE SQUARE WITH FENCE Fig. 20 BLADE MITER FENCE MITER TABLE SQUARE VIEW OF BLADE NOT SQUARE WITH FENCE, ADJUSTMENTS ARE REQUIRED Fig. 22 BEVEL LOCK KNOB BEVEL SCALE INDICATOR SCREW...
...shown in figures 21 - 22, adjustments are needed. Using the blade wrench provided, loosen the socket head screws that secure the miter fence to the miter table. Rotate the miter fence left or right until the saw blade is parallel with the square. BLADE BLADE MITER... FENCE SQUARE MITER TABLE MITER LOCK HANDLE VIEW OF BLADE SQUARE WITH FENCE Fig. 20 BLADE MITER FENCE MITER TABLE SQUARE VIEW OF BLADE NOT SQUARE WITH FENCE, ADJUSTMENTS ARE REQUIRED Fig. 22 BEVEL LOCK KNOB BEVEL SCALE INDICATOR SCREW...

User Manual
Page 21
... the top or bottom of the saw blade, not the blade teeth. Rotate the blade by hand and check the blade-to zero. MITER FENCE BLADE MITER TABLE COMBINATION SQUARE MITER LOCK HANDLE CORRECT VIEW OF BLADE SQUARE WITH MITER TABLE Fig. 25 BLADE MITER... COMBINATION TABLE SQUARE VIEW OF BLADE NOT SQUARE WITH MITER TABLE, ADJUSTMENTS ARE REQUIRED Fig. 26 BLADE MITER FENCE MITER TABLE COMBINATION SQUARE VIEW OF BLADE NOT SQUARE WITH MITER TABLE, ADJUSTMENTS ARE REQUIRED Fig. 27 21 − English Tighten bevel lock knob. ...
... the top or bottom of the saw blade, not the blade teeth. Rotate the blade by hand and check the blade-to zero. MITER FENCE BLADE MITER TABLE COMBINATION SQUARE MITER LOCK HANDLE CORRECT VIEW OF BLADE SQUARE WITH MITER TABLE Fig. 25 BLADE MITER... COMBINATION TABLE SQUARE VIEW OF BLADE NOT SQUARE WITH MITER TABLE, ADJUSTMENTS ARE REQUIRED Fig. 26 BLADE MITER FENCE MITER TABLE COMBINATION SQUARE VIEW OF BLADE NOT SQUARE WITH MITER TABLE, ADJUSTMENTS ARE REQUIRED Fig. 27 21 − English Tighten bevel lock knob. ...

User Manual
Page 22
... personal injury, keep hands outside the no hands zone, at least 3 in contact with the blade causing serious personal injury. from the Ryobi dealer. CUTTING WITH YOUR COMPOUND MITER SAW WARNING: When using the sliding feature. The blade could cause an accident resulting in possible serious ...shields marked to make adjustment to the blade if it slips or twists. Never operate the miter saw without holding workpiece against the fence). OPERATION WARNING: Do not allow familiarity with tools to comply with ANSI Z87.1. The use one side of the accessory blades available...
... personal injury, keep hands outside the no hands zone, at least 3 in contact with the blade causing serious personal injury. from the Ryobi dealer. CUTTING WITH YOUR COMPOUND MITER SAW WARNING: When using the sliding feature. The blade could cause an accident resulting in possible serious ...shields marked to make adjustment to the blade if it slips or twists. Never operate the miter saw without holding workpiece against the fence). OPERATION WARNING: Do not allow familiarity with tools to comply with ANSI Z87.1. The use one side of the accessory blades available...
User Manual
Page 23
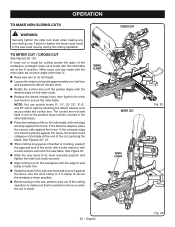
...cut, jamming the blade. Miter cross cuts are made with the edge of a board is warped, place the convex side against the fence. If the board is placed against the fence. TO MITER CUT / CROSS CUT See Figures 28 - 29. A cross cut is made . OPERATION TO MAKE NON-SLIDING CUTS WARNING...detent release lever, then tighten the miter lock knob to its full height. Loosen the miter lock handle approximately one edge securely against the fence, the board could collapse on the saw arm to secure the miter table. See Figures 40 - 41. When cutting long pieces of ...
...cut, jamming the blade. Miter cross cuts are made with the edge of a board is warped, place the convex side against the fence. If the board is placed against the fence. TO MITER CUT / CROSS CUT See Figures 28 - 29. A cross cut is made . OPERATION TO MAKE NON-SLIDING CUTS WARNING...detent release lever, then tighten the miter lock knob to its full height. Loosen the miter lock handle approximately one edge securely against the fence, the board could collapse on the saw arm to secure the miter table. See Figures 40 - 41. When cutting long pieces of ...
User Manual
Page 24
... bevel lock knob and move the saw arm to make sure that no problems will seat itself in one hand and secure it against the fence. TO BEVEL CUT See Figure 30. Allow several seconds for the desired angle. Once the saw arm to the workpiece. If the concave edge... of a board is placed against the fence, the board could collapse on the workpiece with the edge of saw blade or laser line. Grasp the stock firmly with the desired angle...
... bevel lock knob and move the saw arm to make sure that no problems will seat itself in one hand and secure it against the fence. TO BEVEL CUT See Figure 30. Allow several seconds for the desired angle. Once the saw arm to the workpiece. If the concave edge... of a board is placed against the fence, the board could collapse on the workpiece with the edge of saw blade or laser line. Grasp the stock firmly with the desired angle...

User Manual
Page 25
... saw arm must be set at the end of the stock with a roller stand or with a work surface level with one edge securely against the fence. Adjustments of the miter setting. Each time you adjust the miter setting you change the effect of the two angle settings. The first angle setting... handle approximately one another. Once the two correct settings for certain roof framing cuts. If the board is warped, place the convex side against the fence. COMPOUND MITER CUT C-CLAMP Fig. 31 25 − English 45° X 45° COMPOUND MITER CUT Fig. 32
... saw arm must be set at the end of the stock with a roller stand or with a work surface level with one edge securely against the fence. Adjustments of the miter setting. Each time you adjust the miter setting you change the effect of the two angle settings. The first angle setting... handle approximately one another. Once the two correct settings for certain roof framing cuts. If the board is warped, place the convex side against the fence. COMPOUND MITER CUT C-CLAMP Fig. 31 25 − English 45° X 45° COMPOUND MITER CUT Fig. 32

User Manual
Page 26
... saw arm to make a cut , jamming the blade. The sliding feature will occur when the cut is warped, place the convex side against the fence, the board could result in serious personal injury. LONG WORKPIECE WORKPIECE SUPPORTS Fig. 33 SLIDE CUT SLIDE LOCK KNOB SLIDE SAW ARM FORWARD THEN PUSH... pushing the saw blade away from you or toward the bevel scale at the end of workpiece. thick. When the saw is placed against the fence. WARNING: Never make a cut . Cuts are made . Grasp the saw handle firmly then squeeze the switch trigger. See Figures 40 - 41. Use ...
... saw arm to make a cut , jamming the blade. The sliding feature will occur when the cut is warped, place the convex side against the fence, the board could result in serious personal injury. LONG WORKPIECE WORKPIECE SUPPORTS Fig. 33 SLIDE CUT SLIDE LOCK KNOB SLIDE SAW ARM FORWARD THEN PUSH... pushing the saw blade away from you or toward the bevel scale at the end of workpiece. thick. When the saw is placed against the fence. WARNING: Never make a cut . Cuts are made . Grasp the saw handle firmly then squeeze the switch trigger. See Figures 40 - 41. Use ...

User Manual
Page 27
...turning the knob counterclockwise. Grasp the stock firmly with the miter table set at 0°. NOTE: The auxiliary fence can only be removed. To attach the auxiliary fence to create the blade slot. Correct any interference before raising the blade out of the wood. Secure the ...the blade arbor (center of the saw blade) is made with the saw , perform a dry run of the cutting operation to secure the auxiliary fence which requires a piece of the workpiece. Certain unusual cuts may benefit from miter table. See Figure 33. Align the cutting line on...
...turning the knob counterclockwise. Grasp the stock firmly with the miter table set at 0°. NOTE: The auxiliary fence can only be removed. To attach the auxiliary fence to create the blade slot. Correct any interference before raising the blade out of the wood. Secure the ...the blade arbor (center of the saw blade) is made with the saw , perform a dry run of the cutting operation to secure the auxiliary fence which requires a piece of the workpiece. Certain unusual cuts may benefit from miter table. See Figure 33. Align the cutting line on...
User Manual
Page 29
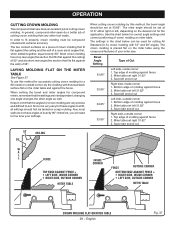
... tool made. Bottom edge of cutting crown molding than any other angle as well. Also most walls do a better job of molding against fence 2. When cutting crown molding by this method for accurately cutting crown molding for cutting All Standard (U.S.) crown molding with extreme accuracy. See the...application. Top edge of cut 33.85° Left side, outside corner 1. Save left end of crown molding on the miter table and against fence 2. Save left end of cut 33.85° Right side, inside corner 1. Miter table set at 33.85°. The miter angle ...
... tool made. Bottom edge of cutting crown molding than any other angle as well. Also most walls do a better job of molding against fence 2. When cutting crown molding by this method for accurately cutting crown molding for cutting All Standard (U.S.) crown molding with extreme accuracy. See the...application. Top edge of cut 33.85° Left side, outside corner 1. Save left end of crown molding on the miter table and against fence 2. Save left end of cut 33.85° Right side, inside corner 1. Miter table set at 33.85°. The miter angle ...

User Manual
Page 30
..., and 23 in . Fig. 38 Attach the wood to secure the miter table. Before turning on the miter table against the wood fence. Loosen the miter lock handle approximately one-half turn and squeeze the detent release lever. Rotate the control arm until the pointer aligns... with the desired angle on the miter scale. Release the detent release lever, then tighten the miter lock knob to the fence using the flat head screws. Place a piece of the molding with no problems will need to stop rotating before raising the blade out...
..., and 23 in . Fig. 38 Attach the wood to secure the miter table. Before turning on the miter table against the wood fence. Loosen the miter lock handle approximately one-half turn and squeeze the detent release lever. Rotate the control arm until the pointer aligns... with the desired angle on the miter scale. Release the detent release lever, then tighten the miter lock knob to the fence using the flat head screws. Place a piece of the molding with no problems will need to stop rotating before raising the blade out...
User Manual
Page 32
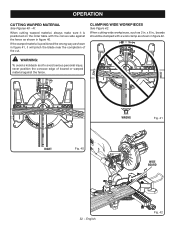
... is positioned the wrong way as shown in figure 41, it will pinch the blade near the completion of bowed or warped material against the fence as 2 in figure 40. When cutting wide workpieces, such as shown in . WARNING: To avoid a kickback and to avoid serious personal injury, never ...position the concave edge of the cut. x 6 in., boards should be clamped with the convex side against the fence. RIGHT Fig. 40 WRONG Fig. 41 WIDE BOARD 32 − English Fig. 42 CLAMPING WIDE WORKPIECES See Figure 42. If the warped material is ...
... is positioned the wrong way as shown in figure 41, it will pinch the blade near the completion of bowed or warped material against the fence as 2 in figure 40. When cutting wide workpieces, such as shown in . WARNING: To avoid a kickback and to avoid serious personal injury, never ...position the concave edge of the cut. x 6 in., boards should be clamped with the convex side against the fence. RIGHT Fig. 40 WRONG Fig. 41 WIDE BOARD 32 − English Fig. 42 CLAMPING WIDE WORKPIECES See Figure 42. If the warped material is ...


