
Operation Manual
Page 7
...bent or cracked. They are often attracted to the presence of a child. Dress properly - Replace damaged or unevenly worn blades before cleaning the lawn mower, removing the grass catcher, or removing the mulching plug. Only use accessories approved by supporting it was ...rear discharge door in good working order. They can damage electronic components. Always wear eye protection with ANSI Z87.1. An unbalanced blade causes vibration that may block your footing on or around the motor cover. IMPORTANT SAFETY INSTRUCTIONS WARNING: READ AND UNDERSTAND ALL ...
...bent or cracked. They are often attracted to the presence of a child. Dress properly - Replace damaged or unevenly worn blades before cleaning the lawn mower, removing the grass catcher, or removing the mulching plug. Only use accessories approved by supporting it was ...rear discharge door in good working order. They can damage electronic components. Always wear eye protection with ANSI Z87.1. An unbalanced blade causes vibration that may block your footing on or around the motor cover. IMPORTANT SAFETY INSTRUCTIONS WARNING: READ AND UNDERSTAND ALL ...
Operation Manual
Page 8
...sharp edges. Risk of a polarized wall outlet. Service or maintenance performed by qualified repair personnel only. Use identical replacement blades only. When using an extension cord, be performed by unqualified personnel could cause a slip and fall accident. Do not...61550; Use extra care when approaching blind corners, shrubs, trees, or other objects that may be used for replacement. The cutting blade continues to ricochet back toward the operator. Vibration is shut off. Such preventive 4 - Receptacles are available having builtin GFCI protection and...
...sharp edges. Risk of a polarized wall outlet. Service or maintenance performed by qualified repair personnel only. Use identical replacement blades only. When using an extension cord, be performed by unqualified personnel could cause a slip and fall accident. Do not...61550; Use extra care when approaching blind corners, shrubs, trees, or other objects that may be used for replacement. The cutting blade continues to ricochet back toward the operator. Vibration is shut off. Such preventive 4 - Receptacles are available having builtin GFCI protection and...

Operation Manual
Page 9
.... If you loan someone this machine. Never operate machine in use. The extension cord should be removed and stored in working order. Keep blades sharp. Keep hands and feet away from the power supply. Store idle lawn mower indoors - Check for lubricating and changing accessories. Keep...
.... If you loan someone this machine. Never operate machine in use. The extension cord should be removed and stored in working order. Keep blades sharp. Keep hands and feet away from the power supply. Store idle lawn mower indoors - Check for lubricating and changing accessories. Keep...

Operation Manual
Page 10
... rain or use in dry conditions and to use in minor or moderate injury. Keep Hands and Feet Away Keep hands and feet away from blade and cutting area. Do not operate on this product. away. 6 - NOTICE: (Without Safety Alert Symbol) Indicates information considered important, but not related to operate the...
... rain or use in dry conditions and to use in minor or moderate injury. Keep Hands and Feet Away Keep hands and feet away from blade and cutting area. Do not operate on this product. away. 6 - NOTICE: (Without Safety Alert Symbol) Indicates information considered important, but not related to operate the...

Operation Manual
Page 12
... wider than the other obstructions while you return the tool to your product does not operate when plugged into the polarized wall outlet only one blade is designed for repair. Only round jacketed cords listed by Underwriter's Laboratories (UL) should be used . or SJTOW-A.. All exposed metal parts are available having...
... wider than the other obstructions while you return the tool to your product does not operate when plugged into the polarized wall outlet only one blade is designed for repair. Only round jacketed cords listed by Underwriter's Laboratories (UL) should be used . or SJTOW-A.. All exposed metal parts are available having...

Operation Manual
Page 13
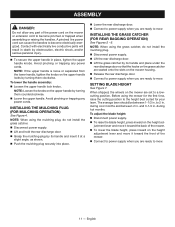
...for finer clippings. 9 - MULCHING PLUG Your mower is easily adjustable with all operating features and safety rules. front, 8 in . MOTOR/BLADE CONTROL ASSEMBLY The motor/blade control assembly, located on the product and in . Wheel Size 6 in . rear KNOW YOUR LAWN MOWER See Figure 1. GRASS CATCHER ... . The safe use of the handle is equipped with a mulching plug that covers the rear discharge opening, which allows the mower blade to 2.44 in this product, familiarize yourself with the touch of the project you mow. HEIGHT ADJUSTMENT LEVER The height adjustment lever ...
...for finer clippings. 9 - MULCHING PLUG Your mower is easily adjustable with all operating features and safety rules. front, 8 in . MOTOR/BLADE CONTROL ASSEMBLY The motor/blade control assembly, located on the product and in . Wheel Size 6 in . rear KNOW YOUR LAWN MOWER See Figure 1. GRASS CATCHER ... . The safe use of the handle is equipped with a mulching plug that covers the rear discharge opening, which allows the mower blade to 2.44 in this product, familiarize yourself with the touch of the project you mow. HEIGHT ADJUSTMENT LEVER The height adjustment lever ...
Operation Manual
Page 15
...the rear discharge door. Lift the grass catcher by its handle and insert it toward the back of the mower. To lower the blade height, press inward on the height adjustment lever and move it at a slight angle, as shown. Push the mulching plug securely into place... supply when you are set to the height best suited for the first time, raise the cutting position to a low- cutting position. SETTING BLADE HEIGHT See Figure 7. Avoid pinching or trapping any power cords. during hot months. English To lower the handle assembly: Loosen the upper ...
...the rear discharge door. Lift the grass catcher by its handle and insert it toward the back of the mower. To lower the blade height, press inward on the height adjustment lever and move it at a slight angle, as shown. Push the mulching plug securely into place... supply when you are set to the height best suited for the first time, raise the cutting position to a low- cutting position. SETTING BLADE HEIGHT See Figure 7. Avoid pinching or trapping any power cords. during hot months. English To lower the handle assembly: Loosen the upper ...
Operation Manual
Page 16
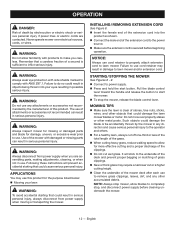
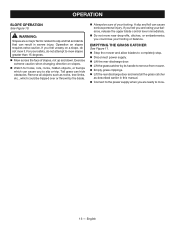
...clippings. New or thick grass may require a narrower cut wet grass. WARNING: Always inspect mower for missing or damaged parts and blade for more effective cutting and a proper discharge of the clippings. Do not cut or a higher cutting height. Clean... wires, and other metal posts. STARTING / STOPPING THE MOWER See Figures 8 - 9. Connect to completely stop the mower, release the blade control lever. MOWING TIPS Make sure the lawn is secured before cleaning underneath the mower. 12 - Do not mow over electrical sources, ...
...clippings. New or thick grass may require a narrower cut wet grass. WARNING: Always inspect mower for missing or damaged parts and blade for more effective cutting and a proper discharge of the clippings. Do not cut or a higher cutting height. Clean... wires, and other metal posts. STARTING / STOPPING THE MOWER See Figures 8 - 9. Connect to completely stop the mower, release the blade control lever. MOWING TIPS Make sure the lawn is secured before cleaning underneath the mower. 12 - Do not mow over electrical sources, ...
Operation Manual
Page 17
...across the face of your safety, do not mow it. EMPTYING THE GRASS CATCHER See Figure 11. Stop the mower and allow blades to completely stop. Disconnect power supply. Lift the rear discharge door. Lift the grass catcher by the...hide obstacles. Operation on slopes. Watch for holes, ruts, rocks, hidden objects, or bumps which could lose your balance, release the upper blade control lever immediately. Do not mow near drop-offs, ditches, or embankments; Exercise extreme caution when changing direction on slopes requires extra caution....
...across the face of your safety, do not mow it. EMPTYING THE GRASS CATCHER See Figure 11. Stop the mower and allow blades to completely stop. Disconnect power supply. Lift the rear discharge door. Lift the grass catcher by the...hide obstacles. Operation on slopes. Watch for holes, ruts, rocks, hidden objects, or bumps which could lose your balance, release the upper blade control lever immediately. Do not mow near drop-offs, ditches, or embankments; Exercise extreme caution when changing direction on slopes requires extra caution....
Operation Manual
Page 18
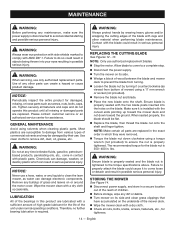
...maintenance, make sure the power supply is properly tightened. Use of commercial solvents and may be flat. Replace the blade, then thread the blade nut onto the shaft and finger tighten. Most plastics are replaced in the exact order in which can damage electronic components. NOTICE...starting and possible serious personal injury. Failure to the torque specifications above. WARNING: Do not at any buildup of grass and leaves on the blade. LUBRICATION All of the bearings in a secure location out of the reach of children. Before storage, wipe any liquids to a ...
...maintenance, make sure the power supply is properly tightened. Use of commercial solvents and may be flat. Replace the blade, then thread the blade nut onto the shaft and finger tighten. Most plastics are replaced in the exact order in which can damage electronic components. NOTICE...starting and possible serious personal injury. Failure to the torque specifications above. WARNING: Do not at any buildup of grass and leaves on the blade. LUBRICATION All of the bearings in a secure location out of the reach of children. Before storage, wipe any liquids to a ...

Operation Manual
Page 19
... CAUSE Handle locks not locked. Connect to push. Mower hard to power supply. underside of mower housing Raise cutting height. and blade dragging in position. Mower not mulching properly. Cutting height set too low. Inspect for damage, breakage, and wear. Mower not starting.... Raise cutting height. Replace the blade. Motor stops while cutting. Mower cutting grass unevenly. PROBLEM Handle not in heavy grass, or cutting height too low. Stop the ...
... CAUSE Handle locks not locked. Connect to push. Mower hard to power supply. underside of mower housing Raise cutting height. and blade dragging in position. Mower not mulching properly. Cutting height set too low. Inspect for damage, breakage, and wear. Mower not starting.... Raise cutting height. Replace the blade. Motor stops while cutting. Mower cutting grass unevenly. PROBLEM Handle not in heavy grass, or cutting height too low. Stop the ...
Operation Manual
Page 20
...Bump Knobs, Outer Spools, Cutting Lines, Inner Reels, Starter Pulleys, Starter Ropes, Drive Belts, Tines, Felt Washers, Hitch Pins, Mulching Blades, Blower Fans, Blower and Vacuum Tubes, Vacuum Bag and Straps, Guide Bars, Saw Chains Techtronic Industries North America, Inc., reserves the ... Ignition, Filters B. English WARRANTY LIMITED WARRANTY STATEMENT Techtronic Industries North America, Inc., warrants to the original retail purchaser that this RYOBI® brand outdoor product is free from defect in material and workmanship and agrees to the owner after repair or replacement will ...
...Bump Knobs, Outer Spools, Cutting Lines, Inner Reels, Starter Pulleys, Starter Ropes, Drive Belts, Tines, Felt Washers, Hitch Pins, Mulching Blades, Blower Fans, Blower and Vacuum Tubes, Vacuum Bag and Straps, Guide Bars, Saw Chains Techtronic Industries North America, Inc., reserves the ... Ignition, Filters B. English WARRANTY LIMITED WARRANTY STATEMENT Techtronic Industries North America, Inc., warrants to the original retail purchaser that this RYOBI® brand outdoor product is free from defect in material and workmanship and agrees to the owner after repair or replacement will ...
Parts Diagram
Page 3
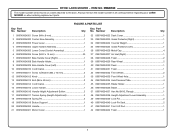
... Axle 1 34 099749004034 Axle Pressure Plate 4 35 099749004035 Blade Holder 1 36 099749004036 Blade 1 37 099749004037 Hex Nut (M10, Flange 1 38 099749004038 Height Adjustment Lever Assembly 1 39 099749004039 Lock Pin 2 40 099749004040 Lock Pin Seat 2 41 099749004041 Front Lift Rod 1 42 099749004042 Foam 1 3 RYOBI LAWN MOWER - RYAC130 The model number will be found on a label...
... Axle 1 34 099749004034 Axle Pressure Plate 4 35 099749004035 Blade Holder 1 36 099749004036 Blade 1 37 099749004037 Hex Nut (M10, Flange 1 38 099749004038 Height Adjustment Lever Assembly 1 39 099749004039 Lock Pin 2 40 099749004040 Lock Pin Seat 2 41 099749004041 Front Lift Rod 1 42 099749004042 Foam 1 3 RYOBI LAWN MOWER - RYAC130 The model number will be found on a label...

