
Operation Manual
Page 2
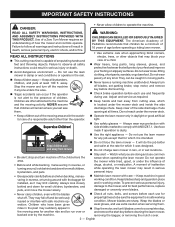
... the mower while tired, upset, or under the influence of any job except that children be run over by the machine. Keep machine in moving parts. Never leave a running machine unattended. They may fall off and be seriously proper tightness to observe all bystanders, children, and pets at all times...
... the mower while tired, upset, or under the influence of any job except that children be run over by the machine. Keep machine in moving parts. Never leave a running machine unattended. They may fall off and be seriously proper tightness to observe all bystanders, children, and pets at all times...

Operation Manual
Page 4
..., and remove start key before storing. Remove start key from one terminal to the product. Use only authorized replacement parts when servicing the product. Following this rule will reduce the risk of riding mower related injuries. The batteries could result in use. When ...recommended operation angle of children. English Never place any way. Replace the blades if they are unevenly worn or damaged in any part of the body in operating condition. therefore, they are always in the blade area until the blades come to protect themselves and...
..., and remove start key before storing. Remove start key from one terminal to the product. Use only authorized replacement parts when servicing the product. Following this rule will reduce the risk of riding mower related injuries. The batteries could result in use. When ...recommended operation angle of children. English Never place any way. Replace the blades if they are unevenly worn or damaged in any part of the body in operating condition. therefore, they are always in the blade area until the blades come to protect themselves and...

Operation Manual
Page 6
...it to damage or stress. That wire size is properly wired and in a risk of improper extension cord could result in contact with plastic parts. IMPORTANT SAFETY RULES FOR CHARGER SAVE THESE INSTRUCTIONS DANGER! TO REDUCE THE RISK OF FIRE, ELECTRIC SHOCK, DEATH, OR SERIOUS PERSONAL INJURY, ... battery terminal. Do not use this manual, on a table or wall with sharp edges or moving parts, or otherwise subjected to an authorized service person for charging RYOBI 48V riding mowers. If you loan someone this product, loan them to instruct others who may generate explosive hydrogen...
...it to damage or stress. That wire size is properly wired and in a risk of improper extension cord could result in contact with plastic parts. IMPORTANT SAFETY RULES FOR CHARGER SAVE THESE INSTRUCTIONS DANGER! TO REDUCE THE RISK OF FIRE, ELECTRIC SHOCK, DEATH, OR SERIOUS PERSONAL INJURY, ... battery terminal. Do not use this manual, on a table or wall with sharp edges or moving parts, or otherwise subjected to an authorized service person for charging RYOBI 48V riding mowers. If you loan someone this product, loan them to instruct others who may generate explosive hydrogen...
Operation Manual
Page 13
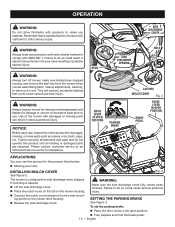
...in use. This will prevent accidental starting that a careless fraction of the mower with ANSI Z87.1. Tighten securely all missing or damaged parts are assembling parts, making adjustments, cleaning, or when not in objects being thrown into your lawn INSTALLING MULCH COVER Fig. 3 See Figure 2. ...To set the parking brake: Place the drive levers in serious personal injury. WARNING: Always inspect mower for missing or damaged parts and blades for the purpose listed below: Mowing your eyes resulting in possible serious injury. The mower is desired: ...
...in use. This will prevent accidental starting that a careless fraction of the mower with ANSI Z87.1. Tighten securely all missing or damaged parts are assembling parts, making adjustments, cleaning, or when not in objects being thrown into your lawn INSTALLING MULCH COVER Fig. 3 See Figure 2. ...To set the parking brake: Place the drive levers in serious personal injury. WARNING: Always inspect mower for missing or damaged parts and blades for the purpose listed below: Mowing your eyes resulting in possible serious injury. The mower is desired: ...

Operation Manual
Page 22
...shields marked to comply with a dry cloth occasionally. Please contact customer service or an authorized service center for damaged, missing, or loose parts such as screws, nuts, bolts, caps, etc. Failure to remove dirt, dust, oil, grease, etc. Most plastics are susceptible... to 4-6 ft. Available hole positions are installed in the same position. A GENERAL MAINTENANCE B C Avoid using solvents when cleaning plastic parts. Chemicals can damage, weaken, or destroy plastic which can create a hazard or cause product damage. Torque nut to do not operate this...
...shields marked to comply with a dry cloth occasionally. Please contact customer service or an authorized service center for damaged, missing, or loose parts such as screws, nuts, bolts, caps, etc. Failure to remove dirt, dust, oil, grease, etc. Most plastics are susceptible... to 4-6 ft. Available hole positions are installed in the same position. A GENERAL MAINTENANCE B C Avoid using solvents when cleaning plastic parts. Chemicals can damage, weaken, or destroy plastic which can create a hazard or cause product damage. Torque nut to do not operate this...
Operation Manual
Page 23
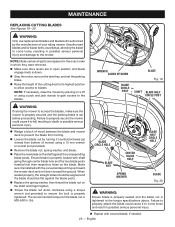
... the spring washer, then thread the blade nut on a lift or using a jack and jack stands to gain access to blades. NOTE: Make certain all parts are replaced in the exact order in which they were removed. Make sure drive levers are in . When seated properly, the straight sides should...
... the spring washer, then thread the blade nut on a lift or using a jack and jack stands to gain access to blades. NOTE: Make certain all parts are replaced in the exact order in which they were removed. Make sure drive levers are in . When seated properly, the straight sides should...

Operation Manual
Page 30
... has exceeded the maximum figures specified in fire and/or serious injury. WARNING: Upon removal, cover the battery's terminals with metal objects and/or body parts as short circuit may prohibit disposal of time or hours stated herein. MAINTENANCE BATTERY REMOVAL AND PREPARATION FOR RECYCLING To preserve natural resources, please recycle...
... has exceeded the maximum figures specified in fire and/or serious injury. WARNING: Upon removal, cover the battery's terminals with metal objects and/or body parts as short circuit may prohibit disposal of time or hours stated herein. MAINTENANCE BATTERY REMOVAL AND PREPARATION FOR RECYCLING To preserve natural resources, please recycle...

Operation Manual 1
Page 2
... and follow all torque wrench tightening specifications. English TABLE OF CONTENTS Rules for Safe Assembly...2 Symbols...3 Tools Needed...3 Unpacking...4 Loose Parts List...5 Assembly...6-7 Final Preparation...8 RULES FOR SAFE ASSEMBLY WARNING: Strictly adhere to do so could cause serious personal injury. Due to assemble this...
... and follow all torque wrench tightening specifications. English TABLE OF CONTENTS Rules for Safe Assembly...2 Symbols...3 Tools Needed...3 Unpacking...4 Loose Parts List...5 Assembly...6-7 Final Preparation...8 RULES FOR SAFE ASSEMBLY WARNING: Strictly adhere to do so could cause serious personal injury. Due to assemble this...

Operation Manual 1
Page 4
...forward direction without a ramp can result in loss of the frame. n Remove and set aside all accessible packaging and wrap from unit and parts. WARNING: Use extra care when driving the mower off of the frame, do not exceed the maximum recommended operation angle of a product ... inspected and satisfactorily operated the product. Once assembly is available, slowly and carefully drive the mower off frame. English WARNING: If any parts are already assembled to the frame bottom, release the parking brake and slowly and carefully drive mower off the frame in death, serious ...
...forward direction without a ramp can result in loss of the frame. n Remove and set aside all accessible packaging and wrap from unit and parts. WARNING: Use extra care when driving the mower off of the frame, do not exceed the maximum recommended operation angle of a product ... inspected and satisfactorily operated the product. Once assembly is available, slowly and carefully drive the mower off frame. English WARNING: If any parts are already assembled to the frame bottom, release the parking brake and slowly and carefully drive mower off the frame in death, serious ...

Operation Manual 1
Page 5
Assembly Guide (Not Shown 1 Operator's Manual (Not Shown 1 WARNING: If any parts are replaced with new original manufacturer's parts or their equivalent. Assembly of this product until the parts are damaged or missing do not assemble this product with Safety Interlock Cable.......... 1 2 Drive Handles 2 3 Towing Plate Assembly Towing Plate 1 Bolts 2 4 Charger 1 5 Tool Kit 2 6 Keys...
Assembly Guide (Not Shown 1 Operator's Manual (Not Shown 1 WARNING: If any parts are replaced with new original manufacturer's parts or their equivalent. Assembly of this product until the parts are damaged or missing do not assemble this product with Safety Interlock Cable.......... 1 2 Drive Handles 2 3 Towing Plate Assembly Towing Plate 1 Bolts 2 4 Charger 1 5 Tool Kit 2 6 Keys...

Operation Manual 1
Page 6
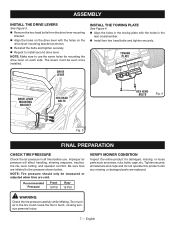
... result in place. TABS INSTALL THE SEAT See Figure 2. Remove the shoulder bolts and lock nuts from the factory, the mower's batteries are assembling parts. CONNECT THE BATTERY See Figure 1. To connect: Press the tabs on the inside of the bolt is misuse and could cause serious personal injury...
... result in place. TABS INSTALL THE SEAT See Figure 2. Remove the shoulder bolts and lock nuts from the factory, the mower's batteries are assembling parts. CONNECT THE BATTERY See Figure 1. To connect: Press the tabs on the inside of the bolt is misuse and could cause serious personal injury...
Operation Manual 1
Page 7
... PREPARATION CHECK TIRE PRESSURE Check the air pressure in all fasteners and caps and do not operate this product until any missing or damaged parts are inflated to use . Too much air in the tire could cause the tire to install second drive lever. NOTE: Tire pressure should... only be even once installed. Tighten securely all tires before use the same holes for damaged, missing, or loose parts such as shown. Reinstall the bolts and tighten securely. Repeat to burst, causing serious personal injury. 7 - ASSEMBLY INSTALL THE ...
... PREPARATION CHECK TIRE PRESSURE Check the air pressure in all fasteners and caps and do not operate this product until any missing or damaged parts are inflated to use . Too much air in the tire could cause the tire to install second drive lever. NOTE: Tire pressure should... only be even once installed. Tighten securely all tires before use the same holes for damaged, missing, or loose parts such as shown. Reinstall the bolts and tighten securely. Repeat to burst, causing serious personal injury. 7 - ASSEMBLY INSTALL THE ...
Parts Diagram
Page 2
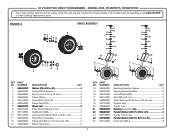
RY48ZTR75, RY48ZTR100 The model number will be found on a label under the seat. NUMBER DESCRIPTION QTY 14 996993001 Bearing Assembly Spacer 2 15 996991001 Bearing Assembly Base 2 ... 14 18 19 15 23 17 16 22 21 24 18 14 18 19 15 7 3 10 9 5 25 13 11 KEY NO. 1 2 3 4 5 6 7 8 9 10 11 12 13 PART NUMBER 994842001 996997001 996988001 996996001 997139001 996999001 996987001 994857001 997138001 997134001 996989001 996998001 996029001 DESCRIPTION QTY Washer (28 x 20.5 x 2t 4 Caster Wheel Spacer 4 Key (6 mm...
RY48ZTR75, RY48ZTR100 The model number will be found on a label under the seat. NUMBER DESCRIPTION QTY 14 996993001 Bearing Assembly Spacer 2 15 996991001 Bearing Assembly Base 2 ... 14 18 19 15 23 17 16 22 21 24 18 14 18 19 15 7 3 10 9 5 25 13 11 KEY NO. 1 2 3 4 5 6 7 8 9 10 11 12 13 PART NUMBER 994842001 996997001 996988001 996996001 997139001 996999001 996987001 994857001 997138001 997134001 996989001 996998001 996029001 DESCRIPTION QTY Washer (28 x 20.5 x 2t 4 Caster Wheel Spacer 4 Key (6 mm...
Parts Diagram
Page 4
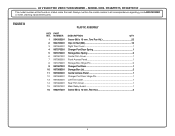
RY48ZTR75, RY48ZTR100 The model number will be found on a label under the seat. FIGURE B PLASTIC ASSEMBLY KEY NO. 1 2 3 4 5 6 7 8 9 10 11 12 13 14 15 16 PART NUMBER 994989001 994785001 997064001 997075001 997076001 997061001 997066001 997070001 997067001 997068001 997065001 997069001 997063001 997062001 997087001 996297001 DESCRIPTION QTY Screw (M6 x 16 mm, Torx Pan ... Hd 2 4 48 V ELECTRIC ZERO TURN MOWER − MODEL NOS. Always mention the model number in all correspondence regarding your LAWN MOWER or when ordering replacement parts.
RY48ZTR75, RY48ZTR100 The model number will be found on a label under the seat. FIGURE B PLASTIC ASSEMBLY KEY NO. 1 2 3 4 5 6 7 8 9 10 11 12 13 14 15 16 PART NUMBER 994989001 994785001 997064001 997075001 997076001 997061001 997066001 997070001 997067001 997068001 997065001 997069001 997063001 997062001 997087001 996297001 DESCRIPTION QTY Screw (M6 x 16 mm, Torx Pan ... Hd 2 4 48 V ELECTRIC ZERO TURN MOWER − MODEL NOS. Always mention the model number in all correspondence regarding your LAWN MOWER or when ordering replacement parts.
Parts Diagram
Page 6
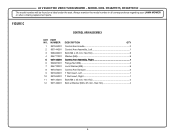
FIGURE C CONTROL ARM ASSEMBLY KEY PART NO. NUMBER 1 997045001 2 997144001 3 996046001 4 994771001 5 997145001 6 994867001 7 994770001 8 997072001 9 997043001 10 997044001 11 997135001 12 997146001 DESCRIPTION QTY Control Arm Handle 2 Control Arm Assembly, ... 4 Lock Washer (M8 8 Control Arm Damper 2 T Slot Insert, Left 1 T Slot Insert, Right 1 Bolt (M8 x 35 mm, Hex Hd 4 Bolt w/Washer (M8 x 25 mm, Hex Hd 4 6 RY48ZTR75, RY48ZTR100 The model number will be found on a label under the seat. Always mention the model number in all correspondence regarding your LAWN MOWER or...
FIGURE C CONTROL ARM ASSEMBLY KEY PART NO. NUMBER 1 997045001 2 997144001 3 996046001 4 994771001 5 997145001 6 994867001 7 994770001 8 997072001 9 997043001 10 997044001 11 997135001 12 997146001 DESCRIPTION QTY Control Arm Handle 2 Control Arm Assembly, ... 4 Lock Washer (M8 8 Control Arm Damper 2 T Slot Insert, Left 1 T Slot Insert, Right 1 Bolt (M8 x 35 mm, Hex Hd 4 Bolt w/Washer (M8 x 25 mm, Hex Hd 4 6 RY48ZTR75, RY48ZTR100 The model number will be found on a label under the seat. Always mention the model number in all correspondence regarding your LAWN MOWER or...

Parts Diagram
Page 7
Always mention the model number in all correspondence regarding your LAWN MOWER or when ordering replacement parts. RY48ZTR75, RY48ZTR100 The model number will be found on a label under the seat. 48 V ELECTRIC ZERO TURN MOWER − MODEL NOS. FIGURE D REAR CROSS MEMBER ASSEMBLY 4 2 3 1 4 KEY PART NO. NUMBER 1 996983001 2 997089001 3 997051001 4 994867001 5 997136001 5 2 DESCRIPTION QTY Rear Cross Member, Frame 1 Bolt (M8 x 70 mm, Hex Hd 2 Tow Hitch 1 Flange Nut (M8 2 Bolt (M8 x 55 mm, Hex Hd 2 7
Always mention the model number in all correspondence regarding your LAWN MOWER or when ordering replacement parts. RY48ZTR75, RY48ZTR100 The model number will be found on a label under the seat. 48 V ELECTRIC ZERO TURN MOWER − MODEL NOS. FIGURE D REAR CROSS MEMBER ASSEMBLY 4 2 3 1 4 KEY PART NO. NUMBER 1 996983001 2 997089001 3 997051001 4 994867001 5 997136001 5 2 DESCRIPTION QTY Rear Cross Member, Frame 1 Bolt (M8 x 70 mm, Hex Hd 2 Tow Hitch 1 Flange Nut (M8 2 Bolt (M8 x 55 mm, Hex Hd 2 7

Parts Diagram
Page 8
...17 12 8 9 7 4 4 97 11 6 5 18 3 1 9 15 19 5 10 KEY NO. 1 2 3 4 5 6 7 8 9 10 11 12 13 14 15 16 17 18 19 PART NUMBER 994770001 997010001 997089001 997012001 994928001 994930001 996013001 997006001 994771001 994929001 997011001 997004001 997005001 997009001 997003001 997007001 997008001 994837001 997131001 DESCRIPTION QTY Lock Washer (M8... 1 Clevis Pin (M8 x 60 mm 1 Parking Brake Torsion Spring 1 Brake Switch 1 Bolt (M8 x 40 mm, Hex Hd 1 8 RY48ZTR75, RY48ZTR100 The model number will be found on a label under the seat. 48 V ELECTRIC ZERO TURN MOWER − MODEL NOS.
...17 12 8 9 7 4 4 97 11 6 5 18 3 1 9 15 19 5 10 KEY NO. 1 2 3 4 5 6 7 8 9 10 11 12 13 14 15 16 17 18 19 PART NUMBER 994770001 997010001 997089001 997012001 994928001 994930001 996013001 997006001 994771001 994929001 997011001 997004001 997005001 997009001 997003001 997007001 997008001 994837001 997131001 DESCRIPTION QTY Lock Washer (M8... 1 Clevis Pin (M8 x 60 mm 1 Parking Brake Torsion Spring 1 Brake Switch 1 Bolt (M8 x 40 mm, Hex Hd 1 8 RY48ZTR75, RY48ZTR100 The model number will be found on a label under the seat. 48 V ELECTRIC ZERO TURN MOWER − MODEL NOS.

Parts Diagram
Page 10
...1 997020001 Deck, 42 in 1 22 996265001 Front Deck Roller Wheel (127 Dia 2 23 997127001 Discharge Chute Mounting Bracket 1 10 FIGURE F DECK ASSEMBLY PARTS LIST KEY PART NO. NUMBER DESCRIPTION QTY 13 682282001 Blade (21 in 2 14 994867001 Flange Nut (M8 2 15 996250001 Screw (M6 x 40 mm, Torx Hd ...Chute Mounting Shaft 1 11 996034001 Flat Washer (M6, 18 mm OD 1 12 997028001 Blade Retainer Washer 2 KEY PART NO. 48 V ELECTRIC ZERO TURN MOWER − MODEL NOS. RY48ZTR75, RY48ZTR100 The model number will be found on a label under the seat. Always mention the model number in all...
...1 997020001 Deck, 42 in 1 22 996265001 Front Deck Roller Wheel (127 Dia 2 23 997127001 Discharge Chute Mounting Bracket 1 10 FIGURE F DECK ASSEMBLY PARTS LIST KEY PART NO. NUMBER DESCRIPTION QTY 13 682282001 Blade (21 in 2 14 994867001 Flange Nut (M8 2 15 996250001 Screw (M6 x 40 mm, Torx Hd ...Chute Mounting Shaft 1 11 996034001 Flat Washer (M6, 18 mm OD 1 12 997028001 Blade Retainer Washer 2 KEY PART NO. 48 V ELECTRIC ZERO TURN MOWER − MODEL NOS. RY48ZTR75, RY48ZTR100 The model number will be found on a label under the seat. Always mention the model number in all...

Parts Diagram
Page 11
RY48ZTR75, RY48ZTR100 The model number will be found on a label under the seat. Deck 1 7 8 2 3 KEY PART NO. NUMBER DESCRIPTION QTY 6 994980001 Torsion Spring (19 x 62 x 3.02 1 7 996217001 Washer (ID5.3 x OD15 x 1t 2 8 996213001 Anchor Screw, Bungie, Riding Mower 2 9 996203001 Rubber ..., Riding Mower 2 4 996292001 Push-On Retainer Clip 1 5 997060001 Side Discharge Chute, 42 in all correspondence regarding your LAWN MOWER or when ordering replacement parts. Always mention the model number in . FIGURE G DISCHARGE AND MULCH COVER ASSEMBLY 8 10 6 2 3 7 5 1 4 9 9 KEY...
RY48ZTR75, RY48ZTR100 The model number will be found on a label under the seat. Deck 1 7 8 2 3 KEY PART NO. NUMBER DESCRIPTION QTY 6 994980001 Torsion Spring (19 x 62 x 3.02 1 7 996217001 Washer (ID5.3 x OD15 x 1t 2 8 996213001 Anchor Screw, Bungie, Riding Mower 2 9 996203001 Rubber ..., Riding Mower 2 4 996292001 Push-On Retainer Clip 1 5 997060001 Side Discharge Chute, 42 in all correspondence regarding your LAWN MOWER or when ordering replacement parts. Always mention the model number in . FIGURE G DISCHARGE AND MULCH COVER ASSEMBLY 8 10 6 2 3 7 5 1 4 9 9 KEY...

Parts Diagram
Page 12
...4 Washer (M10 x 20 6 Bolt (M10 x 45 mm, Hex Hd 6 Tie Rod 3 KEY PART NO. Always mention the model number in all correspondence regarding your LAWN MOWER or when ordering replacement parts. NUMBER 6 994998001 7 997158001 8 997159001 9 997157001 10 997160001 DESCRIPTION QTY Lock Spring Washer (10.9 x... 16.1 x 2.6t 6 Gearbox, Left 1 Gearbox, Right 1 Drive Motor, ZTR 2 Screw (M8 x 30 mm, Soc Hd 8 12 48 V ELECTRIC ZERO TURN MOWER − MODEL NOS. RY48ZTR75,...
...4 Washer (M10 x 20 6 Bolt (M10 x 45 mm, Hex Hd 6 Tie Rod 3 KEY PART NO. Always mention the model number in all correspondence regarding your LAWN MOWER or when ordering replacement parts. NUMBER 6 994998001 7 997158001 8 997159001 9 997157001 10 997160001 DESCRIPTION QTY Lock Spring Washer (10.9 x... 16.1 x 2.6t 6 Gearbox, Left 1 Gearbox, Right 1 Drive Motor, ZTR 2 Screw (M8 x 30 mm, Soc Hd 8 12 48 V ELECTRIC ZERO TURN MOWER − MODEL NOS. RY48ZTR75,...
