
Operation Manual
Page 2
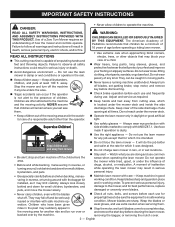
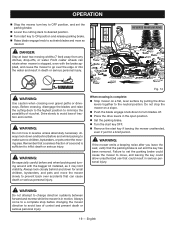
... children away - It will result in reverse, or turning around , look closely behind and down for best performance, replace damaged or unevenly worn blades. • Never carry children, even with care - stop and turn machine off if a child enters the area. • Before and while... than the operator. A moment of inattention while operating the lawn mower may suddenly appear in Stop the motor, wait until blades come to follow all bystanders, children, and pets at all safety instructions could result in daylight or good artificial ful care of a responsible...
... children away - It will result in reverse, or turning around , look closely behind and down for best performance, replace damaged or unevenly worn blades. • Never carry children, even with care - stop and turn machine off if a child enters the area. • Before and while... than the operator. A moment of inattention while operating the lawn mower may suddenly appear in Stop the motor, wait until blades come to follow all bystanders, children, and pets at all safety instructions could result in daylight or good artificial ful care of a responsible...

Operation Manual
Page 3
... away from any damage before inspecting, moving . Never use accessories approved by supporting it horizontally on a slope. Only use running and/or blades moving , cleaning, or performing maintenance on the ground. • Stay at each mowing. • Never attempt to avoid discharge of.... • Always keep the drive levers in any adjustments or repairs with safety devices. Do not make any way. Sharpen a dull blade equally at least two mowing widths (7 feet) away from the operator. Also, avoid discharging material against a wall or obstruction, which could...
... away from any damage before inspecting, moving . Never use accessories approved by supporting it horizontally on a slope. Only use running and/or blades moving , cleaning, or performing maintenance on the ground. • Stay at each mowing. • Never attempt to avoid discharge of.... • Always keep the drive levers in any adjustments or repairs with safety devices. Do not make any way. Sharpen a dull blade equally at least two mowing widths (7 feet) away from the operator. Also, avoid discharging material against a wall or obstruction, which could...

Operation Manual
Page 4
...is used. Shorting the battery terminals together may be stored indoors in a dry, locked place out of the reach of a damaged mower blade. Disengage mower blades when not mowing. Mowers with a garden hose to clean, as necessary. Use full width ramps for loading and unloading.... ous personal injury. 4 - IMPORTANT SAFETY INSTRUCTIONS Stop the motor, set the parking brake, wait until you are sure the blades have to be checked each time the mower is needed to control the speed. Vibration is subject to deterioration and wear and should be plugged...
...is used. Shorting the battery terminals together may be stored indoors in a dry, locked place out of the reach of a damaged mower blade. Disengage mower blades when not mowing. Mowers with a garden hose to clean, as necessary. Use full width ramps for loading and unloading.... ous personal injury. 4 - IMPORTANT SAFETY INSTRUCTIONS Stop the motor, set the parking brake, wait until you are sure the blades have to be checked each time the mower is needed to control the speed. Vibration is subject to deterioration and wear and should be plugged...

Operation Manual
Page 7
... Shock Keep Hands and Feet Away Keep children out of the mowing area and in death or serious injury. Keep hands and feet away from blade and cutting area. Always wear eye protection with ANSI Z87.1. No Slope Keep Children and Bystanders Away Do not operate on wet ground. Risk of...
... Shock Keep Hands and Feet Away Keep children out of the mowing area and in death or serious injury. Keep hands and feet away from blade and cutting area. Always wear eye protection with ANSI Z87.1. No Slope Keep Children and Bystanders Away Do not operate on wet ground. Risk of...

Operation Manual
Page 8
... disposal options. SYMBOLS Some of the following symbols may prohibit disposal of batteries in ordinary trash. Never direct discharged material toward anyone , even when the blades are clear of current Voltage Current Frequency (cycles per second) Power Time 8 - English Please study them and learn their meaning. Local, state or federal laws...
... disposal options. SYMBOLS Some of the following symbols may prohibit disposal of batteries in ordinary trash. Never direct discharged material toward anyone , even when the blades are clear of current Voltage Current Frequency (cycles per second) Power Time 8 - English Please study them and learn their meaning. Local, state or federal laws...
Operation Manual
Page 11
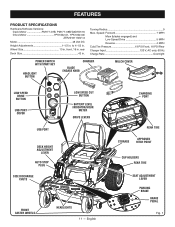
... PM177-07B, PM177-08B/GXDH0116 Drive Motor YPK1002.01, YPK1002.02/ ZTR20181130V1.6 Motor 48 Volt DC Height Adjustments 1-1/2 in. Speed: Forward 7 MPH Mow (blades engaged) and Low Speed Drive 5 MPH Reverse 4 MPH Cold Tire Pressure 19 PSI Front, 18 PSI Rear Charger Input 120 V, AC only, 60 Hz Charge... Rate Overnight POWER SWITCH WITH START KEY HEADLIGHT BUTTON CHARGER BLADE ENGAGE KNOB MULCH COVER LOW SPEED DRIVE BUTTON USB PORT COVER USB PORT DECK HEIGHT ADJUSTMENT LEVER AUTO STOP PLUG SIDE DISCHARGE CHUTE LOW ...
... PM177-07B, PM177-08B/GXDH0116 Drive Motor YPK1002.01, YPK1002.02/ ZTR20181130V1.6 Motor 48 Volt DC Height Adjustments 1-1/2 in. Speed: Forward 7 MPH Mow (blades engaged) and Low Speed Drive 5 MPH Reverse 4 MPH Cold Tire Pressure 19 PSI Front, 18 PSI Rear Charger Input 120 V, AC only, 60 Hz Charge... Rate Overnight POWER SWITCH WITH START KEY HEADLIGHT BUTTON CHARGER BLADE ENGAGE KNOB MULCH COVER LOW SPEED DRIVE BUTTON USB PORT COVER USB PORT DECK HEIGHT ADJUSTMENT LEVER AUTO STOP PLUG SIDE DISCHARGE CHUTE LOW ...

Operation Manual
Page 12
.... CHARGER The mower's charger has a key hole hanging feature for inexperienced users when they are attempting. Set the auto stop the cutting blades. Consult the owner's manual for starting and stopping during normal operation. NOTE: The USB port is only powered when the start key must...parking. Distracted operation can be inserted before the switch can result in place. PARKING BRAKE Use the parking brake to activate the mower's cutting blades. FEATURES KNOW YOUR LAWN MOWER See Figure 1. Before use of this product requires an understanding of a USB cable (not provided) to ...
.... CHARGER The mower's charger has a key hole hanging feature for inexperienced users when they are attempting. Set the auto stop the cutting blades. Consult the owner's manual for starting and stopping during normal operation. NOTE: The USB port is only powered when the start key must...parking. Distracted operation can be inserted before the switch can result in place. PARKING BRAKE Use the parking brake to activate the mower's cutting blades. FEATURES KNOW YOUR LAWN MOWER See Figure 1. Before use of this product requires an understanding of a USB cable (not provided) to ...
Operation Manual
Page 13
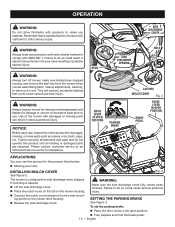
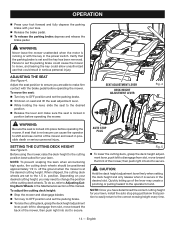
...: Before each use . The mower is configured for assistance. SETTING THE PARKING BRAKE See Figure 3. WARNING: Always inspect mower for missing or damaged parts and blades for damage or uneven or excessive wear prior to use , inspect the entire product for the purpose listed below: Mowing your eyes resulting in... MULCH COVER Fig. 3 See Figure 2. If mulching is sufficient to inflict serious injury. English OPERATION WARNING: Do not allow familiarity with products to make sure blades have stopped moving, and remove the start key from the mower when you careless.
...: Before each use . The mower is configured for assistance. SETTING THE PARKING BRAKE See Figure 3. WARNING: Always inspect mower for missing or damaged parts and blades for damage or uneven or excessive wear prior to use , inspect the entire product for the purpose listed below: Mowing your eyes resulting in... MULCH COVER Fig. 3 See Figure 2. If mulching is sufficient to inflict serious injury. English OPERATION WARNING: Do not allow familiarity with products to make sure blades have stopped moving, and remove the start key from the mower when you careless.
Operation Manual
Page 14
... pedal. To release the parking brake: depress and release the brake pedal. To adjust the cutting deck height: Stop the mower and disengage blades. Turn key to change the position of the lever may need to OFF position and set and the key has been removed. English SEAT...
... pedal. To release the parking brake: depress and release the brake pedal. To adjust the cutting deck height: Stop the mower and disengage blades. Turn key to change the position of the lever may need to OFF position and set and the key has been removed. English SEAT...

Operation Manual
Page 16
... using the instructions that follow. WARNING: Clear the area of bystanders before each of operating the mower in the neutral position and the blade engage knob is down. Install start key and turn mower is different than operating a standard riding mower. Before you are ...in all situations. 16 - If it is working correctly. Operating a zero turn to ON position. Raise blade engage knob to activate blades. Briefly lift off the seat, but do not continue practicing until the safety interlock system has been repaired. Do not operate ...
... using the instructions that follow. WARNING: Clear the area of bystanders before each of operating the mower in the neutral position and the blade engage knob is down. Install start key and turn mower is different than operating a standard riding mower. Before you are ...in all situations. 16 - If it is working correctly. Operating a zero turn to ON position. Raise blade engage knob to activate blades. Briefly lift off the seat, but do not continue practicing until the safety interlock system has been repaired. Do not operate ...

Operation Manual
Page 18
Which lever is in which position determines the direction of battery charge reaches the red zone on the battery charge indicator, the blades will be thrown by the mower blades. Check brake operation. Check tire pressure. Check for loose fasteners. Check to make sure the rear wheels are still...
Which lever is in which position determines the direction of battery charge reaches the red zone on the battery charge indicator, the blades will be thrown by the mower blades. Check brake operation. Check tire pressure. Check for loose fasteners. Check to make sure the rear wheels are still...
Operation Manual
Page 19
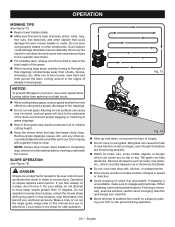
...as it may limit visibility. Failure to set the parking brake could result in serious personal injury. OPERATION Stop the mower, turn blades off. Place the drive levers in reverse unless absolutely necessary. REVERSE MANEUVERING WARNING: Use caution when crossing over the edge or into... parking brake. Turn the start key OFF. Remove the start key to ON position and release parking brake. Raise blade engage knob to prevent back over accidents that can rotate when mower is complete: Stop mower on a slope. Push the...
...as it may limit visibility. Failure to set the parking brake could result in serious personal injury. OPERATION Stop the mower, turn blades off. Place the drive levers in reverse unless absolutely necessary. REVERSE MANEUVERING WARNING: Use caution when crossing over the edge or into... parking brake. Turn the start key OFF. Remove the start key to ON position and release parking brake. Raise blade engage knob to prevent back over accidents that can rotate when mower is complete: Stop mower on a slope. Push the...
Operation Manual
Page 20
...possible. English Mowing on slope if at all objects such as rocks, tree limbs, etc., which can cause the tires to completely stop the blades, look behind you to slip or trip. Remove grass clippings, leaves, dirt, and any direction and cause serious personal injury to mow steep ...manual and use lowest possible speed. NOTE: Always stop mower, allow for holes, ruts, rocks, hidden objects, or bumps which could damage the blade or be tripped over accidents that situation, stop , and remove the start by the mower in any other metal posts. Tall grass can cause loss...
...possible. English Mowing on slope if at all objects such as rocks, tree limbs, etc., which can cause the tires to completely stop the blades, look behind you to slip or trip. Remove grass clippings, leaves, dirt, and any direction and cause serious personal injury to mow steep ...manual and use lowest possible speed. NOTE: Always stop mower, allow for holes, ruts, rocks, hidden objects, or bumps which could damage the blade or be tripped over accidents that situation, stop , and remove the start by the mower in any other metal posts. Tall grass can cause loss...

Operation Manual
Page 21
.... OPERATION If using straps or cables to prevent movement during transport. TRANSPORTING THE MOWER See Figure 17. The wheels on a slope, disengage the blades and proceed slowly and carefully straight down the slope. wider than the mower to minimize the risk of the mower's wheels going uphill, stop... blades, look behind you use one full width loading ramp that can change the stability of the ramp. Slowly back the mower onto the ...
.... OPERATION If using straps or cables to prevent movement during transport. TRANSPORTING THE MOWER See Figure 17. The wheels on a slope, disengage the blades and proceed slowly and carefully straight down the slope. wider than the mower to minimize the risk of the mower's wheels going uphill, stop... blades, look behind you use one full width loading ramp that can change the stability of the ramp. Slowly back the mower onto the ...

Operation Manual
Page 22
... A. ADJUSTING CUTTING DECK WHEELS See Figure 18. This will minimize the chance of any other parts can result in most situations. Allow blades to come in contact with remaining cutting deck wheel, making sure both wheels are positioned in . NOTICE: Periodically inspect the entire product for... in . (C). Replace bolt and nut; MAINTENANCE WARNING: Before performing any maintenance, stop the mower on a level surface, wait for the blades to come to a complete stop . Raise the cutting deck to the desired height setting. Remove nut and bolt holding cutting...
... A. ADJUSTING CUTTING DECK WHEELS See Figure 18. This will minimize the chance of any other parts can result in most situations. Allow blades to come in contact with remaining cutting deck wheel, making sure both wheels are positioned in . NOTICE: Periodically inspect the entire product for... in . (C). Replace bolt and nut; MAINTENANCE WARNING: Before performing any maintenance, stop the mower on a level surface, wait for the blades to come to a complete stop . Raise the cutting deck to the desired height setting. Remove nut and bolt holding cutting...
Operation Manual
Page 23
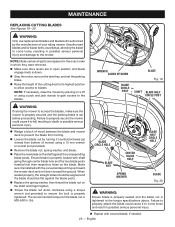
... on a lift or using a jack and jack stands to gain access to blades. BLADE CIRCLE HOLE BLADE NUT CENTER BLADE HOLE SPRING WASHER BLADE HALF CIRCLE HOLE BLADE Fig. 20 WARNING: Ensure blade is properly seated and the blade nut is installed with the curved ends pointing up toward the mower deck and ... raise the mower by the manufacturer of the cutting deck to its highest position to allow access to the blades. WRENCH BLOCK OF WOOD BLADE CIRCLE POST BLADE Fig. 19 SHAFT BLADE HALF CIRCLE POST WARNING: If raising the mower to the mower. Failure to properly secure the mower could ...
... on a lift or using a jack and jack stands to gain access to blades. BLADE CIRCLE HOLE BLADE NUT CENTER BLADE HOLE SPRING WASHER BLADE HALF CIRCLE HOLE BLADE Fig. 20 WARNING: Ensure blade is properly seated and the blade nut is installed with the curved ends pointing up toward the mower deck and ... raise the mower by the manufacturer of the cutting deck to its highest position to allow access to the blades. WRENCH BLOCK OF WOOD BLADE CIRCLE POST BLADE Fig. 19 SHAFT BLADE HALF CIRCLE POST WARNING: If raising the mower to the mower. Failure to properly secure the mower could ...

Operation Manual
Page 25
...: Always level the deck side to side before measuring and adjusting front to 3/8 in . to secure. BOTTOM EDGE JAM NUT ADJUSTMENT NUTS JAM NUT BLADE Fig. 22 Fig. 23 If front-to-back adjustment is necessary. On the side you will change the deck height approximately 1/8... in . To make sure tires are properly inflated to -side adjustment is needed before making a front to back adjustment. Position the blade nearest the side discharge chute so that is now 1/8 in. If the distance between the distance on both sides equally to prevent throwing the side...
...: Always level the deck side to side before measuring and adjusting front to 3/8 in . to secure. BOTTOM EDGE JAM NUT ADJUSTMENT NUTS JAM NUT BLADE Fig. 22 Fig. 23 If front-to-back adjustment is necessary. On the side you will change the deck height approximately 1/8... in . To make sure tires are properly inflated to -side adjustment is needed before making a front to back adjustment. Position the blade nearest the side discharge chute so that is now 1/8 in. If the distance between the distance on both sides equally to prevent throwing the side...

Operation Manual
Page 30
... mower has exceeded the maximum figures specified in dusty areas. Consult your local waste authority for Loose Fasteners Clean Debris From Mower Check/Replace Mower Blades Clean Battery Terminals Inspect Before Each Use X X X X X Every 25 Hours X Every 50 Hours or Yearly X X X Every 100 Hours Before Storage X X NOTE: Maintenance should be...
... mower has exceeded the maximum figures specified in dusty areas. Consult your local waste authority for Loose Fasteners Clean Debris From Mower Check/Replace Mower Blades Clean Battery Terminals Inspect Before Each Use X X X X X Every 25 Hours X Every 50 Hours or Yearly X X X Every 100 Hours Before Storage X X NOTE: Maintenance should be...

Operation Manual
Page 31
... of attachments or accessories not recommended can result in serious personal injury. For warranty details, visit www.ryobitools.com or call the RYOBI Help Line! ACCESSORIES To order these accessories, visit us online at www.ryobitools.com or call 1-800-860-4050. ...; Bagging Kit (includes Bagger Assembly and Bagger Blades ACRM005 Combo Blades (for Mulching and Side Discharge ACRM006 Bagger Blades...ACRM007 WARNING: Current attachments and accessories available for use with this product has a Three-year...
... of attachments or accessories not recommended can result in serious personal injury. For warranty details, visit www.ryobitools.com or call the RYOBI Help Line! ACCESSORIES To order these accessories, visit us online at www.ryobitools.com or call 1-800-860-4050. ...; Bagging Kit (includes Bagger Assembly and Bagger Blades ACRM005 Combo Blades (for Mulching and Side Discharge ACRM006 Bagger Blades...ACRM007 WARNING: Current attachments and accessories available for use with this product has a Three-year...

Operation Manual
Page 32
... CAUSE SOLUTION Battery charge is too fast. Check/clean all four tires. Mower won't move. tion (forward or reverse). Worn, bent, loose, or dull blade. Mow at the desired height. Mow once at a high cutting height, then mow again at a slower speed. Mowing speed is low. Mower vibrating at .... Clean underside of the deck. Wet grass clippings sticking to dry before mowing. underside of mower deck. Worn, bent, loose, or dull blade. Brake is depressed and/or parking Release the brake pedal and/or the brake is not fully seated. Build-up of debris under mower deck...
... CAUSE SOLUTION Battery charge is too fast. Check/clean all four tires. Mower won't move. tion (forward or reverse). Worn, bent, loose, or dull blade. Mow at the desired height. Mow once at a high cutting height, then mow again at a slower speed. Mowing speed is low. Mower vibrating at .... Clean underside of the deck. Wet grass clippings sticking to dry before mowing. underside of mower deck. Worn, bent, loose, or dull blade. Brake is depressed and/or parking Release the brake pedal and/or the brake is not fully seated. Build-up of debris under mower deck...


