

Operation Manual
Page 4
...the risk of children. Following this rule will reduce the risk of the batteries in order not to short the battery with a garden hose to the product. Use only authorized replacement parts when servicing the product. Check with local codes for possible special disposal... instructions. Keep all metal objects like surfaces. Use extra care when loading or unloading the machine into your battery tool or when changing ...
...the risk of children. Following this rule will reduce the risk of the batteries in order not to short the battery with a garden hose to the product. Use only authorized replacement parts when servicing the product. Check with local codes for possible special disposal... instructions. Keep all metal objects like surfaces. Use extra care when loading or unloading the machine into your battery tool or when changing ...

Operation Manual
Page 6
... damage, weaken, or destroy plastic. Keep cord and charger away from heat to prevent damage to be used only for charging RYOBI 48V riding mowers. English Keep sparks, flames, and smoking materials away from the mower charge port before attempting any way. The charger must...an authorized service person. Do not operate charger if it to an authorized service center to be replaced. Service person must unplug charger from the AC wall outlet and from batteries. The charger is in good working order. Make sure cords are the same number...
... damage, weaken, or destroy plastic. Keep cord and charger away from heat to prevent damage to be used only for charging RYOBI 48V riding mowers. English Keep sparks, flames, and smoking materials away from the mower charge port before attempting any way. The charger must...an authorized service person. Do not operate charger if it to an authorized service center to be replaced. Service person must unplug charger from the AC wall outlet and from batteries. The charger is in good working order. Make sure cords are the same number...

Operation Manual
Page 9
...your safety, please review and understand all of the labels come off the unit or become hard to read, contact an authorized service center for replacement. 4 2 1 3 1 RY48ZTR75 ELECTRIC ZERO TURN MOWER 3 099749015 TONDEUSE ÉLECTRIQUE ZERO TURN 48V 42 in China Fabriqué en Chine Fabricado en China 4 2 ...- Para utilizar únicamente con la batería LPC12-75 o LPC12-100. Utiliser seulement avec la batterie LPC12-75 ou LPC12-100. For use only with LPC12-75 or LPC12-100 battery. Use sólo con SC-48 cargador. Box 1288, Anderson, SC 29622 1-800-860-4050 www....
...your safety, please review and understand all of the labels come off the unit or become hard to read, contact an authorized service center for replacement. 4 2 1 3 1 RY48ZTR75 ELECTRIC ZERO TURN MOWER 3 099749015 TONDEUSE ÉLECTRIQUE ZERO TURN 48V 42 in China Fabriqué en Chine Fabricado en China 4 2 ...- Para utilizar únicamente con la batería LPC12-75 o LPC12-100. Utiliser seulement avec la batterie LPC12-75 ou LPC12-100. For use only with LPC12-75 or LPC12-100 battery. Use sólo con SC-48 cargador. Box 1288, Anderson, SC 29622 1-800-860-4050 www....
Operation Manual
Page 26
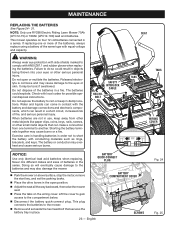
...RYOBI Electric Riding Lawn Mower 75Ah (LPC12-75) or 100Ah (LPC12-100) lead acid batteries. When batteries are not in contact with conducting materials such as rings, bracelets, and keys. The battery or conductor may cause burns or a fire. Check with ANSI Z87.1 and rubber gloves when replacing the batteries... raise the mower seat. Press the tabs on four 12 volt batteries connected in the open or mutilate the batteries. MAINTENANCE REPLACING THE BATTERIES See Figure 24 - 31. If replacing one terminal to the mower. Remove and set the parking brake....
...RYOBI Electric Riding Lawn Mower 75Ah (LPC12-75) or 100Ah (LPC12-100) lead acid batteries. When batteries are not in contact with conducting materials such as rings, bracelets, and keys. The battery or conductor may cause burns or a fire. Check with ANSI Z87.1 and rubber gloves when replacing the batteries... raise the mower seat. Press the tabs on four 12 volt batteries connected in the open or mutilate the batteries. MAINTENANCE REPLACING THE BATTERIES See Figure 24 - 31. If replacing one terminal to the mower. Remove and set the parking brake....

Operation Manual
Page 27
...eyes, flush them with soap and water. If liquid gets into your skin, wash immediately with clean water for the battery or batteries being replaced. WARNING: The battery tray is very heavy and may require two people to extend the tray. English Fig. 29 Remove the cover and ...set aside the battery covers for at least 10 minutes, then seek immediate medical attention. BATTERY TRAY HEX HEAD BOLTS Fig. 27 HEX...
...eyes, flush them with soap and water. If liquid gets into your skin, wash immediately with clean water for the battery or batteries being replaced. WARNING: The battery tray is very heavy and may require two people to extend the tray. English Fig. 29 Remove the cover and ...set aside the battery covers for at least 10 minutes, then seek immediate medical attention. BATTERY TRAY HEX HEAD BOLTS Fig. 27 HEX...
Operation Manual
Page 28
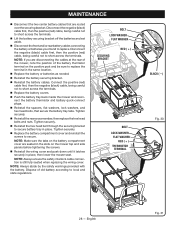
... (black) cable first, then the positive (red) cable, being careful not to short across the terminals. Replace the battery covers. Push the battery tray back inside the mower and reconnect the battery thermistor and battery quick-connect plugs. Reinstall the spacers, flat washers, lock washers, and hex head bolts, that are routed...
... (black) cable first, then the positive (red) cable, being careful not to short across the terminals. Replace the battery covers. Push the battery tray back inside the mower and reconnect the battery thermistor and battery quick-connect plugs. Reinstall the spacers, flat washers, lock washers, and hex head bolts, that are routed...

Operation Manual
Page 30
Consult your local waste authority for Loose Fasteners Clean Debris From Mower Check/Replace Mower Blades Clean Battery Terminals Inspect Before Each Use X X X X X Every 25 Hours X Every 50 Hours or Yearly X X X Every 100 Hours Before Storage X X NOTE: ...mower to comply with metal objects and/or body parts as short circuit may prohibit disposal of properly. WARNING: Upon removal, cover the battery's terminals with heavy-duty adhesive tape. When mower has exceeded the maximum figures specified in dusty areas. English MAINTENANCE SCHEDULE Check Brake Operation...
Consult your local waste authority for Loose Fasteners Clean Debris From Mower Check/Replace Mower Blades Clean Battery Terminals Inspect Before Each Use X X X X X Every 25 Hours X Every 50 Hours or Yearly X X X Every 100 Hours Before Storage X X NOTE: ...mower to comply with metal objects and/or body parts as short circuit may prohibit disposal of properly. WARNING: Upon removal, cover the battery's terminals with heavy-duty adhesive tape. When mower has exceeded the maximum figures specified in dusty areas. English MAINTENANCE SCHEDULE Check Brake Operation...

Operation Manual
Page 32
... Mow once at a high cutting height, then mow again at a slower speed. Charge the battery. Sit down fully on the seat, return the drive levers to mower. Replace blade. Uneven tire pressure. Grass is connected to the neutral position, then try again. Mow ...at the desired height. 32 - Disconnect charger from mower. position. Charger is wet. Grass is in all battery connections. Mow once at a ...
... Mow once at a high cutting height, then mow again at a slower speed. Charge the battery. Sit down fully on the seat, return the drive levers to mower. Replace blade. Uneven tire pressure. Grass is connected to the neutral position, then try again. Mow ...at the desired height. 32 - Disconnect charger from mower. position. Charger is wet. Grass is in all battery connections. Mow once at a ...

Operation Manual
Page 33
...If problem persists after operator Safety interlock system is engaged. Battery charge is fully connected. Then try again. Charge the battery. Raise blade engage knob. Charge the battery. Ensure safety interlock system seat plug is low. Replace battery. POSSIBLE CAUSE Cutting height set . Sit down . Mower... deck. Headlights not working. Press headlight button to turn headlights on. Turn off . SOLUTION Raise the cutting height. Bad battery cells. Operator is down . Blades do not rotate while moving in Blade engage knob is low. Blade engage knob is ...
...If problem persists after operator Safety interlock system is engaged. Battery charge is fully connected. Then try again. Charge the battery. Raise blade engage knob. Charge the battery. Ensure safety interlock system seat plug is low. Replace battery. POSSIBLE CAUSE Cutting height set . Sit down . Mower... deck. Headlights not working. Press headlight button to turn headlights on. Turn off . SOLUTION Raise the cutting height. Bad battery cells. Operator is down . Blades do not rotate while moving in Blade engage knob is low. Blade engage knob is ...
Operation Manual
Page 34
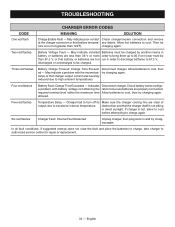
... poor contact Check charger/mower connection and remove at the charger connector or that the charger itself is not sitting in battery or batteries are less than 122˚F). Three red flashes Battery Charge Timeout: Charge Time Exceed- Charger had to turn off its Make sure the charger cooling fins are too run... order to bring them up to 36 V or mower must be charged by another means in direct sunlight. Then try charging again. teries or that battery or batteries are clear of output due to authorized service center for repair or replacement. 34 -
... poor contact Check charger/mower connection and remove at the charger connector or that the charger itself is not sitting in battery or batteries are less than 122˚F). Three red flashes Battery Charge Timeout: Charge Time Exceed- Charger had to turn off its Make sure the charger cooling fins are too run... order to bring them up to 36 V or mower must be charged by another means in direct sunlight. Then try charging again. teries or that battery or batteries are clear of output due to authorized service center for repair or replacement. 34 -

Parts Diagram
Page 19
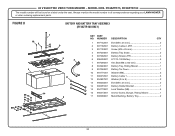
FIGURE N 18 16 3 15 10 6 1 19 1 13 15 12 14 8 BATTERY AND BATTERY TRAY ASSEMBLY (RY48ZTR75 ONLY) 9 5 2 7 11 1 19 1 1 KEY PART NO. NUMBER 1 996346001 2 997102001 3 997133001 4 997049001 5 997092001 6 996269001 7 996363001 8 994923001 9 997050001 10 994771001 11 ... 3 Anchor Screw, Bungie, Riding Mower 1 Metal Bushing, Battery Tray 2 Hex Bolt (M8 x 240 mm 1 Threaded Rod (M8 x 100 mm 4 1 17 4 19 Always mention the model number in all correspondence regarding your LAWN MOWER or when ordering replacement parts. RY48ZTR75, RY48ZTR100 The model number will be found on a label under...
FIGURE N 18 16 3 15 10 6 1 19 1 13 15 12 14 8 BATTERY AND BATTERY TRAY ASSEMBLY (RY48ZTR75 ONLY) 9 5 2 7 11 1 19 1 1 KEY PART NO. NUMBER 1 996346001 2 997102001 3 997133001 4 997049001 5 997092001 6 996269001 7 996363001 8 994923001 9 997050001 10 994771001 11 ... 3 Anchor Screw, Bungie, Riding Mower 1 Metal Bushing, Battery Tray 2 Hex Bolt (M8 x 240 mm 1 Threaded Rod (M8 x 100 mm 4 1 17 4 19 Always mention the model number in all correspondence regarding your LAWN MOWER or when ordering replacement parts. RY48ZTR75, RY48ZTR100 The model number will be found on a label under...
Parts Diagram
Page 20
... Screw, Bungie, Riding Mower 1 Metal Bushing, Battery Tray 2 20 48 V ELECTRIC ZERO TURN MOWER − MODEL NOS. Always mention the model number in all correspondence regarding your LAWN MOWER or when ordering replacement parts. RY48ZTR75, RY48ZTR100 The model number will be found on ...a label under the seat. FIGURE O BATTERY AND BATTERY TRAY ASSEMBLY (RY48ZTR100 ONLY) 16 3 7 15 10 9 5 2 6 11 14 13...
... Screw, Bungie, Riding Mower 1 Metal Bushing, Battery Tray 2 20 48 V ELECTRIC ZERO TURN MOWER − MODEL NOS. Always mention the model number in all correspondence regarding your LAWN MOWER or when ordering replacement parts. RY48ZTR75, RY48ZTR100 The model number will be found on ...a label under the seat. FIGURE O BATTERY AND BATTERY TRAY ASSEMBLY (RY48ZTR100 ONLY) 16 3 7 15 10 9 5 2 6 11 14 13...

Parts Diagram
Page 22
...Controller, Master, ZTR 1 Deck Motor Controller, Master, ZTR 1 Flat Washer (M3 2 Controller Mounting Plate 1 Deck Motor Controller, Slave, ZTR 1 Main Relay 1 Battery Output Cable 1 Charging Controller, ZTR 1 Main Wiring Harness 1 Fuse, 125 Amp 1 Screw (M6 x 16 mm, Soc. FIGURE P ELECTRICAL ASSEMBLY KEY PART NO.... Hd 14 Screw (M6 x 20 mm, Soc. Hd 2 Beeper, ZTR 1 22 RY48ZTR75, RY48ZTR100 The model number will be found on a label under the seat. 48 V ELECTRIC ZERO TURN MOWER − MODEL NOS. Always mention the model...
...Controller, Master, ZTR 1 Deck Motor Controller, Master, ZTR 1 Flat Washer (M3 2 Controller Mounting Plate 1 Deck Motor Controller, Slave, ZTR 1 Main Relay 1 Battery Output Cable 1 Charging Controller, ZTR 1 Main Wiring Harness 1 Fuse, 125 Amp 1 Screw (M6 x 16 mm, Soc. FIGURE P ELECTRICAL ASSEMBLY KEY PART NO.... Hd 14 Screw (M6 x 20 mm, Soc. Hd 2 Beeper, ZTR 1 22 RY48ZTR75, RY48ZTR100 The model number will be found on a label under the seat. 48 V ELECTRIC ZERO TURN MOWER − MODEL NOS. Always mention the model...


