

Operation Manual
Page 7
... not use an extension cord suitable for operations different from the power tool before connecting to lose control. Prevent unintentional starting the power tool accidentally. Store idle power tools out of the reach of parts and any adjusting key or wrench before use . Water entering a power tool will do not allow persons unfamiliar with the charger specified by poorly maintained power tools. Keep cutting tools sharp and clean. Damaged...
... not use an extension cord suitable for operations different from the power tool before connecting to lose control. Prevent unintentional starting the power tool accidentally. Store idle power tools out of the reach of parts and any adjusting key or wrench before use . Water entering a power tool will do not allow persons unfamiliar with the charger specified by poorly maintained power tools. Keep cutting tools sharp and clean. Damaged...

Operation Manual
Page 8
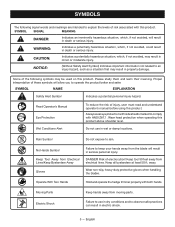
... free from the battery may become lodged in operating condition. See Tool/Appliance/Battery Pack/Charger Correlation Supplement 988000-842. Save these instructions also. 4 - English Liquid ejected from debris. SERVICE Have your power tool serviced by a qualified repair person using with 24 V power head, use , keep it away from one cutting location to instruct others who may use with handle and guard properly assembled to be ejected from the cutter blades...
... free from the battery may become lodged in operating condition. See Tool/Appliance/Battery Pack/Charger Correlation Supplement 988000-842. Save these instructions also. 4 - English Liquid ejected from debris. SERVICE Have your power tool serviced by a qualified repair person using with 24 V power head, use , keep it away from one cutting location to instruct others who may use with handle and guard properly assembled to be ejected from the cutter blades...
Operation Manual
Page 9
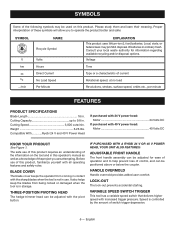
...tool 50 feet away from moving parts. Keep all bystanders at least 50 ft. away. Wear non-slip, heavy-duty protective gloves when handling the blades. English Risk of injury, user must read and understand operator's manual before using this product. Operate With Two Hands Hold and operate the hedge trimmer properly with this product above shoulder level... not avoided, could result in death or serious injury. Moving Parts Electric Shock Keep hands away from electrical lines. SYMBOLS The following symbols may result in wet or damp locations. Do not use in property damage.
...tool 50 feet away from moving parts. Keep all bystanders at least 50 ft. away. Wear non-slip, heavy-duty protective gloves when handling the blades. English Risk of injury, user must read and understand operator's manual before using this product. Operate With Two Hands Hold and operate the hedge trimmer properly with this product above shoulder level... not avoided, could result in death or serious injury. Moving Parts Electric Shock Keep hands away from electrical lines. SYMBOLS The following symbols may result in wet or damp locations. Do not use in property damage.
Operation Manual
Page 10
... Current No Load Speed Per Minute EXPLANATION This product uses lithium-ion (Li-ion) batteries. THREE-POSITION PIVOTING HEAD The hedge trimmer head can be adjusted with the pivot button. HANDLE OVERMOLD Handle overmold provides added user comfort. Voltage Time Type or a characteristic of control, and can be positioned above or below the coupler. LOCK-OUT The lock-out prevents accidental starting. BLADE COVER The blade cover keeps the operator from being nicked...
... Current No Load Speed Per Minute EXPLANATION This product uses lithium-ion (Li-ion) batteries. THREE-POSITION PIVOTING HEAD The hedge trimmer head can be adjusted with the pivot button. HANDLE OVERMOLD Handle overmold provides added user comfort. Voltage Time Type or a characteristic of control, and can be positioned above or below the coupler. LOCK-OUT The lock-out prevents accidental starting. BLADE COVER The blade cover keeps the operator from being nicked...
Operation Manual
Page 11
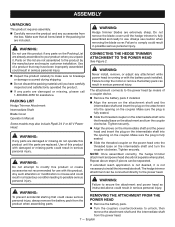
... assembling parts. WARNING: To prevent accidental starting that may also include Ryobi 24 V or 40 V Power Head. REMOVING THE ATTACHMENT FROM THE POWER HEAD Remove the battery pack. Turn the couplers counterclockwise to possible serious personal injury. WARNING: WARNING: Hedge trimmer blades are replaced. PACKING LIST Hedge Trimmer Attachment Intermediate Shaft Blade Cover Operator's Manual Some models may have carefully inspected and satisfactorily operated the product. The attachment connects to use caution when removing the blade cover. Always use . Use...
... assembling parts. WARNING: To prevent accidental starting that may also include Ryobi 24 V or 40 V Power Head. REMOVING THE ATTACHMENT FROM THE POWER HEAD Remove the battery pack. Turn the couplers counterclockwise to possible serious personal injury. WARNING: WARNING: Hedge trimmer blades are replaced. PACKING LIST Hedge Trimmer Attachment Intermediate Shaft Blade Cover Operator's Manual Some models may have carefully inspected and satisfactorily operated the product. The attachment connects to use caution when removing the blade cover. Always use . Use...
Operation Manual
Page 12
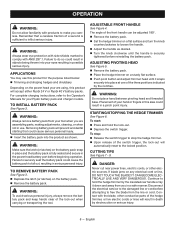
... inflict serious injury. ADJUSTABLE FRONT HANDLE See Figure 4. DANGER: Never cut near power lines, electric cords, or other conductive parts of the switch trigger, the lock-out will prevent accidental starting that a careless fraction of a second is sufficient to the locked position. WARNING: Always wear eye protection with side shields marked to fall out, resulting in the power head battery port before beginning operation. TO INSTALL BATTERY PACK See Figure...
... inflict serious injury. ADJUSTABLE FRONT HANDLE See Figure 4. DANGER: Never cut near power lines, electric cords, or other conductive parts of the switch trigger, the lock-out will prevent accidental starting that a careless fraction of a second is sufficient to the locked position. WARNING: Always wear eye protection with side shields marked to fall out, resulting in the power head battery port before beginning operation. TO INSTALL BATTERY PACK See Figure...
Operation Manual
Page 13
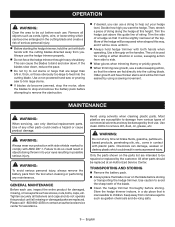
... repaired or replaced by the customer. Failure to do not operate this guide line of string along the hedge at an Authorized Service Center. GENERAL MAINTENANCE Before each use a string to help cut stems or twigs that it will be damaged by using solvents when cleaning plastic parts. Avoid using a sawing movement. All other parts could result in objects being thrown into your hedge level. English MAINTENANCE WARNING: When servicing, use...
... repaired or replaced by the customer. Failure to do not operate this guide line of string along the hedge at an Authorized Service Center. GENERAL MAINTENANCE Before each use a string to help cut stems or twigs that it will be damaged by using solvents when cleaning plastic parts. Avoid using a sawing movement. All other parts could result in objects being thrown into your hedge level. English MAINTENANCE WARNING: When servicing, use...
Operation Manual
Page 14
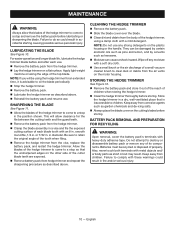
... air vents on the plastic housing or the handle. or 7/32 in diameter. CLEANING THE HEDGE TRIMMER Remove the battery pack. Slide the blade cover over the blade. Clean dirt and debris from the body of the hedge trimmer, using the hedge trimmer for the file between the cutting teeth and the guard teeth. Remove the battery pack from children. Store the hedge trimmer in accidental starting...
... air vents on the plastic housing or the handle. or 7/32 in diameter. CLEANING THE HEDGE TRIMMER Remove the battery pack. Slide the blade cover over the blade. Clean dirt and debris from the body of the hedge trimmer, using the hedge trimmer for the file between the cutting teeth and the guard teeth. Remove the battery pack from children. Store the hedge trimmer in accidental starting...

Operation Manual
Page 15
Battery is depressed. CALL US FIRST For any questions about operating or maintaining your complete satisfaction. 11 - Your product has been fully tested prior to shipment to ensure your product, call the Ryobi® Help Line! TROUBLESHOOTING PROBLEM Motor fails to start when switch trigger is not charged. POSSIBLE CAUSE Battery is not secure. Charge the battery pack according to the instructions included with your model. English SOLUTION To secure the battery pack, make sure the latch (or latches) snap into place.
Battery is depressed. CALL US FIRST For any questions about operating or maintaining your complete satisfaction. 11 - Your product has been fully tested prior to shipment to ensure your product, call the Ryobi® Help Line! TROUBLESHOOTING PROBLEM Motor fails to start when switch trigger is not charged. POSSIBLE CAUSE Battery is not secure. Charge the battery pack according to the instructions included with your model. English SOLUTION To secure the battery pack, make sure the latch (or latches) snap into place.

Operation Manual
Page 16
... result of original retail purchase for any RYOBI® brand outdoor product that is used for cancellation or rescission of the contract of sale of the original retail purchase. Spark Plugs, Carburetor, Carburetor Adjustments, Ignition, Filters B. Bump Knobs, Outer Spools, Cutting Lines, Inner Reels, Starter Pulleys, Starter Ropes, Drive Belts, Tines, Felt Washers, Hitch Pins, Mulching Blades, Blower Fans, Blower and Vacuum Tubes, Vacuum Bag and Straps, Guide Bars, Saw Chains Techtronic Industries North America, Inc., reserves...
... result of original retail purchase for any RYOBI® brand outdoor product that is used for cancellation or rescission of the contract of sale of the original retail purchase. Spark Plugs, Carburetor, Carburetor Adjustments, Ignition, Filters B. Bump Knobs, Outer Spools, Cutting Lines, Inner Reels, Starter Pulleys, Starter Ropes, Drive Belts, Tines, Felt Washers, Hitch Pins, Mulching Blades, Blower Fans, Blower and Vacuum Tubes, Vacuum Bag and Straps, Guide Bars, Saw Chains Techtronic Industries North America, Inc., reserves...

Parts Diagram
Page 1
RYOBI RY40060 HEDGE TRIMMER ATTACHMENT REPAIR SHEET RYOBI TECHNOLOGIES, INC. 1428 Pearman Dairy Road, Anderson, SC 29625 Post Office Box 1207, Anderson, SC 29625 Phone 1-800-860-4050 www.ryobitools.com
RYOBI RY40060 HEDGE TRIMMER ATTACHMENT REPAIR SHEET RYOBI TECHNOLOGIES, INC. 1428 Pearman Dairy Road, Anderson, SC 29625 Post Office Box 1207, Anderson, SC 29625 Phone 1-800-860-4050 www.ryobitools.com
Parts Diagram
Page 3
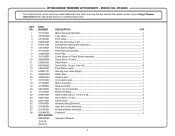
... Button (Right)...1 Pole Housing Assembly...1 Foam Pad...1 Lower Boom w/Circuit Board Assembly 1 Screw (M4 x 16 mm)...1 Strain Relief...1 Screw (M4 x 16 mm, Pan Hd 14 Pivot Button (Left)...1 Warning Icon Label (Right)...1 Data Label...1 Shield Label...1 Connexion Label...1 Motor Assembly...1 Base Assembly...1 Motor Cover Assembly...1 Blade Assembly...1 Washer (M6, ID6.2 x 11OD x 0.3t 3 Screw (M4 x 12 mm)...2 Center Gear...1 Retaining Ring (External)...1 Gear Box Cover Assembly...1 Extended Boom Assembly...1 Scabbard...1 Operator's Manual 3
... Button (Right)...1 Pole Housing Assembly...1 Foam Pad...1 Lower Boom w/Circuit Board Assembly 1 Screw (M4 x 16 mm)...1 Strain Relief...1 Screw (M4 x 16 mm, Pan Hd 14 Pivot Button (Left)...1 Warning Icon Label (Right)...1 Data Label...1 Shield Label...1 Connexion Label...1 Motor Assembly...1 Base Assembly...1 Motor Cover Assembly...1 Blade Assembly...1 Washer (M6, ID6.2 x 11OD x 0.3t 3 Screw (M4 x 12 mm)...2 Center Gear...1 Retaining Ring (External)...1 Gear Box Cover Assembly...1 Extended Boom Assembly...1 Scabbard...1 Operator's Manual 3
Parts Diagram
Page 4
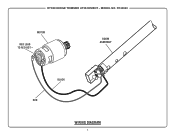
RYOBI HEDGE TRIMMER ATTACHMENT - RY40060 MOTOR RED LEAD TO RED DOT • BOOM ASSEMBLY BLACK RED WIRING DIAGRAM 4 MODEL NO.
RYOBI HEDGE TRIMMER ATTACHMENT - RY40060 MOTOR RED LEAD TO RED DOT • BOOM ASSEMBLY BLACK RED WIRING DIAGRAM 4 MODEL NO.


