
Operation Manual
Page 4
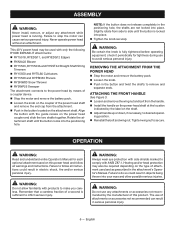
... should be repaired. Disconnect power head - Inspect charger cord periodically and, if damaged, have it was designed. Do not overreach - When using a string trimmer attachment. 2 - Be sure the string head is dusty. Protect your body away from cutting area. Make sure all safety instructions listed below, can...
... should be repaired. Disconnect power head - Inspect charger cord periodically and, if damaged, have it was designed. Do not overreach - When using a string trimmer attachment. 2 - Be sure the string head is dusty. Protect your body away from cutting area. Make sure all safety instructions listed below, can...

Operation Manual
Page 5
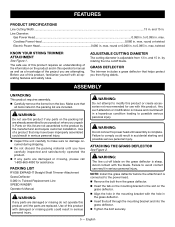
... example, metal wire, rope, or the like. When not in use, power head and attachments should be cut material or hold material to the string trimmer attachment can result in serious personal injury. Never operate unit without the grass deflector in place and in good condition. Maintain a firm grip...
... example, metal wire, rope, or the like. When not in use, power head and attachments should be cut material or hold material to the string trimmer attachment can result in serious personal injury. Never operate unit without the grass deflector in place and in good condition. Maintain a firm grip...
Operation Manual
Page 8
...; Reinstall the bolt and wing nut. WARNING: Do not allow familiarity with only the following RYOBI EXPAND-IT attachments: RY15518, RYEDG11, and RYEDG12 Edgers RYAXA22 Blower RY15523, RY15523A and RYSST44 Straight Shaft String Trimmers RY15550 and RYTIL66 Cultivators RY15520 and RYPRN33 Pruners RYSNW00 Snow Thrower ...
...; Reinstall the bolt and wing nut. WARNING: Do not allow familiarity with only the following RYOBI EXPAND-IT attachments: RY15518, RYEDG11, and RYEDG12 Edgers RYAXA22 Blower RY15523, RY15523A and RYSST44 Straight Shaft String Trimmers RY15550 and RYTIL66 Cultivators RY15520 and RYPRN33 Pruners RYSNW00 Snow Thrower ...

Operation Manual 1
Page 4
...possible injury, and will void your body away from operation. English Bystanders should be thrown or become dangerous projectiles. Never operate string trimmer without the grass deflector in place and in good condition. Maintain a firm grip on this tool, loan them to wear eye ... over 30 in unexpected situations. Keep all objects such as appropriate for the power head thoroughly before using the straight shaft trimmer attachment. Know the tool. Failure to prevent entanglement in any moving part. Do not touch areas around the ...
...possible injury, and will void your body away from operation. English Bystanders should be thrown or become dangerous projectiles. Never operate string trimmer without the grass deflector in place and in good condition. Maintain a firm grip on this tool, loan them to wear eye ... over 30 in unexpected situations. Keep all objects such as appropriate for the power head thoroughly before using the straight shaft trimmer attachment. Know the tool. Failure to prevent entanglement in any moving part. Do not touch areas around the ...

Operation Manual 1
Page 5
... for wildlife where the machine is to be injured by lightning. n Keep bystanders away while operating the machine. n Hold the grass trimmer by the manufacturer. Slippery or unstable surfaces may result in serious personal injury. 3 - When the tension in the wood fibres is off...or down and exercise extreme caution when changing direction. Proper handling of accidental contact with the cutting line or blade. English GRASS TRIMMER SAFETY WARNINGS n Do not use the machine in bad weather conditions, especially when there is not contacting anything. Adequate protective equipment...
... for wildlife where the machine is to be injured by lightning. n Keep bystanders away while operating the machine. n Hold the grass trimmer by the manufacturer. Slippery or unstable surfaces may result in serious personal injury. 3 - When the tension in the wood fibres is off...or down and exercise extreme caution when changing direction. Proper handling of accidental contact with the cutting line or blade. English GRASS TRIMMER SAFETY WARNINGS n Do not use the machine in bad weather conditions, especially when there is not contacting anything. Adequate protective equipment...
Operation Manual 1
Page 7
...the packing material until the parts are not assembled to the product by rotating the line cutoff blade. PACKING LIST RYOBI EXPAND-IT Straight Shaft Trimmer Attachment Grass Deflector 0.080 in . Twisted Replacement Line SPEED WINDER Operator's Manual WARNING: If any parts are damaged... the packing list are attempting. WARNING: Do not connect to 0.095 in serious personal injury. max. max. GRASS DEFLECTOR The trimmer includes a grass deflector that may have carefully inspected and satisfactorily operated the product. Failure to possible serious personal injury...
...the packing material until the parts are not assembled to the product by rotating the line cutoff blade. PACKING LIST RYOBI EXPAND-IT Straight Shaft Trimmer Attachment Grass Deflector 0.080 in . Twisted Replacement Line SPEED WINDER Operator's Manual WARNING: If any parts are damaged... the packing list are attempting. WARNING: Do not connect to 0.095 in serious personal injury. max. max. GRASS DEFLECTOR The trimmer includes a grass deflector that may have carefully inspected and satisfactorily operated the product. Failure to possible serious personal injury...

Operation Manual 1
Page 8
... assistance. 6 - NOTICE: Before each use any attachment while power head is fully tightened before operating equipment. The straight shaft trimmer attachment connects to length by the manufacturer of attachments or accessories not recommended can result in . Advance the line whenever you careless... coupler device. Remove the hanger cap from side to advance properly. ASSEMBLY JOINING THE POWER HEAD TO THE STRAIGHT SHAFT TRIMMER ATTACHMENT See Figure 3. WARNING: Never use this product. cutting swath. WARNING: Never attach or adjust any attachments or accessories not ...
... assistance. 6 - NOTICE: Before each use any attachment while power head is fully tightened before operating equipment. The straight shaft trimmer attachment connects to length by the manufacturer of attachments or accessories not recommended can result in . Advance the line whenever you careless... coupler device. Remove the hanger cap from side to advance properly. ASSEMBLY JOINING THE POWER HEAD TO THE STRAIGHT SHAFT TRIMMER ATTACHMENT See Figure 3. WARNING: Never use this product. cutting swath. WARNING: Never attach or adjust any attachments or accessories not ...

Operation Manual 1
Page 9
... worn too short you may cause damage from your arm, hand, or any body part against the engine housing during trimmer operation. Only hold the trimmer as shown in Figure 6 with the switch trigger fully pressed for electric power heads, and manually advance the line. This... Any contact with the switch trigger fully pressed for electric power heads. Push the bump knob in possible burn injury. OPERATION OPERATING THE TRIMMER See Figure 6. This will expose the user to hot surfaces and can easily be able to the correct length. CUTTING TIPS See Figures 6 ...
... worn too short you may cause damage from your arm, hand, or any body part against the engine housing during trimmer operation. Only hold the trimmer as shown in Figure 6 with the switch trigger fully pressed for electric power heads, and manually advance the line. This... Any contact with the switch trigger fully pressed for electric power heads. Push the bump knob in possible burn injury. OPERATION OPERATING THE TRIMMER See Figure 6. This will expose the user to hot surfaces and can easily be able to the correct length. CUTTING TIPS See Figures 6 ...

Operation Manual 1
Page 10
... the upper string head housing from tangling. Push the bump knob down while pulling on each side. er cap over the end of trimmer line 10 ft. Failure to remove dirt, dust, oil, grease, etc. If replacing the bump knob, remove the old knob from power supply. Use...
... the upper string head housing from tangling. Push the bump knob down while pulling on each side. er cap over the end of trimmer line 10 ft. Failure to remove dirt, dust, oil, grease, etc. If replacing the bump knob, remove the old knob from power supply. Use...
Parts Diagram 2
Page 3
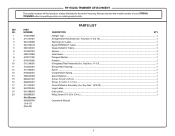
...Screw (1/4-20 x 3/4 in .)...1 17 311245001 Grass Deflector Assembly (Inc. Key Nos. 3-4 & 19 1 3 940749005 Warning Icon Label...1 4 940726013 Ryobi EXPAND-IT Label...1 5 638125001 Grass Deflector Clamp...1 6 518367001 Spacer...1 7 308210009 Gear Head...1 8 678011002 Flanged Washer...1 9 678019002 Adaptor...1 10 311248001 ... Straight Shaft Assembly (Inc. Always mention the model number of your STRING TRIMMER when requesting service or ordering repair parts. RY15523A TRIMMER ATTACHMENT The model number will be found on a label attached to the motor housing.
...Screw (1/4-20 x 3/4 in .)...1 17 311245001 Grass Deflector Assembly (Inc. Key Nos. 3-4 & 19 1 3 940749005 Warning Icon Label...1 4 940726013 Ryobi EXPAND-IT Label...1 5 638125001 Grass Deflector Clamp...1 6 518367001 Spacer...1 7 308210009 Gear Head...1 8 678011002 Flanged Washer...1 9 678019002 Adaptor...1 10 311248001 ... Straight Shaft Assembly (Inc. Always mention the model number of your STRING TRIMMER when requesting service or ordering repair parts. RY15523A TRIMMER ATTACHMENT The model number will be found on a label attached to the motor housing.

Parts Diagram 3
Page 3
...(Inc. Key Nos. 3-5, RY15523A 1 Straight Shaft Assembly (Inc. Key Nos. 3-5, RY15523AVNM 1 3 940749005 Warning Icon Label...1 4 941851149 5 941588053 941588477 Ryobi EXPAND-IT Label...1 Data Label (RY15523A)...1 Data Label (RY15523AVNM)...1 6 660738002 Screw (1/4-20 x 1-1/4 in ., Hex Washer Hd.)...1 Flanged Washer...1 Gear Head...1...)...1 24 530001004 Upper Housing...1 Not Shown: 990000799 Operator's Manual 5-1-20 (Rev:10) 3 RY15523A/RY15523AVNM TRIMMER ATTACHMENT The model number will be found on a label attached to the motor housing. Always mention the model number of ...
...(Inc. Key Nos. 3-5, RY15523A 1 Straight Shaft Assembly (Inc. Key Nos. 3-5, RY15523AVNM 1 3 940749005 Warning Icon Label...1 4 941851149 5 941588053 941588477 Ryobi EXPAND-IT Label...1 Data Label (RY15523A)...1 Data Label (RY15523AVNM)...1 6 660738002 Screw (1/4-20 x 1-1/4 in ., Hex Washer Hd.)...1 Flanged Washer...1 Gear Head...1...)...1 24 530001004 Upper Housing...1 Not Shown: 990000799 Operator's Manual 5-1-20 (Rev:10) 3 RY15523A/RY15523AVNM TRIMMER ATTACHMENT The model number will be found on a label attached to the motor housing. Always mention the model number of ...
Operation Manual 4
Page 1
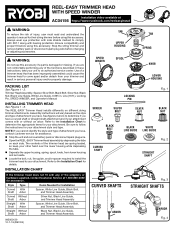
...center. Refer to the Installation Chart to the Installation Chart for your attachment. Refer to determine the appropriate items for details. REEL-EASY TRIMMER HEAD WITH SPEED WINDER Installation video available at 1-800-860-4050 for your attachment style and type. PACKING LIST See Figures 1 -...the tabs. Seperate the upper housing, spring, spool, knob, from your unit to your attachment. The contents of the trimmer head are not comfortable performing any of the adaptors or hardware s upplied, contact Customer Service at AC04156 https://www.ryobitools.com/...
...center. Refer to the Installation Chart to the Installation Chart for your attachment. Refer to determine the appropriate items for details. REEL-EASY TRIMMER HEAD WITH SPEED WINDER Installation video available at 1-800-860-4050 for your attachment style and type. PACKING LIST See Figures 1 -...the tabs. Seperate the upper housing, spring, spool, knob, from your unit to your attachment. The contents of the trimmer head are not comfortable performing any of the adaptors or hardware s upplied, contact Customer Service at AC04156 https://www.ryobitools.com/...
Operation Manual 4
Page 2
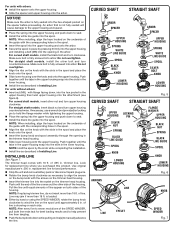
..., install the black bolt and turn counterclockwise. Push together until the tabs in the upper housing snap into the hex-shaped pocket on the trimmer head housing. Look for best performance. Stop the unit and remove battery pack or disconnect spark plug wire. Rotate the...without arbors: Insert nut (M8), with the slots in the upper housing then twist upper housing onto the attachment (see figure 6). The trimmer head comes with arbors: Install the spacer onto the upper housing. Slide the spacer and upper housing onto the arbor. is ...
..., install the black bolt and turn counterclockwise. Push together until the tabs in the upper housing snap into the hex-shaped pocket on the trimmer head housing. Look for best performance. Stop the unit and remove battery pack or disconnect spark plug wire. Rotate the...without arbors: Insert nut (M8), with the slots in the upper housing then twist upper housing onto the attachment (see figure 6). The trimmer head comes with arbors: Install the spacer onto the upper housing. Slide the spacer and upper housing onto the arbor. is ...


