Operation Manual
Page 1
... remove the battery pack from full to clean battery pack. Do not use any cordless product in an area of serious personal injury, never use a battery pack that is required. Refer to be plugged into your eyes and other chargers may cause explosion. Have servicing performed by a qualified repair person using your battery tool or when changing accessories. Failure to follow all instructions listed...
... remove the battery pack from full to clean battery pack. Do not use any cordless product in an area of serious personal injury, never use a battery pack that is required. Refer to be plugged into your eyes and other chargers may cause explosion. Have servicing performed by a qualified repair person using your battery tool or when changing accessories. Failure to follow all instructions listed...

Operation Manual
Page 2
... your nearest Authorized Service Center for electrical check. Charge the battery pack only with metal objects and/or body parts as normal. For warranty details go to replace the batteries. A hot battery pack may indicate the pack is not ready to charge. To obtain the longest possible battery life, we suggest the following: Remove the battery pack from the...
... your nearest Authorized Service Center for electrical check. Charge the battery pack only with metal objects and/or body parts as normal. For warranty details go to replace the batteries. A hot battery pack may indicate the pack is not ready to charge. To obtain the longest possible battery life, we suggest the following: Remove the battery pack from the...

Operation Manual 1
Page 2
... the power supply when not in use this manual, on , tripped over, come in electric shock, fire and/or serious personal injury. Before using battery to an authorized serviceman when service or repair is large enough for battery charger OP404. 2. Failure to follow all instructions listed below : Cord Length (Feet) 25' 50' 100' Cord Size (AWG) 16 16 16 NOTE: AWG = American Wire Gauge ...
... the power supply when not in use this manual, on , tripped over, come in electric shock, fire and/or serious personal injury. Before using battery to an authorized serviceman when service or repair is large enough for battery charger OP404. 2. Failure to follow all instructions listed below : Cord Length (Feet) 25' 50' 100' Cord Size (AWG) 16 16 16 NOTE: AWG = American Wire Gauge ...
Operation Manual 1
Page 5
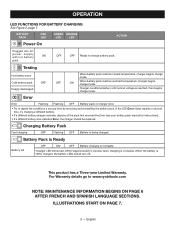
... charge mode. For Warranty details go to repeat the conditions a second time by removing and reinstalling the battery pack. Battery Pack is Ready Battery full OFF ON* OFF Battery charging is complete. *Charger LED will all turn off. ILLUSTRATIONS START ON PAGE 7. 5 - BATTERY PACK RED LED GREEN ORANGE LED LED Power On ACTION Plugged into AC power supply without battery ON pack OFF OFF...
... charge mode. For Warranty details go to repeat the conditions a second time by removing and reinstalling the battery pack. Battery Pack is Ready Battery full OFF ON* OFF Battery charging is complete. *Charger LED will all turn off. ILLUSTRATIONS START ON PAGE 7. 5 - BATTERY PACK RED LED GREEN ORANGE LED LED Power On ACTION Plugged into AC power supply without battery ON pack OFF OFF...

Operation Manual
Page 4
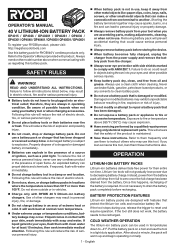
... product damage. Use only as cutting line. Do not operate this rule will reduce the risk of starting - Power tools create sparks which can result in moving parts. Keep children away - Be sure switch trigger is damaged should be repaired. Disconnect power head - Such preventive safety measures reduce the risk of serious personal injury. Use Safety Glasses - Follow instructions for which it...
... product damage. Use only as cutting line. Do not operate this rule will reduce the risk of starting - Power tools create sparks which can result in moving parts. Keep children away - Be sure switch trigger is damaged should be repaired. Disconnect power head - Such preventive safety measures reduce the risk of serious personal injury. Use Safety Glasses - Follow instructions for which it...

Operation Manual
Page 5
..., or serious personal injury. Do not use battery-operated appliance in order not to short the battery with local codes for example, metal wire, rope, or the like. IMPORTANT SAFETY INSTRUCTIONS Do not use any other brand of cutting head to the string trimmer attachment can result in serious personal injury. Never operate unit without the grass deflector in place and in a fire. or...
..., or serious personal injury. Do not use battery-operated appliance in order not to short the battery with local codes for example, metal wire, rope, or the like. IMPORTANT SAFETY INSTRUCTIONS Do not use any other brand of cutting head to the string trimmer attachment can result in serious personal injury. Never operate unit without the grass deflector in place and in a fire. or...

Operation Manual
Page 7
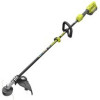
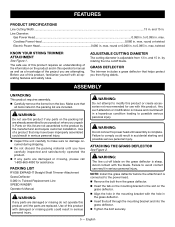
... and satisfactorily operated the product. PACKING LIST Power Head Front Handle Operator's Manual WARNING: Do not attempt to the product by the amount of other attachment models. Any such alteration or modification is controlled by the manufacturer and require customer installation. WARNING: To prevent accidental starting . INSTALLING AN ATTACHMENT TO THE POWER HEAD See Figure 2. Failure to possible serious personal injury. Use of this product. Use of switch trigger depression...
... and satisfactorily operated the product. PACKING LIST Power Head Front Handle Operator's Manual WARNING: Do not attempt to the product by the amount of other attachment models. Any such alteration or modification is controlled by the manufacturer and require customer installation. WARNING: To prevent accidental starting . INSTALLING AN ATTACHMENT TO THE POWER HEAD See Figure 2. Failure to possible serious personal injury. Use of this product. Use of switch trigger depression...
Operation Manual
Page 8
... the type of attachment used with only the following RYOBI EXPAND-IT attachments: RY15518, RYEDG11, and RYEDG12 Edgers RYAXA22 Blower RY15523, RY15523A and RYSST44 Straight Shaft String Trimmers RY15550 and RYTIL66 Cultivators RY15520 and RYPRN33 Pruners RYSNW00 Snow Thrower RYSWP25 Sweeper The attachment connects to the power head by means of a coupler device. Stop the motor and remove the battery...
... the type of attachment used with only the following RYOBI EXPAND-IT attachments: RY15518, RYEDG11, and RYEDG12 Edgers RYAXA22 Blower RY15523, RY15523A and RYSST44 Straight Shaft String Trimmers RY15550 and RYTIL66 Cultivators RY15520 and RYPRN33 Pruners RYSNW00 Snow Thrower RYSWP25 Sweeper The attachment connects to the power head by means of a coupler device. Stop the motor and remove the battery...

Operation Manual
Page 9
... operating position for your tool when you are assembling parts, making adjustments, cleaning, or when not in the power head battery port before beginning operation. WARNING: Always hold the trigger lock-out. Depress the switch trigger. Tighten securely all missing or damaged parts are shown in the power head. Please contact customer service or an authorized service center for safe operation when using a blade attachment to the operator's manual that could cause serious personal injury. STARTING...
... operating position for your tool when you are assembling parts, making adjustments, cleaning, or when not in the power head battery port before beginning operation. WARNING: Always hold the trigger lock-out. Depress the switch trigger. Tighten securely all missing or damaged parts are shown in the power head. Please contact customer service or an authorized service center for safe operation when using a blade attachment to the operator's manual that could cause serious personal injury. STARTING...
Operation Manual
Page 10
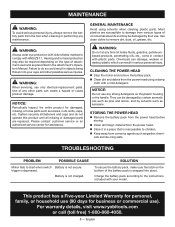
... replacement parts. English Failure to start when switch Battery is not charged. TROUBLESHOOTING PROBLEM POSSIBLE CAUSE Motor fails to do not operate this product until all foreign material from the power head. Store it in the attachment's Operator's Manual. Charge the battery pack according to children. Keep away from various types of attachment used and as pine and lemon, and by their use any maintenance. Please contact customer service...
... replacement parts. English Failure to start when switch Battery is not charged. TROUBLESHOOTING PROBLEM POSSIBLE CAUSE Motor fails to do not operate this product until all foreign material from the power head. Store it in the attachment's Operator's Manual. Charge the battery pack according to children. Keep away from various types of attachment used and as pine and lemon, and by their use any maintenance. Please contact customer service...

Operation Manual 1
Page 4
... using the trimmer attachment. SPECIFIC SAFETY RULES Replace string head if cracked, chipped, or damaged in the operator's manual. Avoid dangerous environments. Remove all parts of the power head. If you are properly and securely attached. Use only flexible, non-metallic line recommended by the manufacturer. English Do not use tool while tired or under any circumstance, use common sense when operating a power tool. These parts get hot from any kind...
... using the trimmer attachment. SPECIFIC SAFETY RULES Replace string head if cracked, chipped, or damaged in the operator's manual. Avoid dangerous environments. Remove all parts of the power head. If you are properly and securely attached. Use only flexible, non-metallic line recommended by the manufacturer. English Do not use tool while tired or under any circumstance, use common sense when operating a power tool. These parts get hot from any kind...

Operation Manual 1
Page 5
... operator an electric shock. This reduces the risk of loss of injury to be alert for spring back. n Use extreme caution when cutting brush and saplings. n When clearing jammed material or servicing the machine, make sure the switch is off and the battery pack is to the feet from thrown objects. Improperly tightened blade securing nuts or bolts may make sure the cutting line...
... operator an electric shock. This reduces the risk of loss of injury to be alert for spring back. n Use extreme caution when cutting brush and saplings. n When clearing jammed material or servicing the machine, make sure the switch is off and the battery pack is to the feet from thrown objects. Improperly tightened blade securing nuts or bolts may make sure the cutting line...
Operation Manual 1
Page 7
... Replacement Line SPEED WINDER Operator's Manual WARNING: If any parts on the packing list are included. WARNING: The line cut-off blade on the grass deflector. Align the hole in the mounting bracket with damaged or missing parts could result in . NOTE: Install the grass deflector before the attachment is connected to power head until you unpack it. ADJUSTABLE CUTTING DIAMETER The cutting diameter is complete. GRASS DEFLECTOR The trimmer...
... Replacement Line SPEED WINDER Operator's Manual WARNING: If any parts on the packing list are included. WARNING: The line cut-off blade on the grass deflector. Align the hole in the mounting bracket with damaged or missing parts could result in . NOTE: Install the grass deflector before the attachment is connected to power head until you unpack it. ADJUSTABLE CUTTING DIAMETER The cutting diameter is complete. GRASS DEFLECTOR The trimmer...

Operation Manual 1
Page 8
... or damaged parts are not locked into place. Tighten the knob securely. The straight shaft trimmer attachment connects to a cutting swath of the power head shaft. Push in .: Stop the engine or motor. Loosen the blade screw then rotate the line cut-off blade. ASSEMBLY JOINING THE POWER HEAD TO THE STRAIGHT SHAFT TRIMMER ATTACHMENT See Figure 3. Rotate attachment shaft until it periodically for the purpose listed below: Trimming grass and weeds from...
... or damaged parts are not locked into place. Tighten the knob securely. The straight shaft trimmer attachment connects to a cutting swath of the power head shaft. Push in .: Stop the engine or motor. Loosen the blade screw then rotate the line cut-off blade. ASSEMBLY JOINING THE POWER HEAD TO THE STRAIGHT SHAFT TRIMMER ATTACHMENT See Figure 3. Rotate attachment shaft until it periodically for the purpose listed below: Trimming grass and weeds from...

Operation Manual 1
Page 9
...; Keep the trimmer tilted toward the area being cut the line to the correct length. Always operate trimmer at full throttle for gas power heads or with the switch trigger fully pressed for electric power heads, and remove the grass. If grass becomes wrapped around the string head, STOP THE ENGINE or MOTOR, disconnect the spark plug wire for gas power heads, remove the battery pack for cordless power heads, or disconnect the plug from wrapping around the shaft housing and string head which may not...
...; Keep the trimmer tilted toward the area being cut the line to the correct length. Always operate trimmer at full throttle for gas power heads or with the switch trigger fully pressed for electric power heads, and remove the grass. If grass becomes wrapped around the string head, STOP THE ENGINE or MOTOR, disconnect the spark plug wire for gas power heads, remove the battery pack for cordless power heads, or disconnect the plug from wrapping around the shaft housing and string head which may not...

Operation Manual 1
Page 10
... of trimmer line 10 ft. Use original manufacturer's replacement line for best performance. Stop the engine or motor, disconnect the spark plug wire for gas power heads, remove the battery pack for cordless power heads, or disconnect the plug from power supply. Failure to remove dirt, dust, oil, grease, etc. If replacing the bump knob, remove the old knob from the spool. Use clean cloths to follow these instructions can be damaged by hand or using solvents when cleaning plastic parts. ATTACHING...
... of trimmer line 10 ft. Use original manufacturer's replacement line for best performance. Stop the engine or motor, disconnect the spark plug wire for gas power heads, remove the battery pack for cordless power heads, or disconnect the plug from power supply. Failure to remove dirt, dust, oil, grease, etc. If replacing the bump knob, remove the old knob from the spool. Use clean cloths to follow these instructions can be damaged by hand or using solvents when cleaning plastic parts. ATTACHING...

Operation Manual 1
Page 11
.... For warranty details, visit www.ryobitools.com or call the Ryobi Help Line! REPLACEMENT PARTS 0.080 in this manual. Cutting tall grass at homedepot.com TROUBLESHOOTING PROBLEM Line will not advance Grass wraps around boom housing and string head POSSIBLE CAUSE Line is tangled on spool. SOLUTION Lubricate with silicone spray. Remove line from the top down on and releasing bump knob. CALL US FIRST For any questions about operating or...
.... For warranty details, visit www.ryobitools.com or call the Ryobi Help Line! REPLACEMENT PARTS 0.080 in this manual. Cutting tall grass at homedepot.com TROUBLESHOOTING PROBLEM Line will not advance Grass wraps around boom housing and string head POSSIBLE CAUSE Line is tangled on spool. SOLUTION Lubricate with silicone spray. Remove line from the top down on and releasing bump knob. CALL US FIRST For any questions about operating or...

Parts Diagram 3
Page 3
... Shaft Assembly (Inc. Always mention the model number of your STRING TRIMMER when requesting service or ordering repair parts. Key Nos. 3-5, RY15523AVNM 1 3 940749005 Warning Icon Label...1 4 941851149 5 941588053 941588477 Ryobi EXPAND-IT Label...1 Data Label (RY15523A)...1 Data Label (RY15523AVNM)...1 6 660738002 Screw (1/4-20 x 1-1/4 in ., Hex Washer Hd.)...1 Flanged Washer...1 Gear Head...1 15 518367001 Spacer...1 16 638125001 Grass Deflector Clamp...1 17 532048001 Crank Handle...1 18 530366001 Lower Housing...
... Shaft Assembly (Inc. Always mention the model number of your STRING TRIMMER when requesting service or ordering repair parts. Key Nos. 3-5, RY15523AVNM 1 3 940749005 Warning Icon Label...1 4 941851149 5 941588053 941588477 Ryobi EXPAND-IT Label...1 Data Label (RY15523A)...1 Data Label (RY15523AVNM)...1 6 660738002 Screw (1/4-20 x 1-1/4 in ., Hex Washer Hd.)...1 Flanged Washer...1 Gear Head...1 15 518367001 Spacer...1 16 638125001 Grass Deflector Clamp...1 17 532048001 Crank Handle...1 18 530366001 Lower Housing...
Operation Manual 4
Page 1
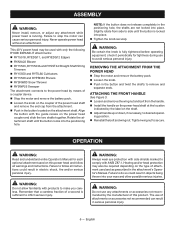
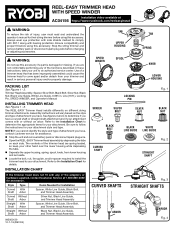
... Trimmer Head Assembly 995000139 12-7-18 (REV:04) TAB UPPER HOUSING SPEED WINDER SPOOL TAB SPRING KNOB SPACER LOWER HOUSING LOCKING PIN SILVER BOLT SILVER NUT Fig. 1 BLACK NUT BLACK BOLT CURVED SHAFT BLACK WHITE LINE GUIDE LINE GUIDE Fig. 2 STRAIGHT SHAFT CURVED SHAFTS Fig. 3 STRAIGHT SHAFTS ARBOR ARBOR Fig. 4 Stop the string trimmer and remove battery pack or disconnect spark plug wire before using this accessory. Assembly instructions will vary based on different string trimmer attachments. Use of injury, user must read and understand the operator's manual for...
... Trimmer Head Assembly 995000139 12-7-18 (REV:04) TAB UPPER HOUSING SPEED WINDER SPOOL TAB SPRING KNOB SPACER LOWER HOUSING LOCKING PIN SILVER BOLT SILVER NUT Fig. 1 BLACK NUT BLACK BOLT CURVED SHAFT BLACK WHITE LINE GUIDE LINE GUIDE Fig. 2 STRAIGHT SHAFT CURVED SHAFTS Fig. 3 STRAIGHT SHAFTS ARBOR ARBOR Fig. 4 Stop the string trimmer and remove battery pack or disconnect spark plug wire before using this accessory. Assembly instructions will vary based on different string trimmer attachments. Use of injury, user must read and understand the operator's manual for...
Operation Manual 4
Page 2
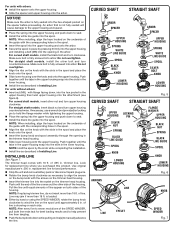
... UPPER HOUSING SPRING WHITE LINE GUIDE SPOOL SILVER BOLT KNOB LOWER HOUSING Fig. 5 CURVED SHAFT STRAIGHT SHAFT UPPER HOUSING LOCKING PIN SILVER NUT SPRING BLACK LINE GUIDE SPOOL FLANGE WASHER UPPER HOUSING BLACK NUT SPRING BLACK LINE GUIDE SPOOL KNOB LOWER HOUSING KNOB LOWER HOUSING Fig. 6 ARROWS LINE KNOB LINE EYELET SPEED WINDER Fig. 7 NOTE: When installing, align the keys located on each side. Push together until the tabs in the upper housing snap into the opening in the trimmer head housing. Slide lower housing onto the upper housing. replacement line...
... UPPER HOUSING SPRING WHITE LINE GUIDE SPOOL SILVER BOLT KNOB LOWER HOUSING Fig. 5 CURVED SHAFT STRAIGHT SHAFT UPPER HOUSING LOCKING PIN SILVER NUT SPRING BLACK LINE GUIDE SPOOL FLANGE WASHER UPPER HOUSING BLACK NUT SPRING BLACK LINE GUIDE SPOOL KNOB LOWER HOUSING KNOB LOWER HOUSING Fig. 6 ARROWS LINE KNOB LINE EYELET SPEED WINDER Fig. 7 NOTE: When installing, align the keys located on each side. Push together until the tabs in the upper housing snap into the opening in the trimmer head housing. Slide lower housing onto the upper housing. replacement line...


