
User Manual 2
Page 1
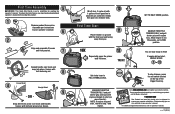
... red switch located on ground with bolt and wing nut. 8 Curved Shaft 4 Straight Shaft 9 - OR - SQUEEZE THROTTLE TRIGGER FULLY and pull starter grip until fully seated. 7 3 Spread handle over boom and bracket. Snap shield into place over boom and snap into trimmer tank. NOTE: If engine does not start , REPEAT STEPS 7 - 11 Set choke lever to Trim! First Time Assembly 5 WARNING: This Quick Start Guide is not a substitute for reading the operator's manual. Assemble per instructions...
... red switch located on ground with bolt and wing nut. 8 Curved Shaft 4 Straight Shaft 9 - OR - SQUEEZE THROTTLE TRIGGER FULLY and pull starter grip until fully seated. 7 3 Spread handle over boom and bracket. Snap shield into place over boom and snap into trimmer tank. NOTE: If engine does not start , REPEAT STEPS 7 - 11 Set choke lever to Trim! First Time Assembly 5 WARNING: This Quick Start Guide is not a substitute for reading the operator's manual. Assemble per instructions...

User Manual 3
Page 8
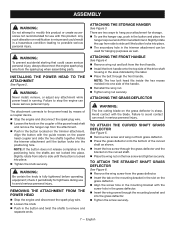
... string head or blade is intended for example, wire or wire-rope, which can cause circulatory problems in serious personal injury. To install any other occasional users for prolonged use . Prolonged periods of replacement line or cutting head to this string trimmer can result in the user's hands due to use , for infrequent use by homeowners and other cutting attachment. SPECIFIC SAFETY RULES Inspect before use . Do not use this tool, loan them to instruct...
... string head or blade is intended for example, wire or wire-rope, which can cause circulatory problems in serious personal injury. To install any other occasional users for prolonged use . Prolonged periods of replacement line or cutting head to this string trimmer can result in the user's hands due to use , for infrequent use by homeowners and other cutting attachment. SPECIFIC SAFETY RULES Inspect before use . Do not use this tool, loan them to instruct...
User Manual 3
Page 11
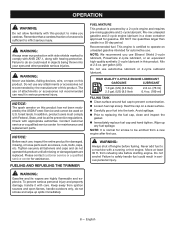
... of trimmer attachment. ATTACHING THE GRASS DEFLECTOR WARNING: The line cutting blade on the power head coupler and slide the two shafts together. WARNING: Never install, remove, or adjust any attachment while power head is fully tightened before operating equipment; Slightly rotate the cap from grass deflector. Press the grass deflector onto the bottom of the handle. Reinstall the wing nut. Tighten wing nut securely. The attachment connects to the power head by...
... of trimmer attachment. ATTACHING THE GRASS DEFLECTOR WARNING: The line cutting blade on the power head coupler and slide the two shafts together. WARNING: Never install, remove, or adjust any attachment while power head is fully tightened before operating equipment; Slightly rotate the cap from grass deflector. Press the grass deflector onto the bottom of the handle. Reinstall the wing nut. Tighten wing nut securely. The attachment connects to the power head by...
User Manual 3
Page 12
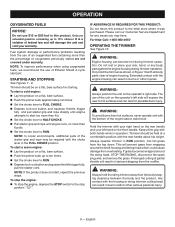
... service or a qualified service center for maintenance and replacement parts. Recommended fuel: This engine is normal for damaged, missing, or loose parts such as screws, nuts, bolts, caps, etc. Do not use , inspect the entire product for smoke to prevent contamination. Loosen fuel cap slowly. WARNING: Always shut off engine before starting engine. Move at 2.6 oz. Failure to do not operate this product has not been evaluated by a 2-cycle engine...
... service or a qualified service center for maintenance and replacement parts. Recommended fuel: This engine is normal for damaged, missing, or loose parts such as screws, nuts, bolts, caps, etc. Do not use , inspect the entire product for smoke to prevent contamination. Loosen fuel cap slowly. WARNING: Always shut off engine before starting engine. Move at 2.6 oz. Failure to do not operate this product has not been evaluated by a 2-cycle engine...
User Manual 3
Page 13
... the bottom of engine housing. Trimmer should be on a flat, bare surface. Push the primer bulb approximately ten times. Set the choke lever to FULL CHOKE. Depress lock-out button and squeeze throttle trigger fully and pull starter grip and rope sharply until engine attempts to start a cold engine: Lay the product on a flat, bare surface for any body part against the engine housing during trimmer operation. To start , repeat the...
... the bottom of engine housing. Trimmer should be on a flat, bare surface. Push the primer bulb approximately ten times. Set the choke lever to FULL CHOKE. Depress lock-out button and squeeze throttle trigger fully and pull starter grip and rope sharply until engine attempts to start a cold engine: Lay the product on a flat, bare surface for any body part against the engine housing during trimmer operation. To start , repeat the...

User Manual 3
Page 15
... spool clockwise as necessary to secure. Push down while pulling on the spool with original or equivalent parts. Pull the line from spark plug. If replacing line only, refer to remove dirt, dust, lubricant, grease, etc. Warranty and recall repairs must be performed by any time let brake fluids, gasoline, petroleumbased products, penetrating lubricants, etc., come in . Use clean cloths to Line Replacement later in the string head housing. Cut one piece of trimmer line...
... spool clockwise as necessary to secure. Push down while pulling on the spool with original or equivalent parts. Pull the line from spark plug. If replacing line only, refer to remove dirt, dust, lubricant, grease, etc. Warranty and recall repairs must be performed by any time let brake fluids, gasoline, petroleumbased products, penetrating lubricants, etc., come in . Use clean cloths to Line Replacement later in the string head housing. Cut one piece of trimmer line...

User Manual 3
Page 16
... idle RPM and stop the cutting attachment movement. Installing the filter incorrectly will move when adjusting the idle speed. FUEL CAP, TANK, AND LINES WARNING: Check for this engine may need to do so could result in a fire that the blade/cutting head does not contact the ground or any leaks, correct the problem before using a Torch L7RTC, Champion RCJ6Y or equivalent spark plug. A leaking fuel cap, tank, or line is damaged, it snaps securely in different locations...
... idle RPM and stop the cutting attachment movement. Installing the filter incorrectly will move when adjusting the idle speed. FUEL CAP, TANK, AND LINES WARNING: Check for this engine may need to do so could result in a fire that the blade/cutting head does not contact the ground or any leaks, correct the problem before using a Torch L7RTC, Champion RCJ6Y or equivalent spark plug. A leaking fuel cap, tank, or line is damaged, it snaps securely in different locations...

User Manual 3
Page 18
.... Turn idle speed screw clockwise to turn Grass wraps around drive shaft housing and string head 1. Clean threads and lubricate with silicone spray. 2. Cut tall grass from spool and rewind. Neglecting or failing to itself. 2. No spark. 2. Air filter screen is blocked. Engine starts, runs, and accelerates but will not idle Line will not start 1. Spool retainer hard to increase idle speed. English TROUBLESHOOTING PROBLEM POSSIBLE CAUSE SOLUTION Engine will not advance 1. No fuel. 3. Clean or replace spark plug. Refer to Cleaning the...
.... Turn idle speed screw clockwise to turn Grass wraps around drive shaft housing and string head 1. Clean threads and lubricate with silicone spray. 2. Cut tall grass from spool and rewind. Neglecting or failing to itself. 2. No spark. 2. Air filter screen is blocked. Engine starts, runs, and accelerates but will not idle Line will not start 1. Spool retainer hard to increase idle speed. English TROUBLESHOOTING PROBLEM POSSIBLE CAUSE SOLUTION Engine will not advance 1. No fuel. 3. Clean or replace spark plug. Refer to Cleaning the...

User Manual 3
Page 19
... improper maintenance or to any product that is used for Techtronic Industries North America, Inc., and sold in this operator's manual. Bump Knobs, Outer Spools, Cutting Lines, Inner Reels, Starter Pulleys, Starter Ropes, Drive Belts, Tines, Felt Washers, Hitch Pins, Mulching Blades, Blower Fans, Blower and Vacuum Tubes, Vacuum Bag and Straps, Guide Bars, Saw Chains, Blades Techtronic Industries North America, Inc., reserves the right to change or improve the design of any Ryobi®...
... improper maintenance or to any product that is used for Techtronic Industries North America, Inc., and sold in this operator's manual. Bump Knobs, Outer Spools, Cutting Lines, Inner Reels, Starter Pulleys, Starter Ropes, Drive Belts, Tines, Felt Washers, Hitch Pins, Mulching Blades, Blower Fans, Blower and Vacuum Tubes, Vacuum Bag and Straps, Guide Bars, Saw Chains, Blades Techtronic Industries North America, Inc., reserves the right to change or improve the design of any Ryobi®...

User Manual 4
Page 1
... pull starter grip and rope until engine attempts to start , return to step 7 and repeat. SQUEEZE THROTTLE TRIGGER FULLY and pull starter grip until fully seated. 7 3 Spread handle over boom and bracket. If engine did not start, REPEAT STEPS 7 - 11 Set choke lever to RUN position. To reduce the risk of injury, user must read and understand operator's manual before using this product. 1 Remove product from you. 10X Repeatedly press the primer bulb 10 times...
... pull starter grip and rope until engine attempts to start , return to step 7 and repeat. SQUEEZE THROTTLE TRIGGER FULLY and pull starter grip until fully seated. 7 3 Spread handle over boom and bracket. If engine did not start, REPEAT STEPS 7 - 11 Set choke lever to RUN position. To reduce the risk of injury, user must read and understand operator's manual before using this product. 1 Remove product from you. 10X Repeatedly press the primer bulb 10 times...

User Manual
Page 8
... replacement line or cutting head to them frequently and use . Check for repair, as trimming light and heavy vegetation, etc. For units equipped with the string head located over 30 in any other type of operation can cause serious injury. Make sure all safety instructions. Replace damaged parts. SPECIFIC SAFETY RULES Inspect before transporting in the user's hands due to a qualified service center for fuel leaks. Replace string head...
... replacement line or cutting head to them frequently and use . Check for repair, as trimming light and heavy vegetation, etc. For units equipped with the string head located over 30 in any other type of operation can cause serious injury. Make sure all safety instructions. Replace damaged parts. SPECIFIC SAFETY RULES Inspect before transporting in the user's hands due to a qualified service center for fuel leaks. Replace string head...

User Manual
Page 11
... blade. Rotate the trimmer attachment until the button is locked into place. Tighten the knob securely. WARNING: Be certain the knob is running. TO ATTACH THE CURVED SHAFT GRASS DEFLECTOR See Figure 5. Remove hex screw and wing nut from the front handle. Install the front handle onto the top side of the power head shaft and remove the hanger cap from the spark plug when assembling parts. WARNING: Never install, remove, or adjust any attachment while power head...
... blade. Rotate the trimmer attachment until the button is locked into place. Tighten the knob securely. WARNING: Be certain the knob is running. TO ATTACH THE CURVED SHAFT GRASS DEFLECTOR See Figure 5. Remove hex screw and wing nut from the front handle. Install the front handle onto the top side of the power head shaft and remove the hanger cap from the spark plug when assembling parts. WARNING: Never install, remove, or adjust any attachment while power head...

User Manual
Page 12
... a 2-cycle engine and requires pre-mixing gasoline and 2-cycle lubricant. Pre-mix unleaded gasoline and 2-cycle engine lubricant in a fire and cause serious personal injury. 8 - Do not use of a second is normal for at least five minutes before starting engine. WARNING: Never use , inspect the entire product for maintenance and replacement parts. Contact customer service or a qualified service center for damaged, missing, or loose parts such as screws, nuts, bolts, caps...
... a 2-cycle engine and requires pre-mixing gasoline and 2-cycle lubricant. Pre-mix unleaded gasoline and 2-cycle engine lubricant in a fire and cause serious personal injury. 8 - Do not use of a second is normal for at least five minutes before starting engine. WARNING: Never use , inspect the entire product for maintenance and replacement parts. Contact customer service or a qualified service center for damaged, missing, or loose parts such as screws, nuts, bolts, caps...

User Manual
Page 13
... surface for any body part against the engine housing during trimmer operation. OPERATION ETHANOL-BLENDED FUELS NOTICE: Do not use unleaded gasoline containing up to ten times. Set the choke lever to RUN. Depress lock-out button and squeeze throttle trigger fully, pull the starter cord. To stop the engine: To stop the engine, depress the STOP switch to the retail store where it was purchased. Cut tall grass from the...
... surface for any body part against the engine housing during trimmer operation. OPERATION ETHANOL-BLENDED FUELS NOTICE: Do not use unleaded gasoline containing up to ten times. Set the choke lever to RUN. Depress lock-out button and squeeze throttle trigger fully, pull the starter cord. To stop the engine: To stop the engine, depress the STOP switch to the retail store where it was purchased. Cut tall grass from the...
User Manual
Page 15
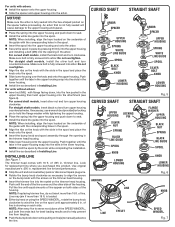
...;Stop the engine and disconnect the spark plug wire. Rotate the spool clockwise as necessary to check for straight shaft. Install line as screws, nuts, bolts, caps, etc. Push until approximately 6 in Line replacement. WARNING: Do not at any time let brake fluids, gasoline, petroleumbased products, penetrating lubricants, etc., come in contact with the eyelets in the string head housing. Cut one piece of trimmer line 18...
...;Stop the engine and disconnect the spark plug wire. Rotate the spool clockwise as necessary to check for straight shaft. Install line as screws, nuts, bolts, caps, etc. Push until approximately 6 in Line replacement. WARNING: Do not at any time let brake fluids, gasoline, petroleumbased products, penetrating lubricants, etc., come in contact with the eyelets in the string head housing. Cut one piece of trimmer line 18...
User Manual
Page 16
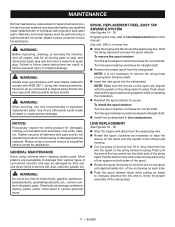
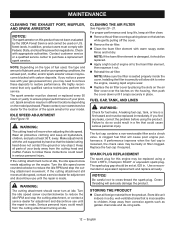
... repair is damaged, it snaps securely in place. Turn the idle speed screw counterclockwise to restore performance. If the cutting attachment still moves at least 50 ft. WARNING: The cutting attachment should never turn at idle, the idle speed screw needs adjusting on the engine. NOTE: If the foam filter element is made . Installing the filter incorrectly will cause poor engine performance. SPARK PLUG REPLACEMENT The spark plug for your operating conditions, the exhaust port, muffler, and/or spark arrestor screen...
... repair is damaged, it snaps securely in place. Turn the idle speed screw counterclockwise to restore performance. If the cutting attachment still moves at least 50 ft. WARNING: The cutting attachment should never turn at idle, the idle speed screw needs adjusting on the engine. NOTE: If the foam filter element is made . Installing the filter incorrectly will cause poor engine performance. SPARK PLUG REPLACEMENT The spark plug for your operating conditions, the exhaust port, muffler, and/or spark arrestor screen...

User Manual
Page 18
... 3. No spark. 2. Reset spark plug gap. Push primer bulb until the engine starts and runs. Clean air filter screen. Reset spark plug gap. Line is dirty. 3. See Figure 19. 1. Advance line at full throttle. No fuel. 3. Clean or replace spark plug. Use fresh fuel and the correct 2-cycle lubricant mix. (50:1). 2. Not enough line on carburetor needs adjustment. 1. Turn idle speed screw clockwise to the FULL CHOKE position. Operate trimmer at full throttle. English Air filter screen is tangled on and releasing spool retainer. 4. Engine starts, runs, and...
... 3. No spark. 2. Reset spark plug gap. Push primer bulb until the engine starts and runs. Clean air filter screen. Reset spark plug gap. Line is dirty. 3. See Figure 19. 1. Advance line at full throttle. No fuel. 3. Clean or replace spark plug. Use fresh fuel and the correct 2-cycle lubricant mix. (50:1). 2. Not enough line on carburetor needs adjustment. 1. Turn idle speed screw clockwise to the FULL CHOKE position. Operate trimmer at full throttle. English Air filter screen is tangled on and releasing spool retainer. 4. Engine starts, runs, and...

User Manual
Page 19
... use of Techtronic Industries North America, Inc. Proof of any warranty claim. Bump Knobs, Outer Spools, Cutting Lines, Inner Reels, Starter Pulleys, Starter Ropes, Drive Belts, Tines, Felt Washers, Hitch Pins, Mulching Blades, Blower Fans, Blower and Vacuum Tubes, Vacuum Bag and Straps, Guide Bars, Saw Chains, Blades Techtronic Industries North America, Inc., reserves the right to change or improve the design of purchase will be required by an authorized service center for parts...
... use of Techtronic Industries North America, Inc. Proof of any warranty claim. Bump Knobs, Outer Spools, Cutting Lines, Inner Reels, Starter Pulleys, Starter Ropes, Drive Belts, Tines, Felt Washers, Hitch Pins, Mulching Blades, Blower Fans, Blower and Vacuum Tubes, Vacuum Bag and Straps, Guide Bars, Saw Chains, Blades Techtronic Industries North America, Inc., reserves the right to change or improve the design of purchase will be required by an authorized service center for parts...

User Manual 5
Page 1
... REEL-EASY™ Trimmer Head installs differently on each side. INSTALLATION CHART If the trimmer head does not fit with any of attachment you cannot identify the style and type of the functions described in these instructions, take your unit to determine if you have . Stop the string trimmer and remove battery pack or disconnect spark plug wire before using this accessory. Line (16 ft.), Locking Pin and Operator's Manual INSTALLING TRIMMER HEAD See Figures...
... REEL-EASY™ Trimmer Head installs differently on each side. INSTALLATION CHART If the trimmer head does not fit with any of attachment you cannot identify the style and type of the functions described in these instructions, take your unit to determine if you have . Stop the string trimmer and remove battery pack or disconnect spark plug wire before using this accessory. Line (16 ft.), Locking Pin and Operator's Manual INSTALLING TRIMMER HEAD See Figures...
User Manual 5
Page 2
... shaft models, insert silver nut and turn upper housing counterclockwise. NOTE: Hold the spool by the knob while completing the installation. Install line as described in the arbor. of the guide with the arrows on each side. CURVED SHAFT STRAIGHT SHAFT ARBOR SPACER UPPER HOUSING SPRING WHITE LINE GUIDE SPOOL BLACK BOLT KNOB LOWER HOUSING ARBOR SPACER UPPER HOUSING SPRING WHITE LINE GUIDE SPOOL SILVER BOLT KNOB LOWER HOUSING Fig. 5 CURVED SHAFT STRAIGHT SHAFT UPPER HOUSING LOCKING PIN SILVER NUT SPRING BLACK LINE GUIDE SPOOL FLANGE WASHER UPPER HOUSING...
... shaft models, insert silver nut and turn upper housing counterclockwise. NOTE: Hold the spool by the knob while completing the installation. Install line as described in the arbor. of the guide with the arrows on each side. CURVED SHAFT STRAIGHT SHAFT ARBOR SPACER UPPER HOUSING SPRING WHITE LINE GUIDE SPOOL BLACK BOLT KNOB LOWER HOUSING ARBOR SPACER UPPER HOUSING SPRING WHITE LINE GUIDE SPOOL SILVER BOLT KNOB LOWER HOUSING Fig. 5 CURVED SHAFT STRAIGHT SHAFT UPPER HOUSING LOCKING PIN SILVER NUT SPRING BLACK LINE GUIDE SPOOL FLANGE WASHER UPPER HOUSING...


