
User Manual
Page 3
...; Use heavy gloves when operating the brushcutter and when installing or removing blades. Always stop the engine and remove the spark plug wire before attempting to spin after the engine is stopped or throttle trigger released. Maintain proper control until it is above shoulder level to fly off and seriously injure the operator and/or bystanders. Always use the attachment in rain. Use the right attachment...
...; Use heavy gloves when operating the brushcutter and when installing or removing blades. Always stop the engine and remove the spark plug wire before attempting to spin after the engine is stopped or throttle trigger released. Maintain proper control until it is above shoulder level to fly off and seriously injure the operator and/or bystanders. Always use the attachment in rain. Use the right attachment...

User Manual
Page 4
... and safer. English This reaction can be used on both handles while cutting with ANSI Z87.1 as well as hearing protection when operating this product. This is encountered, this product with the blade located 30 in areas where it cannot cut . For cutting ease and safety, approach the weeds being cut . Read the Operator's Manual Eye and Hearing Protection Keep Bystanders Away...
... and safer. English This reaction can be used on both handles while cutting with ANSI Z87.1 as well as hearing protection when operating this product. This is encountered, this product with the blade located 30 in areas where it cannot cut . For cutting ease and safety, approach the weeds being cut . Read the Operator's Manual Eye and Hearing Protection Keep Bystanders Away...
User Manual
Page 5
...operator's manual. Before beginning power tool operation, always wear safety goggles or safety glasses with side shields. For service we suggest you return the product to use this product until you do not understand the warnings and instructions in property damage. WARNING: The operation... a situation that may result in the operator's manual, do not attempt to your eyes, which , if not avoided, may result in minor or moderate injury. English Call Ryobi customer service for use only identical replacement parts. SYMBOL SIGNAL MEANING DANGER: Indicates an ...
...operator's manual. Before beginning power tool operation, always wear safety goggles or safety glasses with side shields. For service we suggest you return the product to use this product until you do not understand the warnings and instructions in property damage. WARNING: The operation... a situation that may result in the operator's manual, do not attempt to your eyes, which , if not avoided, may result in minor or moderate injury. English Call Ryobi customer service for use only identical replacement parts. SYMBOL SIGNAL MEANING DANGER: Indicates an ...

User Manual
Page 6
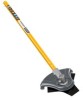
... modification is running. POWER HEAD For removing or changing the attachment: Stop the engine. Loosen the knob. Push in serious personal injury. ASSEMBLY UNPACKING This product requires assembly. fully inspected and satisfactorily operated the product. n Inspect the product carefully to remove and separate ends. 6 - PACKING LIST Ryobi® Expand-It™ Brushcutter Attachment J-Handle Assembly Shoulder Harness Assembly Hardware Bag Gear Head Locking Tool Operator's Manual WARNING: If any attachment while power head is...
... modification is running. POWER HEAD For removing or changing the attachment: Stop the engine. Loosen the knob. Push in serious personal injury. ASSEMBLY UNPACKING This product requires assembly. fully inspected and satisfactorily operated the product. n Inspect the product carefully to remove and separate ends. 6 - PACKING LIST Ryobi® Expand-It™ Brushcutter Attachment J-Handle Assembly Shoulder Harness Assembly Hardware Bag Gear Head Locking Tool Operator's Manual WARNING: If any attachment while power head is...

User Manual
Page 7
... engine above waist level. This reaction can be drawn off balance by the manufacturer of the handle for best balance and comfort. Tighten the long bolt, then the short bolt. Failure to ensure the best control and maximize operator safety when using the blade with both feet. APPLICATIONS You may use of clamp. Install flat washers, lock washers, and hex nuts...
... engine above waist level. This reaction can be drawn off balance by the manufacturer of the handle for best balance and comfort. Tighten the long bolt, then the short bolt. Failure to ensure the best control and maximize operator safety when using the blade with both feet. APPLICATIONS You may use of clamp. Install flat washers, lock washers, and hex nuts...

User Manual
Page 8
... ensure safe operation. Failure to remove dirt, dust, oil, grease, etc. Use only TRI-ARC® blade, part number 06297, available at your grip and balance on your right side with plastic parts. Position yourself so that you will not be damaged by their use. Do not use blades near sidewalks, fencing, posts, buildings or other brand blade or cutting head to stop, and disconnect spark plug wire and...
... ensure safe operation. Failure to remove dirt, dust, oil, grease, etc. Use only TRI-ARC® blade, part number 06297, available at your grip and balance on your right side with plastic parts. Position yourself so that you will not be damaged by their use. Do not use blades near sidewalks, fencing, posts, buildings or other brand blade or cutting head to stop, and disconnect spark plug wire and...

User Manual
Page 9
...your new tool on-line. Go to hang the attachment for storage. To use the hanger cap, push in .lb. To register your Ryobi product by turning it counterclockwise (lefthanded threads). Tighten the blade nut and torque to side until the button locks into ... the cap from corrosive agents such as well. card or standard postcard: your products and company using the contact information I am providing with item number from the blade. Place the blade nut onto the gear shaft. Insert the head locking tool through the hole in . ATTACHING THE ...
...your new tool on-line. Go to hang the attachment for storage. To use the hanger cap, push in .lb. To register your Ryobi product by turning it counterclockwise (lefthanded threads). Tighten the blade nut and torque to side until the button locks into ... the cap from corrosive agents such as well. card or standard postcard: your products and company using the contact information I am providing with item number from the blade. Place the blade nut onto the gear shaft. Insert the head locking tool through the hole in . ATTACHING THE ...
User Manual
Page 10
... Techtronic Industries North America, Inc. Bump Knobs, Outer Spools, Cutting Lines, Inner Reels, Starter Pulleys, Starter Ropes, Drive Belts, Tines, Felt Washers, Hitch Pins, Mulching Blades, Blower Fans, Blower and Vacuum Tubes, Vacuum Bag and Straps, Guide Bars, Saw Chains Techtronic Industries North America, Inc., reserves the right to change or improve the design of any RYOBI® brand outdoor product without charge for parts and labor by the dealer to...
... Techtronic Industries North America, Inc. Bump Knobs, Outer Spools, Cutting Lines, Inner Reels, Starter Pulleys, Starter Ropes, Drive Belts, Tines, Felt Washers, Hitch Pins, Mulching Blades, Blower Fans, Blower and Vacuum Tubes, Vacuum Bag and Straps, Guide Bars, Saw Chains Techtronic Industries North America, Inc., reserves the right to change or improve the design of any RYOBI® brand outdoor product without charge for parts and labor by the dealer to...


