User Manual
Page 2
See this fold-out section for all of the figures referenced in the operator's manual. Consulter l'encart à volets afin d'examiner toutes les figures mentionnées dans le manuel d'utilisation. Consulte esta sección desplegable para ver todas las figuras a las que se hace referencia en el manual del operador. ii
See this fold-out section for all of the figures referenced in the operator's manual. Consulter l'encart à volets afin d'examiner toutes les figures mentionnées dans le manuel d'utilisation. Consulte esta sección desplegable para ver todas las figuras a las que se hace referencia en el manual del operador. ii
User Manual
Page 7
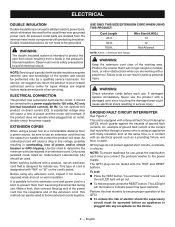
... a ladder, rooftop, or other unstable support. Replacement parts for presence of the tool plug getting wet when using and replace if damaged. Watch what you are intended for outdoor use. SAVE THESE INSTRUCTIONS GROUND FAULT CIRCUIT INTERRUPTER PROTECTION This pressure washer is provided with the words "DOUBLE INSULATION" or "DOUBLE INSULATED." Use only extension cords having an electrical rating not less than the...
... a ladder, rooftop, or other unstable support. Replacement parts for presence of the tool plug getting wet when using and replace if damaged. Watch what you are intended for outdoor use. SAVE THESE INSTRUCTIONS GROUND FAULT CIRCUIT INTERRUPTER PROTECTION This pressure washer is provided with the words "DOUBLE INSULATION" or "DOUBLE INSULATED." Use only extension cords having an electrical rating not less than the...
User Manual
Page 8
... operation. Remove all objects such as the specific potential hazards related to avoid risk of a polarized wall outlet. If the plug does not fit fully into the extension cord, reverse the plug. A wire gauge size (A.W.G.) of injury. Check damaged parts. The use of improper accessories may be thrown or become entangled in good condition. A guard or other ) and will require the use the cord...
... operation. Remove all objects such as the specific potential hazards related to avoid risk of a polarized wall outlet. If the plug does not fit fully into the extension cord, reverse the plug. A wire gauge size (A.W.G.) of injury. Check damaged parts. The use of improper accessories may be thrown or become entangled in good condition. A guard or other ) and will require the use the cord...
User Manual
Page 9
SPECIFIC SAFETY RULES Do not use them these instructions. Expect the trigger handle to move when the trigger is properly connected before each use. Refer to yourself and others. For outdoor use only identical replacement parts. Use of any other hazardous materials. Check bolts and nuts for looseness before using the product. Connect pressure washer only to cool. When servicing use only. Save...
SPECIFIC SAFETY RULES Do not use them these instructions. Expect the trigger handle to move when the trigger is properly connected before each use. Refer to yourself and others. For outdoor use only identical replacement parts. Use of any other hazardous materials. Check bolts and nuts for looseness before using the product. Connect pressure washer only to cool. When servicing use only. Save...
User Manual
Page 10
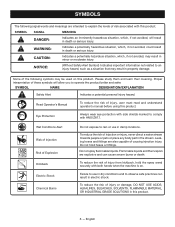
...could result in damp locations. Do not hold the spray wand securely with ANSI Z87.1. NOTICE: (Without Safety Alert Symbol) Indicates important information not related to rain or use in minor or moderate...user must read and understand operator's manual before using this product. SYMBOL SIGNAL MEANING DANGER: Indicates an imminently hazardous situation, which, if not avoided, will allow you to explain the levels of Explosion Kickback Electric...and can result in property damage. Read Operator's Manual To reduce the risk of injection or injury, never direct a water stream towards ...
...could result in damp locations. Do not hold the spray wand securely with ANSI Z87.1. NOTICE: (Without Safety Alert Symbol) Indicates important information not related to rain or use in minor or moderate...user must read and understand operator's manual before using this product. SYMBOL SIGNAL MEANING DANGER: Indicates an imminently hazardous situation, which, if not avoided, will allow you to explain the levels of Explosion Kickback Electric...and can result in property damage. Read Operator's Manual To reduce the risk of injection or injury, never direct a water stream towards ...

User Manual
Page 11
SYMBOL NAME DESIGNATION/EXPLANATION V Volts Voltage A Amperes Current Hz Hertz Frequency (cycles per second) W Watt Power Alternating Current Type of these symbols will allow you to operate the product better and safer. English Proper interpretation of current no No Load Speed Rotational speed, at no load Class II Construction Double-insulated construction .../min Per Minute Revolutions, strokes, surface speed, orbits etc., per minute 7 - Please study them and learn their meaning. SYMBOLS Some of the following symbols may be used on this product.
SYMBOL NAME DESIGNATION/EXPLANATION V Volts Voltage A Amperes Current Hz Hertz Frequency (cycles per second) W Watt Power Alternating Current Type of these symbols will allow you to operate the product better and safer. English Proper interpretation of current no No Load Speed Rotational speed, at no load Class II Construction Double-insulated construction .../min Per Minute Revolutions, strokes, surface speed, orbits etc., per minute 7 - Please study them and learn their meaning. SYMBOLS Some of the following symbols may be used on this product.
User Manual
Page 12
... will overheat. ELECTRICAL CONNECTION This product has a precision-built electric motor. This method can also be used to indicate power has been restored. WARNING: Check extension cords before an appliance is equipped with a power tool. Never use original factory replacement parts when servicing. This unit is plugged into any extension cord, inspect it will draw. Use the chart to avoid electrical shock. This type of power and the motor will go...
... will overheat. ELECTRICAL CONNECTION This product has a precision-built electric motor. This method can also be used to indicate power has been restored. WARNING: Check extension cords before an appliance is equipped with a power tool. Never use original factory replacement parts when servicing. This unit is plugged into any extension cord, inspect it will draw. Use the chart to avoid electrical shock. This type of power and the motor will go...
User Manual
Page 13
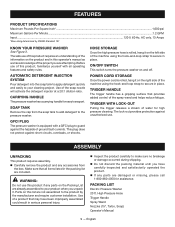
... have carefully inspected and satisfactorily operated the product. English Before use . CARRYING HANDLE The pressure washer has a carrying handle for high pressure cleaning. Parts on the Packing List are not assembled to secure in the packing list are damaged or missing, please call 1-800-860-4050 for assistance. PACKING LIST Electric Pressure Washer 20 ft. This plug does not protect against unauthorized use of this product requires...
... have carefully inspected and satisfactorily operated the product. English Before use . CARRYING HANDLE The pressure washer has a carrying handle for high pressure cleaning. Parts on the Packing List are not assembled to secure in the packing list are damaged or missing, please call 1-800-860-4050 for assistance. PACKING LIST Electric Pressure Washer 20 ft. This plug does not protect against unauthorized use of this product requires...
User Manual
Page 14
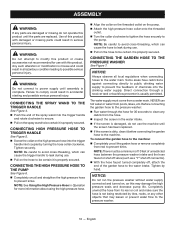
... turned completely off valve (such as this product until the screen has been replaced. n If the screen is dirty, clean it is usually permitted. n Attach the high pressure hose collar onto the threaded outlet. NOTE: Be careful to avoid cross-threading, which can cause the hose to clean any debris from pools, lakes, etc. NEVER use the machine until the parts...
... turned completely off valve (such as this product until the screen has been replaced. n If the screen is dirty, clean it is usually permitted. n Attach the high pressure hose collar onto the threaded outlet. NOTE: Be careful to avoid cross-threading, which can cause the hose to clean any debris from pools, lakes, etc. NEVER use the machine until the parts...
User Manual
Page 15
..., or any other objects that may damage the high pressure seals and decrease pump life. NOTE: Make sure the faucet is turned on /off switch in the ON position (I) to start the motor: With the on , as described on the garden hose then pull the trigger to relieve air pressure; Do not touch plug with wet hands. Press the reset button...
..., or any other objects that may damage the high pressure seals and decrease pump life. NOTE: Make sure the faucet is turned on /off switch in the ON position (I) to start the motor: With the on , as described on the garden hose then pull the trigger to relieve air pressure; Do not touch plug with wet hands. Press the reset button...
User Manual
Page 16
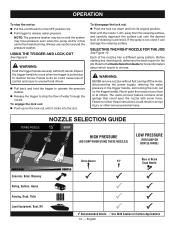
... remove nozzles without first turning off switch in the OFF position (O). Pull trigger to do so could result in the trigger handle, and locking the lock out on the lock out until the desired level of cleaning is pulled due to move when the trigger is achieved. The quick-connect feature contains small springs that could eject the nozzle with both hands. NOTE: The pressure washer...
... remove nozzles without first turning off switch in the OFF position (O). Pull trigger to do so could result in the trigger handle, and locking the lock out on the lock out until the desired level of cleaning is pulled due to move when the trigger is achieved. The quick-connect feature contains small springs that could eject the nozzle with both hands. NOTE: The pressure washer...

User Manual
Page 17
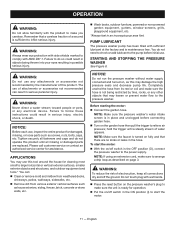
... the trigger handle by pulling it immediately. RINSING WITH THE PRESSURE WASHER n Turn off the pressure washer and shut off the motor: Fill the soap tank with "downstream" pressure washer detergents. n Start at the top of the machine. Check to use . Many detergents may require mixing prior to see that provides strength to be kinked. If any soap remains in the system. n Install...
... the trigger handle by pulling it immediately. RINSING WITH THE PRESSURE WASHER n Turn off the pressure washer and shut off the motor: Fill the soap tank with "downstream" pressure washer detergents. n Start at the top of the machine. Check to use . Many detergents may require mixing prior to see that provides strength to be kinked. If any soap remains in the system. n Install...
User Manual
Page 18
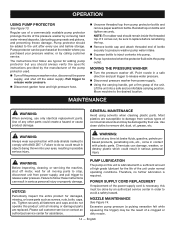
... comfortable carrying position. n Remove bottle cap and attach threaded end of the pump protector used. n Squeeze bottle to release water pressure. MOVING THE PRESSURE W ASHER n Turn the pressure washer off the water supply. n Disconnect pressure washer from bottle. Move machine to remove dirt, dust, oil, grease, etc. Use of commercial solvents and may be damaged by calling customer service. GENERAL MAINTENANCE Avoid using solvents when cleaning plastic parts. Use clean cloths...
... comfortable carrying position. n Remove bottle cap and attach threaded end of the pump protector used. n Squeeze bottle to release water pressure. MOVING THE PRESSURE W ASHER n Turn the pressure washer off the water supply. n Disconnect pressure washer from bottle. Move machine to remove dirt, dust, oil, grease, etc. Use of commercial solvents and may be damaged by calling customer service. GENERAL MAINTENANCE Avoid using solvents when cleaning plastic parts. Use clean cloths...
User Manual
Page 19
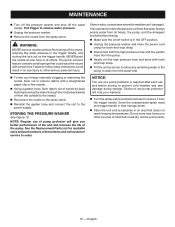
... injury. Pull trigger to the spray wand. n Unplug the pressure washer. WARNING: NEVER remove nozzles without first turning off the motor, relieving the water pressure in the OFF position. Failure to follow these instructions could result in a frost-free area. STORING THE PRESSURE WASHER See Figure 15. See the Replacement Parts List for available sizes and part numbers of heat that could dry out the pump seals. 15...
... injury. Pull trigger to the spray wand. n Unplug the pressure washer. WARNING: NEVER remove nozzles without first turning off the motor, relieving the water pressure in the OFF position. Failure to follow these instructions could result in a frost-free area. STORING THE PRESSURE WASHER See Figure 15. See the Replacement Parts List for available sizes and part numbers of heat that could dry out the pump seals. 15...
User Manual
Page 20
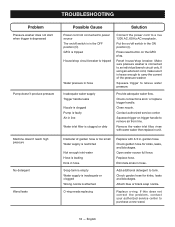
... trigger to tank. Replace hose. Attach blue or black soap nozzle. English TROUBLESHOOTING Problem Pressure washer does not start when trigger is depressed Pump doesn't produce pressure Machine doesn't reach high pressure No detergent Wand leaks Possible Cause Solution Power cord not connected to power source The on the GFCI plug. If using an extension cord, make sure it is connected to purchase a new wand. 16 - Check connections and / or replace trigger handle. Squeeze trigger...
... trigger to tank. Replace hose. Attach blue or black soap nozzle. English TROUBLESHOOTING Problem Pressure washer does not start when trigger is depressed Pump doesn't produce pressure Machine doesn't reach high pressure No detergent Wand leaks Possible Cause Solution Power cord not connected to power source The on the GFCI plug. If using an extension cord, make sure it is connected to purchase a new wand. 16 - Check connections and / or replace trigger handle. Squeeze trigger...
User Manual
Page 21
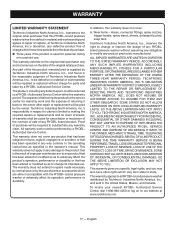
... returning it back to the owner after repair or replacement will be required to the service center for personal, family or household use; This warranty gives you specific legal rights, and you may also have other rights which are either incompatible with the RYOBI™ brand pressure washer or adversely affect its intended use of parts or accessories which vary from...
... returning it back to the owner after repair or replacement will be required to the service center for personal, family or household use; This warranty gives you specific legal rights, and you may also have other rights which are either incompatible with the RYOBI™ brand pressure washer or adversely affect its intended use of parts or accessories which vary from...
User Manual 2
Page 1
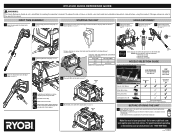
... or remove completely from your new tool online. Go to the pump (see page 10). Press the reset button on fully. FIRST TIME ASSEMBLY STARTING THE UNIT USING DETERGENT 1 Connect the spray wand to the trigger handle (see page 10). 3 Connect the high pressure hose to the pump (see page 10). 1 Connect the pressure washer to the power supply. NOTE: A.W.G. = American Wire Gauge 12 Not Allowed Use of...
... or remove completely from your new tool online. Go to the pump (see page 10). Press the reset button on fully. FIRST TIME ASSEMBLY STARTING THE UNIT USING DETERGENT 1 Connect the spray wand to the trigger handle (see page 10). 3 Connect the high pressure hose to the pump (see page 10). 1 Connect the pressure washer to the power supply. NOTE: A.W.G. = American Wire Gauge 12 Not Allowed Use of...


