

Operator's Manual
Page 2
Consulter l'encart à volets afin d'examiner toutes les figures mentionnées dans le manuel d'utilisation. ii Consulte esta sección desplegable para ver todas las figuras a las que se hace referencia en el manual del operador. See this fold-out section for all of the figures referenced in the operator's manual.
Consulter l'encart à volets afin d'examiner toutes les figures mentionnées dans le manuel d'utilisation. ii Consulte esta sección desplegable para ver todas las figuras a las que se hace referencia en el manual del operador. See this fold-out section for all of the figures referenced in the operator's manual.
Operator's Manual
Page 9
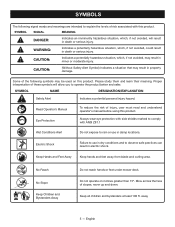
...Z87.1 Wet Conditions Alert Do not expose to rain or use in dry conditions and to use in electric shock. Read Operator's Manual Eye Protection To reduce the risk of these symbols will result in minor or moderate injury. Keep all children and bystanders... at least 100 ft. Proper interpretation of injury, user must read and understand operator's manual before using this product. SYMBOL NAME DESIGNATION/EXPLANATION Safety Alert Indicates a potential personal injury hazard. CAUTION: (Without Safety Alert Symbol) ...
...Z87.1 Wet Conditions Alert Do not expose to rain or use in dry conditions and to use in electric shock. Read Operator's Manual Eye Protection To reduce the risk of these symbols will result in minor or moderate injury. Keep all children and bystanders... at least 100 ft. Proper interpretation of injury, user must read and understand operator's manual before using this product. SYMBOL NAME DESIGNATION/EXPLANATION Safety Alert Indicates a potential personal injury hazard. CAUTION: (Without Safety Alert Symbol) ...
Operator's Manual
Page 11
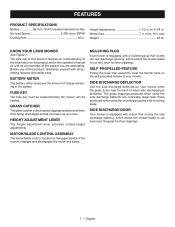
...in . Height Adjustments 1-1/2 in . Before use of this product requires an understanding of the information on the upper handle of this operator's manual as well as you are noticeably larger than those produced when using the side discharge deflector are attempting. HEIGHT ADJUSTMENT LEVER The height ... adjustments. MOTOR/BLADE CONTROL ASSEMBLY The motor/blade control, located on the product and in this product, familiarize yourself with all operating features and safety rules. The safe use of the mower, engages and disengages the motor and blade. BATTERY METER The battery ...
...in . Height Adjustments 1-1/2 in . Before use of this product requires an understanding of the information on the upper handle of this operator's manual as well as you are noticeably larger than those produced when using the side discharge deflector are attempting. HEIGHT ADJUSTMENT LEVER The height ... adjustments. MOTOR/BLADE CONTROL ASSEMBLY The motor/blade control, located on the product and in this product, familiarize yourself with all operating features and safety rules. The safe use of the mower, engages and disengages the motor and blade. BATTERY METER The battery ...
Operator's Manual
Page 12
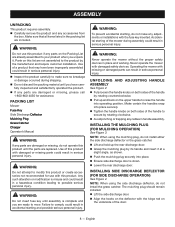
...; Lower the rear discharge door. WARNING: To prevent accidental starting, do not install the grass catcher. INSTALLING THE MULCHING PLUG (FOR MULCHING OPERATION) See Figure 3. WARNING: Do not attempt to secure by rotating clockwise. Avoid pinching or trapping any cables in serious ...Accidental starting and possible serious personal injury. PACKING LIST Mower Fuse Key Side Discharge Deflector Mulching Plug Grass Catcher Charger Operator's Manual WARNING: If any parts on both sides of the mower during shipping. Any such alteration or modification is complete ...
...; Lower the rear discharge door. WARNING: To prevent accidental starting, do not install the grass catcher. INSTALLING THE MULCHING PLUG (FOR MULCHING OPERATION) See Figure 3. WARNING: Do not attempt to secure by rotating clockwise. Avoid pinching or trapping any cables in serious ...Accidental starting and possible serious personal injury. PACKING LIST Mower Fuse Key Side Discharge Deflector Mulching Plug Grass Catcher Charger Operator's Manual WARNING: If any parts on both sides of the mower during shipping. Any such alteration or modification is complete ...
Operator's Manual
Page 15
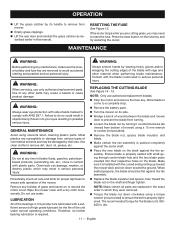
...the blade nut is 350400 in this product are replaced in the exact order in this manual. LUBRICATION All of the bearings in . The recommended torque for the life of the unit under normal operating conditions. REPLACING THE CUTTING BLADE See Figure 14 - 15. Make sure it counterclockwise (...as described earlier in which may be flat against the fan assembly. blade nut on the shaft against the fan assembly. OPERATION Lift the grass catcher by its side. Wedge a block of wood between the blade and mower deck to a complete ...
...the blade nut is 350400 in this product are replaced in the exact order in this manual. LUBRICATION All of the bearings in . The recommended torque for the life of the unit under normal operating conditions. REPLACING THE CUTTING BLADE See Figure 14 - 15. Make sure it counterclockwise (...as described earlier in which may be flat against the fan assembly. blade nut on the shaft against the fan assembly. OPERATION Lift the grass catcher by its side. Wedge a block of wood between the blade and mower deck to a complete ...
Operator's Manual
Page 16
... the wheel components to fail during use, which could result in serious personal injury to the operator and/ or mower or property damage. Reinstall wheel gear with a dry cloth. ...wheel gear. STORING THE MOWER See Figure 18. Remove the fuse key and store in the OPERATION section of the mower deck. Wipe the mower clean with new wheel. Replace ...mower on its side and clean grass clippings that accepts lead acid batteries. To ensure smooth operation of wheels, the wheel assembly should be used to secure. Charge the new battery pack before...
... the wheel components to fail during use, which could result in serious personal injury to the operator and/ or mower or property damage. Reinstall wheel gear with a dry cloth. ...wheel gear. STORING THE MOWER See Figure 18. Remove the fuse key and store in the OPERATION section of the mower deck. Wipe the mower clean with new wheel. Replace ...mower on its side and clean grass clippings that accepts lead acid batteries. To ensure smooth operation of wheels, the wheel assembly should be used to secure. Charge the new battery pack before...
Operator's Manual
Page 18
... is used for any product that has been subject to any product that has been operated in this operator's manual. English In addition, this product found in the United States and Canada. The warranty does not extend to all RYOBI® brand outdoor products manufactured by an authorized service center for more than one...
... is used for any product that has been subject to any product that has been operated in this operator's manual. English In addition, this product found in the United States and Canada. The warranty does not extend to all RYOBI® brand outdoor products manufactured by an authorized service center for more than one...

