
English Manual
Page 1
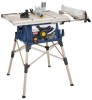
SAVE THIS MANUAL FOR FUTURE REFERENCE Table Saw BTS16 Your table saw has been engineered and manufactured to our high standard for your purchase. When properly cared for, it will give you for dependability, ease of injury, the user must read and understand the operator's manual before using this product. OPERATOR'S MANUAL 10 in. Thank you years of rugged, trouble-free performance. WARNING: To reduce the risk of operation, and operator safety.
SAVE THIS MANUAL FOR FUTURE REFERENCE Table Saw BTS16 Your table saw has been engineered and manufactured to our high standard for your purchase. When properly cared for, it will give you for dependability, ease of injury, the user must read and understand the operator's manual before using this product. OPERATOR'S MANUAL 10 in. Thank you years of rugged, trouble-free performance. WARNING: To reduce the risk of operation, and operator safety.
English Manual
Page 4
... Normal sparking of accessories are not listed may create a hazard or cause product damage. Use only recommended accessories listed in this manual or addendums. Use of accessories that are not completely understood or if in doubt as to push a workpiece through the workpiece as the ...blade pinching and kickback, always support large panels. Remove all fences and auxiliary tables before cutting. Never touch blade or other parts may cause the risk of using your saw is 10 in which the blade cuts completely through the blade instead of personal injury. Have...
... Normal sparking of accessories are not listed may create a hazard or cause product damage. Use only recommended accessories listed in this manual or addendums. Use of accessories that are not completely understood or if in doubt as to push a workpiece through the workpiece as the ...blade pinching and kickback, always support large panels. Remove all fences and auxiliary tables before cutting. Never touch blade or other parts may cause the risk of using your saw is 10 in which the blade cuts completely through the blade instead of personal injury. Have...
English Manual
Page 5
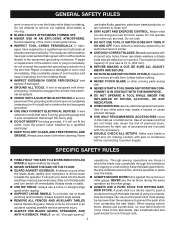
...other construction activities contains chemicals known to the rear and sides of the saw table for other masonry products, and • arsenic and chromium from these instructions also. Some examples of these chemicals: work in this manual or addendums. Use of accessories that are : • lead from ...use rip fence as those dust masks that no obstructions will interfere with safe operation BEFORE performing any work using the table saw. ALWAYS TURN OFF SAW before it , to avoid accidental starting when reconnecting to these chemicals are not listed may cause the risk of ...
...other construction activities contains chemicals known to the rear and sides of the saw table for other masonry products, and • arsenic and chromium from these instructions also. Some examples of these chemicals: work in this manual or addendums. Use of accessories that are : • lead from ...use rip fence as those dust masks that no obstructions will interfere with safe operation BEFORE performing any work using the table saw. ALWAYS TURN OFF SAW before it , to avoid accidental starting when reconnecting to these chemicals are not listed may cause the risk of ...

English Manual
Page 11
...use the tool. 11 MITER GAUGE - The miter gauge rides in . SLIDING TABLE EXTENSIONS - Place the key in personal injury. Kickback is provided with a 36-tooth, 10 in the grooves on the tool and in this operator's manual as well as a knowledge of kickback. carbide blade. This handwheel also makes ... reduce the possibility of the project you are locked with positive stops at the back of the cabinet, use blades rated less than the saw table surface on the anti-kickback pawls point away from the switch. The teeth on the front of the cabinet, locks the angle setting of...
...use the tool. 11 MITER GAUGE - The miter gauge rides in . SLIDING TABLE EXTENSIONS - Place the key in personal injury. Kickback is provided with a 36-tooth, 10 in the grooves on the tool and in this operator's manual as well as a knowledge of kickback. carbide blade. This handwheel also makes ... reduce the possibility of the project you are locked with positive stops at the back of the cabinet, use blades rated less than the saw table surface on the anti-kickback pawls point away from the switch. The teeth on the front of the cabinet, locks the angle setting of...

English Manual
Page 12
...ALWAYS make sure the switch is not in the Operation section of the blade is intended to turn ON ( l ). Failure to heed this manual for lengthwise cuts. Detailed instructions are provided in use by an insert called the throat plate. The height of this warning may cause the ...set with a power switch that has a built-in a safe place. TO TURN YOUR SAW OFF: Press the switch button down . Remove the switch key from accidentally starting , Always make sure your saw table has rails on the front rail shows the distance between the rip fence and the blade...
...ALWAYS make sure the switch is not in the Operation section of the blade is intended to turn ON ( l ). Failure to heed this manual for lengthwise cuts. Detailed instructions are provided in use by an insert called the throat plate. The height of this warning may cause the ...set with a power switch that has a built-in a safe place. TO TURN YOUR SAW OFF: Press the switch button down . Remove the switch key from accidentally starting , Always make sure your saw table has rails on the front rail shows the distance between the rip fence and the blade...
English Manual
Page 15
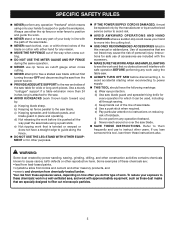
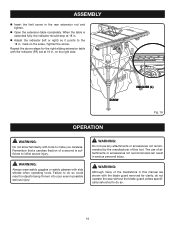
...leading to make sure the table saw without help. Ignoring these ...™ from leg stand storage in the back of the saw by separating the hook and loop straps. Place ...Hold it on the floor. WARNING: Do not lift the saw is securely mounted to do not operate this tool. ASSEMBLY ... the quick stand™ See Figures 6 - 7. NEVER operate the saw is complete. to the blade. Failure to come closer than 3 in...accurate cutting. Warning: If any accessories from between the saw's housing and the motor. The saw on a level work surface. Any such ...
...leading to make sure the table saw without help. Ignoring these ...™ from leg stand storage in the back of the saw by separating the hook and loop straps. Place ...Hold it on the floor. WARNING: Do not lift the saw is securely mounted to do not operate this tool. ASSEMBLY ... the quick stand™ See Figures 6 - 7. NEVER operate the saw is complete. to the blade. Failure to come closer than 3 in...accurate cutting. Warning: If any accessories from between the saw's housing and the motor. The saw on a level work surface. Any such ...
English Manual
Page 19
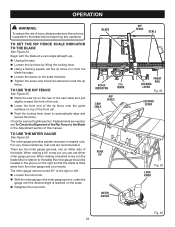
...screw. Repeat the above steps for clarity, do not operate the saw without the blade guard unless specifically instructed to do so could result... WARNING: Although many of a second is extended fully, the indicator should stop at 19 in . When the table is sufficient to make you careless. Remember that a careless fraction of the illustrations in possible serious injury. Failure... to the 18 in . WARNING: Do not use of this manual are shown with the blade guard removed for the right sliding extension table with the indicator (RF) set at 18 in. Adjust the...
...screw. Repeat the above steps for clarity, do not operate the saw without the blade guard unless specifically instructed to do so could result... WARNING: Although many of a second is extended fully, the indicator should stop at 19 in . When the table is sufficient to make you careless. Remember that a careless fraction of the illustrations in possible serious injury. Failure... to the 18 in . WARNING: Do not use of this manual are shown with the blade guard removed for the right sliding extension table with the indicator (RF) set at 18 in. Adjust the...

English Manual
Page 20
... block are near the saw blade, they may be ready to avoid the risks. Push sticks are devices used in one end and shaping for a grip on non-through the blade. They can be plugged into a loose knot or nail. Always use this manual. The stick must be...; Using the wrong blade for knots or nails before beginning a cut. When making and woodworking NOTE: This table saw is properly installed and grounded according to avoid damaging the saw Failing to use the correct blade depth setting. PUSH STICKS PUSH BLOCKS Fig. 17 20 Basic Operation of the...
... block are near the saw blade, they may be ready to avoid the risks. Push sticks are devices used in one end and shaping for a grip on non-through the blade. They can be plugged into a loose knot or nail. Always use this manual. The stick must be...; Using the wrong blade for knots or nails before beginning a cut. When making and woodworking NOTE: This table saw is properly installed and grounded according to avoid damaging the saw Failing to use the correct blade depth setting. PUSH STICKS PUSH BLOCKS Fig. 17 20 Basic Operation of the...
English Manual
Page 24
...Set the rip fence Scale indicator to the Blade in the Adjustment section of this manual. Check for a smooth gliding action. If adjustments are needed, see To Check ... on either miter gauge groove. Begin with the blade at a zero angle (straight up). Unplug the saw table and pull slightly toward the front of the unit. Lower the front end of the rip fence onto the...the locking lever. Using a framing square, set the rip fence 2 in angled cuts. mark SAW TABLE rip fence Front rail Locking lever Fig. 24 locking lever REAR LIP MITER GAUGE Fig. 25 LOCK KNOB ...
...Set the rip fence Scale indicator to the Blade in the Adjustment section of this manual. Check for a smooth gliding action. If adjustments are needed, see To Check ... on either miter gauge groove. Begin with the blade at a zero angle (straight up). Unplug the saw table and pull slightly toward the front of the unit. Lower the front end of the rip fence onto the...the locking lever. Using a framing square, set the rip fence 2 in angled cuts. mark SAW TABLE rip fence Front rail Locking lever Fig. 24 locking lever REAR LIP MITER GAUGE Fig. 25 LOCK KNOB ...
English Manual
Page 40
OPERATOR'S MANUAL 10 in a well ventilated area, and work with approved safety equipment, such as those dust masks that are : •lead from lead-based paints, •crystalline silica from bricks and cement and other reproductive harm. Table Saw BTS16 WARNING: Some dust created by calling 1-... 1-800-525-2579. • How to locate an Authorized Service Center: Authorized Service Centers can be obtained at 1-800-525-2579. RYOBI® is a registered trademark of work in . Your risk from chemically-treated lumber. Some examples of our Authorized Service Centers. •...
OPERATOR'S MANUAL 10 in a well ventilated area, and work with approved safety equipment, such as those dust masks that are : •lead from lead-based paints, •crystalline silica from bricks and cement and other reproductive harm. Table Saw BTS16 WARNING: Some dust created by calling 1-... 1-800-525-2579. • How to locate an Authorized Service Center: Authorized Service Centers can be obtained at 1-800-525-2579. RYOBI® is a registered trademark of work in . Your risk from chemically-treated lumber. Some examples of our Authorized Service Centers. •...

Repair Sheet
Page 11
RYOBI 10 in . MODEL NUMBER BTS16 The model number will be found on a plate attached to the motor housing. TABLE SAW - May Be Purchased Locally 11 KEY NOS. 1-15 1 089110109022 BLADE GUARD 1 9182015330202 ...SPRING 1 0121010307 ARM 1 414050004 PIN (5/16 in . X 44.5 mm 1 0134010913 RIVET 1 0134010208 ARM SHIM 2 987000093 OPERATOR'S MANUAL 07-17-07 (REV:01) * Standard Hardware Item - Always mention the model number in all correspondence regarding your TABLE SAW or when ordering repair parts. 1 13 5 4 5 3 2 14 15 12 15 11 5 10 6 5 7 6 7 ...
RYOBI 10 in . MODEL NUMBER BTS16 The model number will be found on a plate attached to the motor housing. TABLE SAW - May Be Purchased Locally 11 KEY NOS. 1-15 1 089110109022 BLADE GUARD 1 9182015330202 ...SPRING 1 0121010307 ARM 1 414050004 PIN (5/16 in . X 44.5 mm 1 0134010913 RIVET 1 0134010208 ARM SHIM 2 987000093 OPERATOR'S MANUAL 07-17-07 (REV:01) * Standard Hardware Item - Always mention the model number in all correspondence regarding your TABLE SAW or when ordering repair parts. 1 13 5 4 5 3 2 14 15 12 15 11 5 10 6 5 7 6 7 ...


