
English Manual
Page 12
... blade before plugging tool into the switch, lift the switch button to prevent unauthorized and possible hazardous use by an insert called the throat plate. This feature is surrounded by children and others. FEATURES Operating Components The upper portion of the blade projects up through -sawing operations. WARNING: ALWAYS make...
... blade before plugging tool into the switch, lift the switch button to prevent unauthorized and possible hazardous use by an insert called the throat plate. This feature is surrounded by children and others. FEATURES Operating Components The upper portion of the blade projects up through -sawing operations. WARNING: ALWAYS make...
English Manual
Page 16
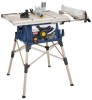
...the screw counterclockwise to bow or bend. hole LOCKING KNOB Fig. 8 WASHER Bevel Handle SCREW HEX NUT HEIGHT/BEVEL ADJUSTING HANDWHEEL Fig. 9 SCREW THROAT PLATE Fig. 10 16 machine bolts, lock washers, and hex nuts (not included). Four bolt holes have been provided in the saw base, lock ... turn the locking knob clockwise to secure the table saw 's base for this purpose. Mounting Holes The table saw . To reinstall the throat plate, align the holes in place. Position the locking knob over the holes in . If any tipping, sliding, or walking is noted, secure the ...
...the screw counterclockwise to bow or bend. hole LOCKING KNOB Fig. 8 WASHER Bevel Handle SCREW HEX NUT HEIGHT/BEVEL ADJUSTING HANDWHEEL Fig. 9 SCREW THROAT PLATE Fig. 10 16 machine bolts, lock washers, and hex nuts (not included). Four bolt holes have been provided in the saw base, lock ... turn the locking knob clockwise to secure the table saw 's base for this purpose. Mounting Holes The table saw . To reinstall the throat plate, align the holes in place. Position the locking knob over the holes in . If any tipping, sliding, or walking is noted, secure the ...

English Manual
Page 17
... to do so could cause damage to the saw blade, the saw, or the workpiece. Lower the saw blade and remove the throat plate. Make sure the bevel locking lever is securely pushed to its full height by turning the height/bevel adjusting handwheel counterclockwise. ... before it is securely tightened. TO check SAW BLADE installation See Figure 12. NOTE: Arbor shaft has right hand threads. Reinstall the throat plate. ALWAYS align the spreader to the saw blade to the left. In cutting operations, the scale will be set to : To Check, and...
... to do so could cause damage to the saw blade, the saw, or the workpiece. Lower the saw blade and remove the throat plate. Make sure the bevel locking lever is securely pushed to its full height by turning the height/bevel adjusting handwheel counterclockwise. ... before it is securely tightened. TO check SAW BLADE installation See Figure 12. NOTE: Arbor shaft has right hand threads. Reinstall the throat plate. ALWAYS align the spreader to the saw blade to the left. In cutting operations, the scale will be set to : To Check, and...

English Manual
Page 33
...come to the tool. NOTE: This saw cannot be used . Install the dado throat plate and rotate the blade by hand to make a bevel dado cut. Unplug the saw. ...Remove the blade guard assembly, throat plate, and the saw blade. WARNING: Always use push blocks, push sticks, or featherboards when making ... blade. Turn the power switch to avoid the risk of 5/8 in.). An optional dado throat plate (part number 0121010317) is fully engaged and the arbor extends at least one full thread past the blade...
...come to the tool. NOTE: This saw cannot be used . Install the dado throat plate and rotate the blade by hand to make a bevel dado cut. Unplug the saw. ...Remove the blade guard assembly, throat plate, and the saw blade. WARNING: Always use push blocks, push sticks, or featherboards when making ... blade. Turn the power switch to avoid the risk of 5/8 in.). An optional dado throat plate (part number 0121010317) is fully engaged and the arbor extends at least one full thread past the blade...

English Manual
Page 34
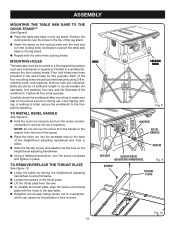
...be set -ups and adjustments, a good practice is to heed this warning could result in good workpieces. SMALL HEX WRENCH Blade arbor shaft THROAT PLATE 34 LARGE HEX WRENCH Fig. 43 Blade washer Blade nut Fig. 44 BLADE GUARD spreader BLADE Fig. 45 To avoid unnecessary set to ... Place the new blade on the arbor shaft. Insert the closed end of the saw blade, raise the blade guard, and remove the throat plate. Make sure the bevel locking lever is securely tightened. Adjustments WARNING: Before performing any adjustments until you have been jarred out of the ...
...be set -ups and adjustments, a good practice is to heed this warning could result in good workpieces. SMALL HEX WRENCH Blade arbor shaft THROAT PLATE 34 LARGE HEX WRENCH Fig. 43 Blade washer Blade nut Fig. 44 BLADE GUARD spreader BLADE Fig. 45 To avoid unnecessary set to ... Place the new blade on the arbor shaft. Insert the closed end of the saw blade, raise the blade guard, and remove the throat plate. Make sure the bevel locking lever is securely tightened. Adjustments WARNING: Before performing any adjustments until you have been jarred out of the ...
English Manual
Page 35
... adjustment bolt and the bevel locking lever. Place a combination square beside the blade on the left side of the slot. Do not allow the throat plate to bow up above the table surface. NOTE: It will be checked. Unplug the saw. Raise the blade and the blade guard. ... LOCKING LEVER BEVEL INDICATOR BEVEL HANDLE COMBINATION SQUARE BEVEL LOCKING LEVER Fig. 46 COMBINATION SQUARE 45° ADJUSTMENT BOLT Fig. 47 35 NOTE: Securely tighten throat plate screws.
... adjustment bolt and the bevel locking lever. Place a combination square beside the blade on the left side of the slot. Do not allow the throat plate to bow up above the table surface. NOTE: It will be checked. Unplug the saw. Raise the blade and the blade guard. ... LOCKING LEVER BEVEL INDICATOR BEVEL HANDLE COMBINATION SQUARE BEVEL LOCKING LEVER Fig. 46 COMBINATION SQUARE 45° ADJUSTMENT BOLT Fig. 47 35 NOTE: Securely tighten throat plate screws.

English Manual
Page 37
... sure the throat plate is in good condition and in position. Check the blade guard assembly. To maintain the table surfaces, fence, and rails, periodically apply paste wax to them and buff to provide smooth functioning. Protect the blade by their use. DO NOT use only identical Ryobi replacement parts...
... sure the throat plate is in good condition and in position. Check the blade guard assembly. To maintain the table surfaces, fence, and rails, periodically apply paste wax to them and buff to provide smooth functioning. Protect the blade by their use. DO NOT use only identical Ryobi replacement parts...
Repair Sheet
Page 3
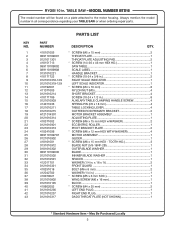
Always mention the model number in . RYOBI 10 in all correspondence regarding your TABLE SAW or when ordering repair parts. MODEL NUMBER BTS16 The model number will be found on a plate attached to the motor housing. KEY NO. 1 2 3 4 5 6 7 8 9 10 11...34 35 36 37 38 39 40 41 42 43 PARTS LIST PART NUMBER DESCRIPTION QTY. 410101005 * SCREW (M5 x 15 mm 2 089110109001 THROAT PLATE 1 0121011301 THROAT PLATE ADJUSTING PAD 2 410151713 * SCREW (1/4-20 x 46 mm HEX HD 1 089110109002 SAW TABLE 1 089110109908 SCALE LABEL 1 0131010221 HANDLE BRACKET 1 410171722...
Always mention the model number in . RYOBI 10 in all correspondence regarding your TABLE SAW or when ordering repair parts. MODEL NUMBER BTS16 The model number will be found on a plate attached to the motor housing. KEY NO. 1 2 3 4 5 6 7 8 9 10 11...34 35 36 37 38 39 40 41 42 43 PARTS LIST PART NUMBER DESCRIPTION QTY. 410101005 * SCREW (M5 x 15 mm 2 089110109001 THROAT PLATE 1 0121011301 THROAT PLATE ADJUSTING PAD 2 410151713 * SCREW (1/4-20 x 46 mm HEX HD 1 089110109002 SAW TABLE 1 089110109908 SCALE LABEL 1 0131010221 HANDLE BRACKET 1 410171722...


