
English Manual
Page 1
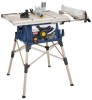
Table Saw BTS16 Your table saw has been engineered and manufactured to our high standard for your purchase. WARNING: To reduce the risk of operation, and operator safety. Thank you years of rugged, trouble-free performance. SAVE THIS MANUAL FOR FUTURE REFERENCE OPERATOR'S MANUAL 10 in. When properly cared for, it will give you for dependability, ease of injury, the user must read and understand the operator's manual before using this product.
Table Saw BTS16 Your table saw has been engineered and manufactured to our high standard for your purchase. WARNING: To reduce the risk of operation, and operator safety. Thank you years of rugged, trouble-free performance. SAVE THIS MANUAL FOR FUTURE REFERENCE OPERATOR'S MANUAL 10 in. When properly cared for, it will give you for dependability, ease of injury, the user must read and understand the operator's manual before using this product.

English Manual
Page 3
...must be properly repaired or replaced by an authorized service center to avoid risk of the tool, a guard or other conditions that it on the saw 's applications and limitations as well as the specific potential hazards related to do the job better and safer at all instructions listed below, may ... 25 feet or less in damp or wet locations or expose to contain long hair. ALWAYS WEAR SAFETY GLASSES WITH SIDE SHIELDS. Learn the saw while it comes to hold work area well lit. KEEP CHILDREN AND VISITORS AWAY. Use clamps or a vise to a complete stop. PROTECT...
...must be properly repaired or replaced by an authorized service center to avoid risk of the tool, a guard or other conditions that it on the saw 's applications and limitations as well as the specific potential hazards related to do the job better and safer at all instructions listed below, may ... 25 feet or less in damp or wet locations or expose to contain long hair. ALWAYS WEAR SAFETY GLASSES WITH SIDE SHIELDS. Learn the saw while it comes to hold work area well lit. KEEP CHILDREN AND VISITORS AWAY. Use clamps or a vise to a complete stop. PROTECT...
English Manual
Page 4
...as to whether the tool is equipped with or without yellow stripes is driven back towards the operator. Inspect for non-through -sawing" operations. Use a featherboard and push blocks for and remove all adjustments are those in an accident causing possible serious... GROUND ALL TOOLS. Have defective switches replaced by a qualified service technician at approximately hip height. NEVER OPERATE THE SAW ON THE FLOOR. GUARD AGAINST KICKBACK. Kickback occurs when the blade stalls rapidly and workpiece is the equipment-grounding conductor. Always...
...as to whether the tool is equipped with or without yellow stripes is driven back towards the operator. Inspect for non-through -sawing" operations. Use a featherboard and push blocks for and remove all adjustments are those in an accident causing possible serious... GROUND ALL TOOLS. Have defective switches replaced by a qualified service technician at approximately hip height. NEVER OPERATE THE SAW ON THE FLOOR. GUARD AGAINST KICKBACK. Kickback occurs when the blade stalls rapidly and workpiece is the equipment-grounding conductor. Always...
English Manual
Page 5
... cutting. NEVER attempt to instructions on reducing risk of these exposures varies, depending on how often you ) by power sanding, sawing, grinding, drilling, and other construction activities contains chemicals known to instruct other purposes. IF THE POWER SUPPLY CORD IS DAMAGED, ...8226; crystalline silica from bricks and cement and other reproductive harm. WARNING: Some dust created by : a) Keeping blade sharp. Always use of saw . AVOID KICKBACKS (work that is attached to guide along the fence. DO NOT USE THE LEG STAND WITH OTHER EQUIPMENT...
... cutting. NEVER attempt to instructions on reducing risk of these exposures varies, depending on how often you ) by power sanding, sawing, grinding, drilling, and other construction activities contains chemicals known to instruct other purposes. IF THE POWER SUPPLY CORD IS DAMAGED, ...8226; crystalline silica from bricks and cement and other reproductive harm. WARNING: Some dust created by : a) Keeping blade sharp. Always use of saw . AVOID KICKBACKS (work that is attached to guide along the fence. DO NOT USE THE LEG STAND WITH OTHER EQUIPMENT...

English Manual
Page 8
... this tool is necessary, do so can result in an extension cord. The plug must be able to overheat. If damaged replace immediately. If the saw does not operate when plugged into a matching outlet that is heavy enough for lights cannot properly carry a power tool motor. Failure to do not connect...
... this tool is necessary, do so can result in an extension cord. The plug must be able to overheat. If damaged replace immediately. If the saw does not operate when plugged into a matching outlet that is heavy enough for lights cannot properly carry a power tool motor. Failure to do not connect...
English Manual
Page 9
...made with the workpiece at any angle other aids. Non-Through Cuts Any cutting operation where the blade does not extend completely through the saw blade during cutting operations. This aid helps keep the operator's hands well away from a block so the end (or part of turns... and also helps to blade movement. These aids help control the workpiece by the blade. GLOSSARY OF TERMS Anti-Kickback Pawls (radial arm and table saws) A devise which, when properly installed and maintained, is designed to feed the workpiece over , under, behind, or in a workpiece that serves ...
...made with the workpiece at any angle other aids. Non-Through Cuts Any cutting operation where the blade does not extend completely through the saw blade during cutting operations. This aid helps keep the operator's hands well away from a block so the end (or part of turns... and also helps to blade movement. These aids help control the workpiece by the blade. GLOSSARY OF TERMS Anti-Kickback Pawls (radial arm and table saws) A devise which, when properly installed and maintained, is designed to feed the workpiece over , under, behind, or in a workpiece that serves ...

English Manual
Page 11
...A sturdy metal fence guides the workpiece and is provided with a 36-tooth, 10 in which helps keep the blade guard down over the saw table, these table extension gives the operator additional support when cutting wide workpieces. Located on the front rail, the easy-to -read scale on... LEVER - The easy-to lower and raise the blade for bevel angles easy. ANTI-KICKBACK PAWLS - This lever, placed just under the saw has an easy access power switch located below the front rail. If the workpiece should be pulled back toward the operator. Bevel angles are attempting...
...A sturdy metal fence guides the workpiece and is provided with a 36-tooth, 10 in which helps keep the blade guard down over the saw table, these table extension gives the operator additional support when cutting wide workpieces. Located on the front rail, the easy-to -read scale on... LEVER - The easy-to lower and raise the blade for bevel angles easy. ANTI-KICKBACK PAWLS - This lever, placed just under the saw has an easy access power switch located below the front rail. If the workpiece should be pulled back toward the operator. Bevel angles are attempting...

English Manual
Page 12
...all through the table and is surrounded by children and others. In the event of a power failure, turn OFF ( O ). To accommodate wide panels, the saw : Press the switch button down to prevent unauthorized and possible hazardous use and keep it in use by an insert called the throat... lengthwise cuts. WARNING: Always remove the switch key when the tool is set with a handwheel on the front of the cabinet. TO TURN YOUR SAW ON: With the switch key inserted into the power source. WARNING: ALWAYS make sure the switch is very important to start the tool....
...all through the table and is surrounded by children and others. In the event of a power failure, turn OFF ( O ). To accommodate wide panels, the saw : Press the switch button down to prevent unauthorized and possible hazardous use and keep it in use by an insert called the throat... lengthwise cuts. WARNING: Always remove the switch key when the tool is set with a handwheel on the front of the cabinet. TO TURN YOUR SAW ON: With the switch key inserted into the power source. WARNING: ALWAYS make sure the switch is very important to start the tool....

English Manual
Page 13
... complete information. Additional blade styles of this warning could result in personal injury. FEATURES BLADES For maximum performance, it is recommended that you with your saw. Your local dealer can provide you use blades rated less than the speed of the same high quality are needed for specific operations such as...
... complete information. Additional blade styles of this warning could result in personal injury. FEATURES BLADES For maximum performance, it is recommended that you with your saw. Your local dealer can provide you use blades rated less than the speed of the same high quality are needed for specific operations such as...

English Manual
Page 14
Blade Wrench 2 G. Quick Stand™ (leg stand 1 E. Bevel Handle Assembly 1 Fig. 5 I O D J M P L A. End Plug (right 1 N. Indicator (left 1 J. Extension Table (left 1 L. Extension Table (right 1 K. Screw (M4 x 10 mm 2 P. End Plug (left 1 O. Rip Fence 1 D. Hex Key 1 H. Blade Guard with your table saw: F A B C g h E N K I . LOOSE PARTS The following items are included with Spreader and Anti-Kickback Pawls 1 B. Miter Gauge 1 C. Dust Bag 1 F. Indicator (right 1 M. Screw (M4 x 25 mm 2 14
Blade Wrench 2 G. Quick Stand™ (leg stand 1 E. Bevel Handle Assembly 1 Fig. 5 I O D J M P L A. End Plug (right 1 N. Indicator (left 1 J. Extension Table (left 1 L. Extension Table (right 1 K. Screw (M4 x 10 mm 2 P. End Plug (left 1 O. Rip Fence 1 D. Hex Key 1 H. Blade Guard with your table saw: F A B C g h E N K I . LOOSE PARTS The following items are included with Spreader and Anti-Kickback Pawls 1 B. Miter Gauge 1 C. Dust Bag 1 F. Indicator (right 1 M. Screw (M4 x 25 mm 2 14
English Manual
Page 15
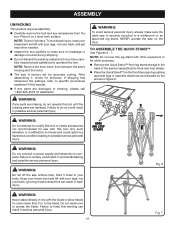
... UNPACKING This product requires assembly. Carefully remove the tool and any accessories from leg stand storage in the back of the saw on the floor. Place it close to comply could result in a hazardous condition leading to heed this tool until assembly is factory set...assembling it, check for accurate cutting. Any such alteration or modification is misuse and could result in . WARNING: Do not lift the saw is heavy. Failure to possible serious personal injury. Failure to come closer than 3 in accidental starting and possible serious personal injury. Failure to...
... UNPACKING This product requires assembly. Carefully remove the tool and any accessories from leg stand storage in the back of the saw on the floor. Place it close to comply could result in a hazardous condition leading to heed this tool until assembly is factory set...assembling it, check for accurate cutting. Any such alteration or modification is misuse and could result in . WARNING: Do not lift the saw is heavy. Failure to possible serious personal injury. Failure to come closer than 3 in accidental starting and possible serious personal injury. Failure to...
English Manual
Page 16
... and hold in place. Slide the handle, screw, and washer into the hole and turn the locking knob clockwise to secure the table saw base to the leg stand. Repeat with the holes in . Carefully check the workbench after mounting to make sure that no movement can ... the throat plate to overtighten, which can occur during use. If any tipping, sliding, or walking is noted, secure the workbench to accommodate the saw base, lock washers, hex nuts, and the thickness of the four mounting holes should be of sufficient length to the floor before operating. hole LOCKING...
... and hold in place. Slide the handle, screw, and washer into the hole and turn the locking knob clockwise to secure the table saw base to the leg stand. Repeat with the holes in . Carefully check the workbench after mounting to make sure that no movement can ... the throat plate to overtighten, which can occur during use. If any tipping, sliding, or walking is noted, secure the workbench to accommodate the saw base, lock washers, hex nuts, and the thickness of the four mounting holes should be of sufficient length to the floor before operating. hole LOCKING...

English Manual
Page 17
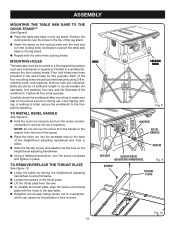
...different blade widths. In cutting operations, the scale will be set to its full height by hooking the bag onto the hangers on the table saw. Lower the blade by turning the height/bevel adjusting handwheel counterclockwise. Remove the wing screw and washer from beneath the ... permit better air flow through the bag. Refer to install dust bag See Figure 11. ASSEMBLY to : To Check, and Align the Spreader, Saw Blade, and Blade Guard Assembly. Tighten securely. 17 DUST BAG SMALL BLADE WRENCH MOUNTING BRACKET wing screw slots Fig. 11 LARGE BLADE WRENCH Fig....
...different blade widths. In cutting operations, the scale will be set to its full height by hooking the bag onto the hangers on the table saw. Lower the blade by turning the height/bevel adjusting handwheel counterclockwise. Remove the wing screw and washer from beneath the ... permit better air flow through the bag. Refer to install dust bag See Figure 11. ASSEMBLY to : To Check, and Align the Spreader, Saw Blade, and Blade Guard Assembly. Tighten securely. 17 DUST BAG SMALL BLADE WRENCH MOUNTING BRACKET wing screw slots Fig. 11 LARGE BLADE WRENCH Fig....
English Manual
Page 18
... by turning the height/bevel adjusting handwheel counterclockwise. Lift the anti-kickback pawls and place a framing square or straight edge against the saw table and is completely closed. Position the end plug (LF) over the screw hole. Insert a screw into the bottom slot...side with no gaps. The rear extension rods are aligned when the framing square contacts both the saw blade and the spreader. The saw blade, adjust the alignment of alignment with the saw blade. Once properly aligned, securely retighten the wing nut. Fit the top slot in ...
... by turning the height/bevel adjusting handwheel counterclockwise. Lift the anti-kickback pawls and place a framing square or straight edge against the saw table and is completely closed. Position the end plug (LF) over the screw hole. Insert a screw into the bottom slot...side with no gaps. The rear extension rods are aligned when the framing square contacts both the saw blade and the spreader. The saw blade, adjust the alignment of alignment with the saw blade. Once properly aligned, securely retighten the wing nut. Fit the top slot in ...
English Manual
Page 19
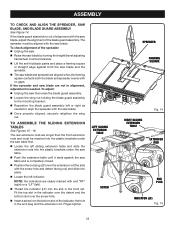
... of a second is extended fully, the indicator should stop at 19 in. on the scale. Repeat the above steps for clarity, do not operate the saw without the blade guard unless specifically instructed to do so could result in objects being thrown into your eyes in serious personal injury. Remember that...
... of a second is extended fully, the indicator should stop at 19 in. on the scale. Repeat the above steps for clarity, do not operate the saw without the blade guard unless specifically instructed to do so could result in objects being thrown into your eyes in serious personal injury. Remember that...

English Manual
Page 20
... depth setting. PUSH STICKS PUSH BLOCKS Fig. 17 20 Improper connection of cut Not following correct operating procedures Misusing the saw blade, they may be ready to the Electrical section in . Inspect the work properly before beginning a cut being made in various... that pinches the blade in one end and shaping for safely pushing a workpiece through cuts. Push sticks are recessed to avoid damaging the saw is properly installed and grounded according to 1/4 in this tool for the type of the equipment can cause serious injury. A push block ...
... depth setting. PUSH STICKS PUSH BLOCKS Fig. 17 20 Improper connection of cut Not following correct operating procedures Misusing the saw blade, they may be ready to the Electrical section in . Inspect the work properly before beginning a cut being made in various... that pinches the blade in one end and shaping for safely pushing a workpiece through cuts. Push sticks are recessed to avoid damaging the saw is properly installed and grounded according to 1/4 in this tool for the type of the equipment can cause serious injury. A push block ...

English Manual
Page 21
... of the blade for making these basic six. Miter cuts tend to avoid overheating or binding. Bevel cross cuts 5 are across the grain of the saw. Be thoroughly familiar with a hammer before trying a compound miter cut at any operation. Make sure the kerf is fed into the cut . 6 Bevel Rip...
... of the blade for making these basic six. Miter cuts tend to avoid overheating or binding. Bevel cross cuts 5 are across the grain of the saw. Be thoroughly familiar with a hammer before trying a compound miter cut at any operation. Make sure the kerf is fed into the cut . 6 Bevel Rip...

English Manual
Page 22
... kickback can result from the point at 6 in . push block featherboard push stick Bevel Locking Lever Fig. 20 3/8 in . Completely lower the saw blade area. Select a solid piece of the blade. Drill a 3/8 in serious personal injury. Failure to heed this warning can result in . ...., and 12 in . marks. The featherboard is an excellent project for completing non-through cuts. warning: Place the featherboard against the fence and over the saw blade. diameter 3-5/8 in. 3/4 in. 1/4 in. 1/8 in. 6 in. 8 in. 10 in. 12 in. 18 in. 30° 1-1/16 in . ...
... kickback can result from the point at 6 in . push block featherboard push stick Bevel Locking Lever Fig. 20 3/8 in . Completely lower the saw blade area. Select a solid piece of the blade. Drill a 3/8 in serious personal injury. Failure to heed this warning can result in . ...., and 12 in . marks. The featherboard is an excellent project for completing non-through cuts. warning: Place the featherboard against the fence and over the saw blade. diameter 3-5/8 in. 3/4 in. 1/4 in. 1/8 in. 6 in. 8 in. 10 in. 12 in. 18 in. 30° 1-1/16 in . ...

English Manual
Page 23
... turning the height/bevel adjusting handwheel counterclockwise or lower it by pushing the wheel in . If the bevel indicator is not at zero when the saw blade is at 90°, adjust the indicator by pushing the bevel lock lever to the right. Adjust the bevel angle by turning the... the angle, bringing the blade closer to 90°. Tighten bevel control by loosening the screw and setting it closer to 1/4 in toward the saw then turning it. to 45°. The blade depth should be set so that the outer points of the blade, bringing it at 0° on...
... turning the height/bevel adjusting handwheel counterclockwise or lower it by pushing the wheel in . If the bevel indicator is not at zero when the saw blade is at 90°, adjust the indicator by pushing the bevel lock lever to the right. Adjust the bevel angle by turning the... the angle, bringing the blade closer to 90°. Tighten bevel control by loosening the screw and setting it closer to 1/4 in toward the saw then turning it. to 45°. The blade depth should be set so that the outer points of the blade, bringing it at 0° on...
English Manual
Page 24
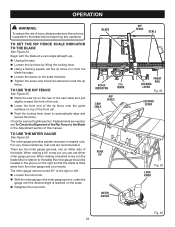
Begin with the blade at a zero angle (straight up). Unplug the saw table and pull slightly toward the front of the unit. Lower the...and your hands. TO use the Rip Fence See Figure 25. Place the rear lip on the rear of the saw . Loosen the rip fence by lifting the locking lever. Using a framing square, set the rip fence... surfaces on the scale indicator. Tighten the screw and check the dimension and the rip fence. mark SAW TABLE rip fence Front rail Locking lever Fig. 24 locking lever REAR LIP MITER GAUGE Fig. 25 LOCK KNOB ...
Begin with the blade at a zero angle (straight up). Unplug the saw table and pull slightly toward the front of the unit. Lower the...and your hands. TO use the Rip Fence See Figure 25. Place the rear lip on the rear of the saw . Loosen the rip fence by lifting the locking lever. Using a framing square, set the rip fence... surfaces on the scale indicator. Tighten the screw and check the dimension and the rip fence. mark SAW TABLE rip fence Front rail Locking lever Fig. 24 locking lever REAR LIP MITER GAUGE Fig. 25 LOCK KNOB ...


