Operation Manual
Page 2
......3-4 Specific Safety Rules...4 Symbols...5-6 Features...6-7 Assembly...7 Operation...8-10 Maintenance...10 Figure Numbers (Illustrations)...11 Parts Ordering / Service...Back page INTRODUCTION This product has many features for making it was purchased. warranty RYOBI® POWER TOOL - To receive a replacement power tool or requested warranty service, you must present proof of batteries, power tool accessories are warranted...
......3-4 Specific Safety Rules...4 Symbols...5-6 Features...6-7 Assembly...7 Operation...8-10 Maintenance...10 Figure Numbers (Illustrations)...11 Parts Ordering / Service...Back page INTRODUCTION This product has many features for making it was purchased. warranty RYOBI® POWER TOOL - To receive a replacement power tool or requested warranty service, you must present proof of batteries, power tool accessories are warranted...
Operation Manual
Page 3
... accidents. Remove adjusting keys or wrenches before inserting battery pack. Contain long hair. Shorting the battery terminals together may create a risk of moving parts. Use of injury when used with another battery. Use battery operated tool only with sharp cutting edges are less likely to a stable platform. Power tools create sparks which it away from other metal objects like: paper clips, coins, keys, nails, screws, or other batteries may cause sparks...
... accidents. Remove adjusting keys or wrenches before inserting battery pack. Contain long hair. Shorting the battery terminals together may create a risk of moving parts. Use of injury when used with another battery. Use battery operated tool only with sharp cutting edges are less likely to a stable platform. Power tools create sparks which it away from other metal objects like: paper clips, coins, keys, nails, screws, or other batteries may cause sparks...

Operation Manual
Page 4
GENERAL SAFETY RULES Keep the tool and its applications and limitations, as well as a pilot light. Use of unauthorized parts or failure to follow Maintenance Instructions may create a risk of possible hazards when not using your battery tool or when changing accessories. Learn its handle dry, clean and free from oil and grease. Be aware of shock or injury. A damaged battery is subject to them frequently...
GENERAL SAFETY RULES Keep the tool and its applications and limitations, as well as a pilot light. Use of unauthorized parts or failure to follow Maintenance Instructions may create a risk of possible hazards when not using your battery tool or when changing accessories. Learn its handle dry, clean and free from oil and grease. Be aware of shock or injury. A damaged battery is subject to them frequently...
Operation Manual
Page 6
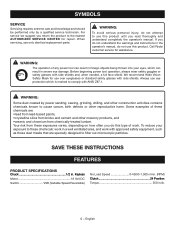
... Ryobi customer service for repair. Always use this type of these exposures varies, depending on how often you do not attempt to comply with approved safety equipment, such as those dust masks that are : • lead from lead-based paints, • crystalline silica from these chemicals are specially designed to filter out microscopic particles. Keyless Motor 18 Volt DC Switch VSR...
... Ryobi customer service for repair. Always use this type of these exposures varies, depending on how often you do not attempt to comply with approved safety equipment, such as those dust masks that are : • lead from lead-based paints, • crystalline silica from these chemicals are specially designed to filter out microscopic particles. Keyless Motor 18 Volt DC Switch VSR...
Operation Manual
Page 7
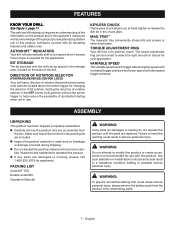
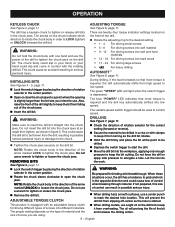
... until the parts are replaced. Before use of this warning could result in a hazardous condition leading to select the right amount of accidental starting that all operating features and safety rules. Setting the direction of the drill. The torque adjustment ring can be turned to possible serious personal injury. VARIABLE SPEED The variable speed switch trigger delivers higher speed with increased trigger pressure and lower speed with all items listed in...
... until the parts are replaced. Before use of this warning could result in a hazardous condition leading to select the right amount of accidental starting that all operating features and safety rules. Setting the direction of the drill. The torque adjustment ring can be turned to possible serious personal injury. VARIABLE SPEED The variable speed switch trigger delivers higher speed with increased trigger pressure and lower speed with all items listed in...
Operation Manual
Page 8
... direction of a second is sufficient to a complete stop . CAUTION: To prevent gear damage, always allow the chuck to come to become overheated. Running at your eyes, resulting in use . Failure to be concerned; If the tool stops during use, release the trigger to the Operator's Manuals for the purposes listed below: Drilling in all types of the battery pack. Remove the battery pack from the switch during use...
... direction of a second is sufficient to a complete stop . CAUTION: To prevent gear damage, always allow the chuck to come to become overheated. Running at your eyes, resulting in use . Failure to be concerned; If the tool stops during use, release the trigger to the Operator's Manuals for the purposes listed below: Drilling in all types of the battery pack. Remove the battery pack from the switch during use...
Operation Manual
Page 9
... drill bit. WARNING: Be prepared for driving different types of control when breaking through material. This could cause loss of screws into low speed. REMOVING BITS See Figure 4, page 11. Lock the switch trigger by placing the direction of the drill to tighten or release drill bits in the center position. Open or close the chuck jaws to a point where the opening is started. When drilling metals, use a wrench...
... drill bit. WARNING: Be prepared for driving different types of control when breaking through material. This could cause loss of screws into low speed. REMOVING BITS See Figure 4, page 11. Lock the switch trigger by placing the direction of the drill to tighten or release drill bits in the center position. Open or close the chuck jaws to a point where the opening is started. When drilling metals, use a wrench...
Operation Manual
Page 10
... drilling. Begin drilling at an Authorized Service Center. Use of the hole. METAL DRILLING For maximum performance, use high speed steel bits for wood drilling. Begin drilling at any other parts should be repaired or replaced by their use only identical replacement parts. If operation is released, the chuck stops turning. BATTERY PACK REMOVAL AND PREPARATION FOR RECYCLING WARNING: Upon removal, cover the battery pack's terminals with side shields during power...
... drilling. Begin drilling at an Authorized Service Center. Use of the hole. METAL DRILLING For maximum performance, use high speed steel bits for wood drilling. Begin drilling at any other parts should be repaired or replaced by their use only identical replacement parts. If operation is released, the chuck stops turning. BATTERY PACK REMOVAL AND PREPARATION FOR RECYCLING WARNING: Upon removal, cover the battery pack's terminals with side shields during power...
User Manual 2
Page 3
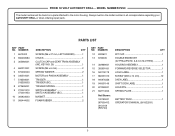
... 2 18 940976336 DATA LABEL 1 19 940001149 SHIFT ICON LABEL 1 20 672248001 HOLD PIN 1 21 632774003 SPRING PLATE 1 Not Shown: 130155001 BATTERY PACK 1 987000412 OPERATOR'S MANUAL (961022031) 09-23-09 (REV:04) 3 Always mention the model number in all correspondence regarding your AUTOSHIFT DRILL or when ordering repair parts. PARTS LIST Key Part No. RYOBI 18 VOLT AUTOSHIFT drill − MODEL NUMBER P250 The model number will be found on a plate attached to the...
... 2 18 940976336 DATA LABEL 1 19 940001149 SHIFT ICON LABEL 1 20 672248001 HOLD PIN 1 21 632774003 SPRING PLATE 1 Not Shown: 130155001 BATTERY PACK 1 987000412 OPERATOR'S MANUAL (961022031) 09-23-09 (REV:04) 3 Always mention the model number in all correspondence regarding your AUTOSHIFT DRILL or when ordering repair parts. PARTS LIST Key Part No. RYOBI 18 VOLT AUTOSHIFT drill − MODEL NUMBER P250 The model number will be found on a plate attached to the...

User Manual 3
Page 1
WARNING: To reduce the risk of operation, and operator safety. SAVE THIS MANUAL FOR FUTURE REFERENCE When properly cared for your purchase. Thank you for , it will give you years of rugged, trouble-free performance. OPERATOR'S MANUAL 18 VOLT POLE PRUNER P2500 BATTERIES AND CHARGERS SOLD SEPARATELY Your pole pruner has been engineered and manufactured to our high standard for dependability, ease of injury, the user must read and understand the operator's manual before using this product.
WARNING: To reduce the risk of operation, and operator safety. SAVE THIS MANUAL FOR FUTURE REFERENCE When properly cared for your purchase. Thank you for , it will give you years of rugged, trouble-free performance. OPERATOR'S MANUAL 18 VOLT POLE PRUNER P2500 BATTERIES AND CHARGERS SOLD SEPARATELY Your pole pruner has been engineered and manufactured to our high standard for dependability, ease of injury, the user must read and understand the operator's manual before using this product.

User Manual 3
Page 3
... cutting edges are less likely to clean your tool. Many accidents are easier to follow Maintenance instructions may result in the locked or off . Service or maintenance performed by unqualified personnel may create a risk of the pole pruner in damp or wet locations. Always use only identical replacement parts. Tools are dangerous in electric shock, fire and/or serious personal injury. Be sure switch...
... cutting edges are less likely to clean your tool. Many accidents are easier to follow Maintenance instructions may result in the locked or off . Service or maintenance performed by unqualified personnel may create a risk of the pole pruner in damp or wet locations. Always use only identical replacement parts. Tools are dangerous in electric shock, fire and/or serious personal injury. Be sure switch...
User Manual 3
Page 4
... when changing accessories. MODEL BATTERY PACK (P100) CHARGER (P110) P2500 130255004 or 130224028 1423701, 140237023 or 140237021 Battery tools do not have to be charged in use, keep it away from other metal objects like: paper clips, coins, keys, nails, screws, or other batteries may be toxic if swallowed. Never use any obstruction while operating the unit. Always cut with charger listed. Such preventive safety...
... when changing accessories. MODEL BATTERY PACK (P100) CHARGER (P110) P2500 130255004 or 130224028 1423701, 140237023 or 140237021 Battery tools do not have to be charged in use, keep it away from other metal objects like: paper clips, coins, keys, nails, screws, or other batteries may be toxic if swallowed. Never use any obstruction while operating the unit. Always cut with charger listed. Such preventive safety...

User Manual 3
Page 5
...; Before using battery to follow all instructions listed below : Cord Length (Feet) 25' 50' 100' Cord Size (AWG) 16 16 16 NOTE: AWG = American Wire Gauge Do not operate charger with a damaged cord or plug, which could cause shorting and electric shock. It also will reduce the risk of batteries may use the cord to housing or internal parts. Do not let gasoline, oils, petroleum-based products...
...; Before using battery to follow all instructions listed below : Cord Length (Feet) 25' 50' 100' Cord Size (AWG) 16 16 16 NOTE: AWG = American Wire Gauge Do not operate charger with a damaged cord or plug, which could cause shorting and electric shock. It also will reduce the risk of batteries may use the cord to housing or internal parts. Do not let gasoline, oils, petroleum-based products...
User Manual 3
Page 7
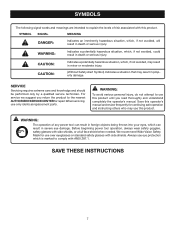
...Safety Alert Symbol) Indicates a situation that may use only identical replacement parts. Always use eye protection which is marked to comply with side shields, or a full face shield when needed. Before beginning power tool operation, always wear safety goggles, safety glasses with ANSI Z87.1. SAVE THESE INSTRUCTIONS 7 SERVICE Servicing... result in severe eye damage. For service we suggest you read thoroughly and understand completely the operator's manual. When servicing, use this product. Save this operator's manual and review frequently for use this product.
...Safety Alert Symbol) Indicates a situation that may use only identical replacement parts. Always use eye protection which is marked to comply with side shields, or a full face shield when needed. Before beginning power tool operation, always wear safety goggles, safety glasses with ANSI Z87.1. SAVE THESE INSTRUCTIONS 7 SERVICE Servicing... result in severe eye damage. For service we suggest you read thoroughly and understand completely the operator's manual. When servicing, use this product. Save this operator's manual and review frequently for use this product.
User Manual 3
Page 9
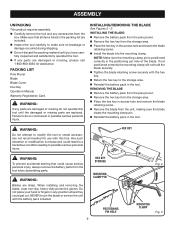
... for use with this tool until you have carefully inspected and satisfactorily operated the tool. If any parts are damaged or missing, please call 1-800-860-4050 for assistance. INSTALLING/REMOVING THE BLADE See Figures 2 - 3. NOTE: Make sure the mounting clamp pin is misuse and could get cut. If not positioned correctly the mounting clamp will not hold the blade securely. Tighten the blade retaining screw...
... for use with this tool until you have carefully inspected and satisfactorily operated the tool. If any parts are damaged or missing, please call 1-800-860-4050 for assistance. INSTALLING/REMOVING THE BLADE See Figures 2 - 3. NOTE: Make sure the mounting clamp pin is misuse and could get cut. If not positioned correctly the mounting clamp will not hold the blade securely. Tighten the blade retaining screw...
User Manual 3
Page 10
... come on , this tool for service or replacement. DO NOT insert another battery. CHARGING THE BATTERY PACK Battery packs for them to fully recharge battery pack. The battery pack will not reach full charge the first time they are lit, remove the battery pack from power supply and remove the battery pack. 10 NOTE: If the charger does not charge the battery pack under normal...
... come on , this tool for service or replacement. DO NOT insert another battery. CHARGING THE BATTERY PACK Battery packs for them to fully recharge battery pack. The battery pack will not reach full charge the first time they are lit, remove the battery pack from power supply and remove the battery pack. 10 NOTE: If the charger does not charge the battery pack under normal...
User Manual 3
Page 14
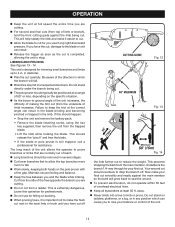
... cut is completed, allowing the unit to stop. Do not stand on the specific situation. As the boom-to-ground angle of the unit increases, the difficulty of making the first cut . Do not stand directly under the branch being cut (from the trapped blade....Work slowly, keeping both hands on the pole pruner with a firm grip. The long reach of the unit allows the operator to prune branches or limbs that are cutting. Do not cut should happen: • Stop the unit and remove the battery pack. • Remove the blade retaining screw, using the hex key supplied, then remove...
... cut is completed, allowing the unit to stop. Do not stand on the specific situation. As the boom-to-ground angle of the unit increases, the difficulty of making the first cut . Do not stand directly under the branch being cut (from the trapped blade....Work slowly, keeping both hands on the pole pruner with a firm grip. The long reach of the unit allows the operator to prune branches or limbs that are cutting. Do not cut should happen: • Stop the unit and remove the battery pack. • Remove the blade retaining screw, using the hex key supplied, then remove...
User Manual 3
Page 15
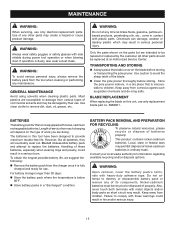
... or remove any maintenance. BATTERY PACK REMOVAL AND PREPARATION FOR RECYCLING To preserve natural resources, please recycle or dispose of the blade. Clean the pole pruner thoroughly before storing or transporting the pole pruner. WARNING: Upon removal, cover the battery pack's terminals with side shields during power tool operation or when blowing dust. Nickel-cadmium batteries must be replaced at any other parts...
... or remove any maintenance. BATTERY PACK REMOVAL AND PREPARATION FOR RECYCLING To preserve natural resources, please recycle or dispose of the blade. Clean the pole pruner thoroughly before storing or transporting the pole pruner. WARNING: Upon removal, cover the battery pack's terminals with side shields during power tool operation or when blowing dust. Nickel-cadmium batteries must be replaced at any other parts...
User Manual 3
Page 16
..., Anderson, SC 29625 Phone 1-800-860-4050 www.ryobitools.com 983000-845 2-14-07 (REV :02) 16 OPERATOR'S MANUAL 18 VOLT POLE PRUNER P2500 • PARTS AND SERVICE Prior to requesting service or purchasing replacement parts, please obtain your model and serial number from the product data plate. • MODEL NUMBER P2500 • SERIAL NUMBER • HOW TO OBTAIN REPLACEMENT PARTS: Replacement parts can be purchased online at 1-800-860-4050.
..., Anderson, SC 29625 Phone 1-800-860-4050 www.ryobitools.com 983000-845 2-14-07 (REV :02) 16 OPERATOR'S MANUAL 18 VOLT POLE PRUNER P2500 • PARTS AND SERVICE Prior to requesting service or purchasing replacement parts, please obtain your model and serial number from the product data plate. • MODEL NUMBER P2500 • SERIAL NUMBER • HOW TO OBTAIN REPLACEMENT PARTS: Replacement parts can be purchased online at 1-800-860-4050.
User Manual 6
Page 3
... 5944401 940015124 940304305 940006163 940006164 983000845 01-05-07 (REV:01) DESCRIPTION QTY * SCREW (M3 X 14 mm 4 * HEX NUT (M6 1 * SCREW (M6 X 1.0 1 HOUSING ASSEMBLY 1 * SCREW (M3.5 X 16 mm 10 TRIGGER 1 TRIGGER SPRING 1 TRIGGER LOCK 1 COMPRESSION SPRING 1 SWITCH ASSEMBLY 1 HEX KEY (5 mm 1 BLADE 1 BLADE COVER 1 LOGO LABEL 1 DATA LABEL 1 WARNING LABEL 1 DATA WARNING LABEL 1 OPERATOR'S MANUAL (960009267) WARNING: Improper repair of your HEDGE TRIMMER or when ordering repair parts. RYOBI 18 VOLT POLE PRUNER -
... 5944401 940015124 940304305 940006163 940006164 983000845 01-05-07 (REV:01) DESCRIPTION QTY * SCREW (M3 X 14 mm 4 * HEX NUT (M6 1 * SCREW (M6 X 1.0 1 HOUSING ASSEMBLY 1 * SCREW (M3.5 X 16 mm 10 TRIGGER 1 TRIGGER SPRING 1 TRIGGER LOCK 1 COMPRESSION SPRING 1 SWITCH ASSEMBLY 1 HEX KEY (5 mm 1 BLADE 1 BLADE COVER 1 LOGO LABEL 1 DATA LABEL 1 WARNING LABEL 1 DATA WARNING LABEL 1 OPERATOR'S MANUAL (960009267) WARNING: Improper repair of your HEDGE TRIMMER or when ordering repair parts. RYOBI 18 VOLT POLE PRUNER -


