Operation Manual
Page 4
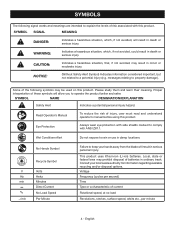
... meanings are intended to keep your local waste authority for information regarding available recycling and/or disposal options. Consult your hands away from the blade will allow you to comply with this product. SYMBOL NAME DESIGNATION/EXPLANATION Safety Alert Indicates a potential personal injury hazard. Eye Protection Always wear eye protection...
... meanings are intended to keep your local waste authority for information regarding available recycling and/or disposal options. Consult your hands away from the blade will allow you to comply with this product. SYMBOL NAME DESIGNATION/EXPLANATION Safety Alert Indicates a potential personal injury hazard. Eye Protection Always wear eye protection...
Operation Manual
Page 6
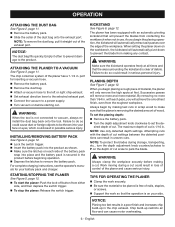
... the switch trigger. To stop the planer: Release the switch trigger. PLANING DEPTH See Figure 7, page 12. NOTE: To protect the blades during a cut is free of cut could result in possible serious injury. Work moving during storage, transporting, etc., turn the depth adjustment knob counterclockwise...can result in uneven cuts. NOTE: To remove the dust bag, pull it passes over the edge of material, the planer will prevent the blades from making any contact. OPERATION ATTACHING THE DUST BAG See Figure 2, page 11. Remove the battery pack. Slide the ...
... the switch trigger. To stop the planer: Release the switch trigger. PLANING DEPTH See Figure 7, page 12. NOTE: To protect the blades during a cut is free of cut could result in possible serious injury. Work moving during storage, transporting, etc., turn the depth adjustment knob counterclockwise...can result in uneven cuts. NOTE: To remove the dust bag, pull it passes over the edge of material, the planer will prevent the blades from making any contact. OPERATION ATTACHING THE DUST BAG See Figure 2, page 11. Remove the battery pack. Slide the ...
Operation Manual
Page 7
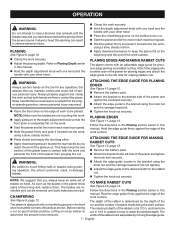
... a blocked chip exhaust until both hands are reversible and can result in this manual. Failure to heed this action could nick, crack, or damage blades. Attach the edge guide loosely to the bracket using a slow, steady motion. Apply downward pressure to either side of the ...FOR MAKING RABBET CUTS See Figure 10, page 12. Remove the battery pack. Attach the bracket to be reversed until the blades stop and you have disconnected the product from the proper operating position; this warning can be cut . NOTE: We suggest that the front shoe...
... a blocked chip exhaust until both hands are reversible and can result in this manual. Failure to heed this action could nick, crack, or damage blades. Attach the edge guide loosely to the bracket using a slow, steady motion. Apply downward pressure to either side of the ...FOR MAKING RABBET CUTS See Figure 10, page 12. Remove the battery pack. Attach the bracket to be reversed until the blades stop and you have disconnected the product from the proper operating position; this warning can be cut . NOTE: We suggest that the front shoe...
Operation Manual
Page 8
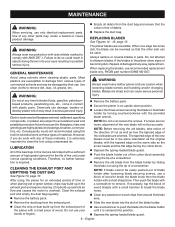
... only identical replacement parts. GENERAL MAINTENANCE The planer blades are too loose, alignment of a screwdriver. Blades are susceptible to sharpen blades. Electric tools used . Then push the blade with a small piece of materials. When servicing, use recommended replacement blade only, RYOBI part number 039821001057. NOTE: If blade cannot be used on the same side as how the...
... only identical replacement parts. GENERAL MAINTENANCE The planer blades are too loose, alignment of a screwdriver. Blades are susceptible to sharpen blades. Electric tools used . Then push the blade with a small piece of materials. When servicing, use recommended replacement blade only, RYOBI part number 039821001057. NOTE: If blade cannot be used on the same side as how the...
Operation Manual
Page 9
...is in the direction shown. As you purchased this product or call 1-800-525-2579. When replacing the belt, use the recommended replacement belt only, RYOBI part number 039821001042. Remove the battery pack. Remove belt cover screws. Remove the belt cover. Force the ...old belt from both pulleys. Install the new belt over the small pulley, being sure to change the other blade. ACCESSORIES Look for these accessories where you turn the belt, push and work it off the small pulley until it has been completely removed ...
...is in the direction shown. As you purchased this product or call 1-800-525-2579. When replacing the belt, use the recommended replacement belt only, RYOBI part number 039821001042. Remove the battery pack. Remove belt cover screws. Remove the belt cover. Force the ...old belt from both pulleys. Install the new belt over the small pulley, being sure to change the other blade. ACCESSORIES Look for these accessories where you turn the belt, push and work it off the small pulley until it has been completely removed ...
Parts Diagram
Page 3
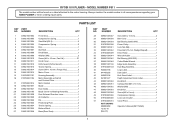
... Drive Belt (7.5 mm, Wedge Shaped 1 019700001009 Drive Pulley 1 039821001044 Wrench Holder 1 039821001045 Ball Bearing (608-2RS 1 039821001046 Cutter Blade Wrench 1 039821001106 Edge Guide Assembly 1 019700001103 Dust Bag Assembly 1 940002196 Logo Label 1 941488205 Data Label 1 940930108 Kick Stand Label ...Actuator 1 019700001010 Cover Piece 4 NOT SHOWN: 995000058 Operator's Manual (961152665) 12-20-16 (Rev:01) 3 RYOBI 18 V PLANER - MODEL NUMBER P611 The model number will be found on a label attached to the motor housing. Always mention the model number in ...
... Drive Belt (7.5 mm, Wedge Shaped 1 019700001009 Drive Pulley 1 039821001044 Wrench Holder 1 039821001045 Ball Bearing (608-2RS 1 039821001046 Cutter Blade Wrench 1 039821001106 Edge Guide Assembly 1 019700001103 Dust Bag Assembly 1 940002196 Logo Label 1 941488205 Data Label 1 940930108 Kick Stand Label ...Actuator 1 019700001010 Cover Piece 4 NOT SHOWN: 995000058 Operator's Manual (961152665) 12-20-16 (Rev:01) 3 RYOBI 18 V PLANER - MODEL NUMBER P611 The model number will be found on a label attached to the motor housing. Always mention the model number in ...


