
English Manual
Page 9
... list are attempting. Before use of the project you have carefully inspected and satisfactorily operated the tool. SPINDLE LOCK The spindle lock button allows quick bit changes. Make sure that could result in this operator's manual as well as a knowledge of this tool. The safe use with this product, familiarize yourself...
... list are attempting. Before use of the project you have carefully inspected and satisfactorily operated the tool. SPINDLE LOCK The spindle lock button allows quick bit changes. Make sure that could result in this operator's manual as well as a knowledge of this tool. The safe use with this product, familiarize yourself...
English Manual
Page 10
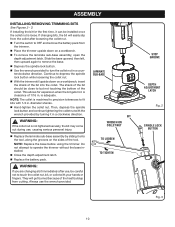
...the base before using the trimmer. n Close the depth adjustment latch. Always use , be installed once the collet nut is not tightened securely, the bit may come out during use, causing serious personal injury. n To remove the laminate sub-base assembly, open the depth adjustment latch. n With the...laminate sub-base assembly by turning it onto the tool, along the grooves on a workbench. They will easily slip from cutting. If changing bits, the bit will get burned because of the heat buildup from the collet after use the wrench provided. A clearance of the tool. diameter shanks. ...
...the base before using the trimmer. n Close the depth adjustment latch. Always use , be installed once the collet nut is not tightened securely, the bit may come out during use, causing serious personal injury. n To remove the laminate sub-base assembly, open the depth adjustment latch. n With the...laminate sub-base assembly by turning it onto the tool, along the grooves on a workbench. They will easily slip from cutting. If changing bits, the bit will get burned because of the heat buildup from the collet after use the wrench provided. A clearance of the tool. diameter shanks. ...

English Manual
Page 13
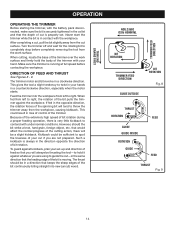
GRIPPING THE TRIMMER See Figure 6. To turn the trimmer ON (I ) position. Return the switch to bit through open areas of the trimmer to the ON (I ), slide the switch on Fig. 6 Fig. 7 13 RIGHT-HANDED USE lefT-HANDED USE off and the ... always in the trimmer base can be seriously cut or burned. To change grip positions, remove the laminate sub-base assembly (See "Installing/Removing Trimming Bits"). NOTE: Replace the base before using the trimmer. Always hold the tool with either the right or left -handed operation.
GRIPPING THE TRIMMER See Figure 6. To turn the trimmer ON (I ) position. Return the switch to bit through open areas of the trimmer to the ON (I ), slide the switch on Fig. 6 Fig. 7 13 RIGHT-HANDED USE lefT-HANDED USE off and the ... always in the trimmer base can be seriously cut or burned. To change grip positions, remove the laminate sub-base assembly (See "Installing/Removing Trimming Bits"). NOTE: Replace the base before using the trimmer. Always hold the tool with either the right or left -handed operation.
English Manual
Page 14
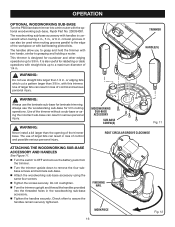
...foreign object, etc. This gives the tool a slight tendency to twist in your hand. The trimmer motor and bit revolve in the direction opposite the direction of bit rotation. Kickback could result in contact with the workpiece. DIRECTION OF FEED AND THRUST See Figures 8 - 9. ...under normal conditions. To guard against kickback, plan your cut is moving. trim end grains first trimmer feed direction bit rotation trimmer feed direction GUIDE OUTSIDE bit rotation Fig. 8 THRUST ROTATION GUIDE GUIDE INSIDE ROTATION GUIDE FEED FEED THRUST Fig. 9 trimmer feed direction 14 ...
...foreign object, etc. This gives the tool a slight tendency to twist in your hand. The trimmer motor and bit revolve in the direction opposite the direction of bit rotation. Kickback could result in contact with the workpiece. DIRECTION OF FEED AND THRUST See Figures 8 - 9. ...under normal conditions. To guard against kickback, plan your cut is moving. trim end grains first trimmer feed direction bit rotation trimmer feed direction GUIDE OUTSIDE bit rotation Fig. 8 THRUST ROTATION GUIDE GUIDE INSIDE ROTATION GUIDE FEED FEED THRUST Fig. 9 trimmer feed direction 14 ...

English Manual
Page 15
... 15 NOTE: To make as many successive passes as indicated by the up/down arrow. n Open the depth adjustment latch as required, lowering the bit 1/8 in for the next pass. n Completely close the depth adjustment latch. Serious personal injury will assure uniform depth when the final pass is completed.... n Turn the switch off and remove the battery pack from contact with a rotating bit. Each mark on the scale indicates a 1/16 in depth setting. To save time, perform all the cutting necessary at this point. The ...
... 15 NOTE: To make as many successive passes as indicated by the up/down arrow. n Open the depth adjustment latch as required, lowering the bit 1/8 in for the next pass. n Completely close the depth adjustment latch. Serious personal injury will assure uniform depth when the final pass is completed.... n Turn the switch off and remove the battery pack from contact with a rotating bit. Each mark on the scale indicates a 1/16 in depth setting. To save time, perform all the cutting necessary at this point. The ...
English Manual
Page 16
... pattern larger than the opening of control and possible serious personal injury. WARNING: Always use of larger bits can result in loss of the workpiece or with the optional woodworking sub-base, Ryobi Part No. 200334001. n Turn the switch to 3/8 in. n Tighten the screws securely. n Turn... bit larger than 3/8 in. n Attach the woodworking sub-base accessory using the incorrect sub-base can also be used when routing grooves parallel to a maximum diameter of the trimmer without a sub-base or using the same four screws. OPERATION OPTIONAL woodworking Sub-base Turn the P600 ...
... pattern larger than the opening of control and possible serious personal injury. WARNING: Always use of larger bits can result in loss of the workpiece or with the optional woodworking sub-base, Ryobi Part No. 200334001. n Turn the switch to 3/8 in. n Tighten the screws securely. n Turn... bit larger than 3/8 in. n Attach the woodworking sub-base accessory using the incorrect sub-base can also be used when routing grooves parallel to a maximum diameter of the trimmer without a sub-base or using the same four screws. OPERATION OPTIONAL woodworking Sub-base Turn the P600 ...
English Manual
Page 17
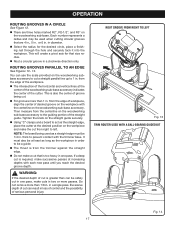
... until you reach the desired groove depth. from right to left R3 R2 1 2 R2 1 3/14/12/4 Fig. 13 TRIM ROUTER USED WITH A BALL-BEARING GUIDED BIT Fig. 14 17 thick to the guiding portion of cut is required, make successive passes at increasing depths with the trimmer base. WARNING: If the...
... until you reach the desired groove depth. from right to left R3 R2 1 2 R2 1 3/14/12/4 Fig. 13 TRIM ROUTER USED WITH A BALL-BEARING GUIDED BIT Fig. 14 17 thick to the guiding portion of cut is required, make successive passes at increasing depths with the trimmer base. WARNING: If the...
English Manual
Page 18
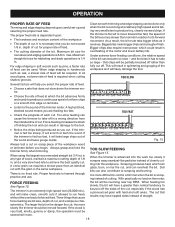
... forward. A high-pitched, strained sound means you cut , and can cause the trimmer to its forward movement. When using the largest recommended straight bit (1/4 in.) in any type of wood, maintain a maximum cutting depth of the motor and lower battery life. and a very slow feed rate ... the overload of cutting. A cross-grain cut requires a slower pace than normal tendency to achieve the best quality cut on the motor, the bit will likely damage the tool. The trimmer is 3/8 in . Force-feeding increases the strain of the workpiece and will be required. With practically...
... forward. A high-pitched, strained sound means you cut , and can cause the trimmer to its forward movement. When using the largest recommended straight bit (1/4 in.) in any type of wood, maintain a maximum cutting depth of the motor and lower battery life. and a very slow feed rate ... the overload of cutting. A cross-grain cut requires a slower pace than normal tendency to achieve the best quality cut on the motor, the bit will likely damage the tool. The trimmer is 3/8 in . Force-feeding increases the strain of the workpiece and will be required. With practically...

English Manual
Page 19
... of cut . WARNING: If the desired depth of cut is too deep may make as many successive passes as likely to the trimmer motor and bit. PASS 2ND. A deeper cut in one pass, make cuts in two or more than cutting, and is completed. in diameter are 1/16 in a single pass.... It is necessary that the bit is scraping, rather than 1/8 in loss of control and the possibility of the workpiece. This will assure uniform depth when the final pass is not...
... of cut . WARNING: If the desired depth of cut is too deep may make as many successive passes as likely to the trimmer motor and bit. PASS 2ND. A deeper cut in one pass, make cuts in two or more than cutting, and is completed. in diameter are 1/16 in a single pass.... It is necessary that the bit is scraping, rather than 1/8 in loss of control and the possibility of the workpiece. This will assure uniform depth when the final pass is not...


