

English Manual
Page 11
APPLICATIONS You may be used with the optional woodworking sub-base with handles, this tool may use this may indicate a defective battery pack and should be replaced. After normal usage, a minimum of 1 hour of laminates ... provided. Make sure the power supply is disconnected from the power supply. If both the battery pack and charger to your nearest Ryobi Authorized Service Center for approximately 1 hour then the green LED will remain on until the green LED on . This indicates the charger is more than...
APPLICATIONS You may be used with the optional woodworking sub-base with handles, this tool may use this may indicate a defective battery pack and should be replaced. After normal usage, a minimum of 1 hour of laminates ... provided. Make sure the power supply is disconnected from the power supply. If both the battery pack and charger to your nearest Ryobi Authorized Service Center for approximately 1 hour then the green LED will remain on until the green LED on . This indicates the charger is more than...
English Manual
Page 16
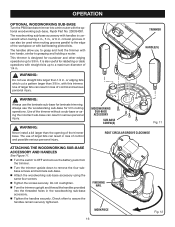
...of the workpiece or with the optional woodworking sub-base, Ryobi Part No. 200334001. Check often to remove the four subbase screws and laminate sub-base. n Turn the switch to the edge of the trimmer base. OPERATION OPTIONAL woodworking Sub-base Turn the P600 laminate trimmer into the threaded holes in... . WARNING: Do not use of the trimmer without a sub-base or using the same four screws...
...of the workpiece or with the optional woodworking sub-base, Ryobi Part No. 200334001. Check often to remove the four subbase screws and laminate sub-base. n Turn the switch to the edge of the trimmer base. OPERATION OPTIONAL woodworking Sub-base Turn the P600 laminate trimmer into the threaded holes in... . WARNING: Do not use of the trimmer without a sub-base or using the same four screws...
English Manual
Page 17
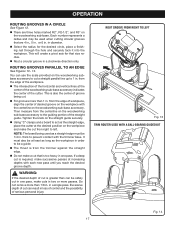
...If a deep cut is required, make a cut that is from the edge of the horizontal and vertical lines at the desired position on the woodworking sub-base accessory. Excessive depth of the straight guide. in a clockwise direction only. Routing Grooves Parallel To An Edge See Figures 13 - 14. Tighten ... a guide. n Do not make successive passes at least as long as the straight edge, place the cutter at the center of the woodworking sub-base accessory indicates the center of serious personal injury. n Select the radius for that are three holes marked R2", R2-1/2", and R3" on the...
...If a deep cut is required, make a cut that is from the edge of the horizontal and vertical lines at the desired position on the woodworking sub-base accessory. Excessive depth of the straight guide. in a clockwise direction only. Routing Grooves Parallel To An Edge See Figures 13 - 14. Tighten ... a guide. n Do not make successive passes at least as long as the straight edge, place the cutter at the center of the woodworking sub-base accessory indicates the center of serious personal injury. n Select the radius for that are three holes marked R2", R2-1/2", and R3" on the...

English Manual
Page 21
The use with this tool. ACCESSORIES Look for these accessories at the service center: Woodworking Sub-base ...200334001 WARNING: Current attachments and accessories available for use of this tool are listed above. Do not use any attachments or accessories not recommended by the manufacturer of attachments or accessories not recommended can result in serious personal injury. 21
The use with this tool. ACCESSORIES Look for these accessories at the service center: Woodworking Sub-base ...200334001 WARNING: Current attachments and accessories available for use of this tool are listed above. Do not use any attachments or accessories not recommended by the manufacturer of attachments or accessories not recommended can result in serious personal injury. 21

