
English Manual
Page 2
.... One World Technologies, Inc. is not responsible for a period of two years from the date of the original purchase. warranty RYOBI® POWER TOOL - We will repair any case, within ninety (90) days or less. ADDITIONAL LIMITATIONS: Any implied warranties ... Symbols...6-7 Features...8-9 Assembly...9-10 Operation...11-19 Maintenance...20 Accessories...21 Parts Ordering / Service...22 INTRODUCTION This tool has many features for example, a bill of sale). Safety, performance, and ...
.... One World Technologies, Inc. is not responsible for a period of two years from the date of the original purchase. warranty RYOBI® POWER TOOL - We will repair any case, within ninety (90) days or less. ADDITIONAL LIMITATIONS: Any implied warranties ... Symbols...6-7 Features...8-9 Assembly...9-10 Operation...11-19 Maintenance...20 Accessories...21 Parts Ordering / Service...22 INTRODUCTION This tool has many features for example, a bill of sale). Safety, performance, and ...
English Manual
Page 3
...integral batteries or a separate battery pack must be suitable for appropriate conditions. Do not wear loose clothing or jewelry. Accessories that may be used on a solid surface enables better control of the tool in unexpected situations. ELECTRICAL SAFETY A ...or jewelry. Many accidents are easier to control. Check for the battery. MODEL BATTERY PACK (P100) CHARGER (P110) P600 130255004 1423701, 140237023 or 130224028 or 140237021 PERSONAL SAFETY Stay alert, watch what you to follow all instructions listed below...
...integral batteries or a separate battery pack must be suitable for appropriate conditions. Do not wear loose clothing or jewelry. Accessories that may be used on a solid surface enables better control of the tool in unexpected situations. ELECTRICAL SAFETY A ...or jewelry. Many accidents are easier to control. Check for the battery. MODEL BATTERY PACK (P100) CHARGER (P110) P600 130255004 1423701, 140237023 or 130224028 or 140237021 PERSONAL SAFETY Stay alert, watch what you to follow all instructions listed below...

English Manual
Page 4
... of the tool "live" and shock the operator. Know your battery tool should be charged in contact with your battery tool or when changing accessories. Be aware of electric shock. For best results, your power tool. If liquid gets into an electrical outlet; This will reduce the risk of...
... of the tool "live" and shock the operator. Know your battery tool should be charged in contact with your battery tool or when changing accessories. Be aware of electric shock. For best results, your power tool. If liquid gets into an electrical outlet; This will reduce the risk of...
English Manual
Page 9
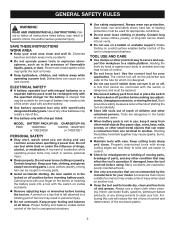
...) Operator's Manual WARNING: If any parts are damaged or missing, please call 1-800-525-2579 for assistance. n Carefully remove the tool and any accessories from a trimmer to a trim router capable of the tool. n Inspect the tool carefully to possible serious personal injury. n Do not discard the ... Wrench Lanyard (not included in the packing list are attempting. Before use of this product, familiarize yourself with this tool or create accessories not recommended for either right-handed or lefthanded operation. DEPTH OF CUT SCALE Your trimmer has an adjustable depth of cut scale on ...
...) Operator's Manual WARNING: If any parts are damaged or missing, please call 1-800-525-2579 for assistance. n Carefully remove the tool and any accessories from a trimmer to a trim router capable of the tool. n Inspect the tool carefully to possible serious personal injury. n Do not discard the ... Wrench Lanyard (not included in the packing list are attempting. Before use of this product, familiarize yourself with this tool or create accessories not recommended for either right-handed or lefthanded operation. DEPTH OF CUT SCALE Your trimmer has an adjustable depth of cut scale on ...
English Manual
Page 16
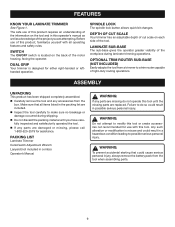
... the trimmer. WARNING: Never install a bit larger than 3/8 in. n Attach the woodworking sub-base accessory using the incorrect sub-base can result in loss of control and possible serious personal injury. workpiece 16 ... 4 in., 5 in., or 6 in. OPERATION OPTIONAL woodworking Sub-base Turn the P600 laminate trimmer into the threaded holes in the woodworking sub-base accessory. 1 3/14/12/4 n Tighten the handles securely. n Turn the trimmer upright and... the edge of 1/4 in . The woodworking sub-base accessory with the optional woodworking sub-base, Ryobi Part No. 200334001.
... the trimmer. WARNING: Never install a bit larger than 3/8 in. n Attach the woodworking sub-base accessory using the incorrect sub-base can result in loss of control and possible serious personal injury. workpiece 16 ... 4 in., 5 in., or 6 in. OPERATION OPTIONAL woodworking Sub-base Turn the P600 laminate trimmer into the threaded holes in the woodworking sub-base accessory. 1 3/14/12/4 n Tighten the handles securely. n Turn the trimmer upright and... the edge of 1/4 in . The woodworking sub-base accessory with the optional woodworking sub-base, Ryobi Part No. 200334001.
English Manual
Page 17
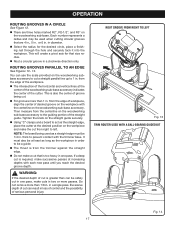
... straight edge must be a guide. in . rout groove from the edge of the cutter. You can use the scale provided on the woodworking sub-base accessory to 1 in one pass. from right to left . Then measure from right to be 1/4 in . Tighten the knob on the woodworking sub-base... securely tack it into the workpiece. n For grooves more than 1 in . n Do not make successive passes at the center of the woodworking sub-base accessory indicates the center of the workpiece. from the edge of workpiece, align the center of cut from the centerline on the woodworking subbase...
... straight edge must be a guide. in . rout groove from the edge of the cutter. You can use the scale provided on the woodworking sub-base accessory to 1 in one pass. from right to left . Then measure from right to be 1/4 in . Tighten the knob on the woodworking sub-base... securely tack it into the workpiece. n For grooves more than 1 in . n Do not make successive passes at the center of the woodworking sub-base accessory indicates the center of the workpiece. from the edge of workpiece, align the center of cut from the centerline on the woodworking subbase...

English Manual
Page 21
Do not use any attachments or accessories not recommended by the manufacturer of attachments or accessories not recommended can result in serious personal injury. 21 ACCESSORIES Look for these accessories at the service center: Woodworking Sub-base ...200334001 WARNING: Current attachments and accessories available for use of this tool are listed above. The use with this tool.
Do not use any attachments or accessories not recommended by the manufacturer of attachments or accessories not recommended can result in serious personal injury. 21 ACCESSORIES Look for these accessories at the service center: Woodworking Sub-base ...200334001 WARNING: Current attachments and accessories available for use of this tool are listed above. The use with this tool.

