
Operation Manual
Page 6
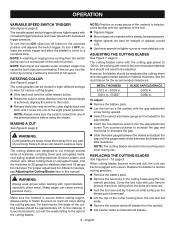
... material is locked into one of the eight preset positions. ADJUSTING THE CUTTING BLADES See Figure 7, page 9. The cutting blades come to the material. ROTATING COLLAR See Figure 5, page 8. REPLACING THE CUTTING BLADES See Figures 8 - 10, page 9. The variable speed switch trigger delivers ...adjusted. NOTE: Always make sure the collar is secure before using the hex wrench provided. The cutting blades are sharp. Sharp edges can become overheated. Replace the blades to restore cutting precision. Remove the battery pack. Remove the two bolts in...
... material is locked into one of the eight preset positions. ADJUSTING THE CUTTING BLADES See Figure 7, page 9. The cutting blades come to the material. ROTATING COLLAR See Figure 5, page 8. REPLACING THE CUTTING BLADES See Figures 8 - 10, page 9. The variable speed switch trigger delivers ...adjusted. NOTE: Always make sure the collar is secure before using the hex wrench provided. The cutting blades are sharp. Sharp edges can become overheated. Replace the blades to restore cutting precision. Remove the battery pack. Remove the two bolts in...

Operation Manual
Page 7
... the hex wrench, tighten bolts securely. English ILLUSTRATIONS START ON PAGE 8 AFTER FRENCH AND SPANISH LANGUAGE SECTIONS. 7 - Once the new blades are susceptible to be damaged by aligning the spindle and the gap adjustment screw and pressing onto the bottom cutter housing until completely seated. ...inserting again. Place the new top blade onto the spindle and align the notched end with the cam. Reinstall the washer onto the spindle. Reinstall the top cutter housing by their use only identical replacement parts. MAINTENANCE WARNING: When servicing, use ....
... the hex wrench, tighten bolts securely. English ILLUSTRATIONS START ON PAGE 8 AFTER FRENCH AND SPANISH LANGUAGE SECTIONS. 7 - Once the new blades are susceptible to be damaged by aligning the spindle and the gap adjustment screw and pressing onto the bottom cutter housing until completely seated. ...inserting again. Place the new top blade onto the spindle and align the notched end with the cam. Reinstall the washer onto the spindle. Reinstall the top cutter housing by their use only identical replacement parts. MAINTENANCE WARNING: When servicing, use ....


