
Operator's Manual
Page 2
ii Consulte esta sección desplegable para ver todas las figuras a las que se hace referencia en el manual del operador. Consulter l'encart à volets afin d'examiner toutes les figures mentionnées dans le manuel d'utilisation. See this fold-out section for all of the figures referenced in the operator's manual.
ii Consulte esta sección desplegable para ver todas las figuras a las que se hace referencia en el manual del operador. Consulter l'encart à volets afin d'examiner toutes les figures mentionnées dans le manuel d'utilisation. See this fold-out section for all of the figures referenced in the operator's manual.

Operator's Manual
Page 5
... and do the job better and safer at all instructions. ELECTRICAL SAFETY Power tool plugs must be drawn into air vents. Do not use the power tool if the switch does not turn it on invites accidents. Remove any adapter plugs with 18V nickel-cadmium and 18V lithium-ion battery packs, see tool/appliance/battery pack/charger correlation supplement 987000-432. Unmodified plugs and matching outlets...
... and do the job better and safer at all instructions. ELECTRICAL SAFETY Power tool plugs must be drawn into air vents. Do not use the power tool if the switch does not turn it on invites accidents. Remove any adapter plugs with 18V nickel-cadmium and 18V lithium-ion battery packs, see tool/appliance/battery pack/charger correlation supplement 987000-432. Unmodified plugs and matching outlets...
Operator's Manual
Page 6
...; When servicing a power tool, use any other battery packs may contact hidden wiring. Do not use , keep it unstable and may create a risk of fire when used with the charger specified by insulated gripping surfaces, when performing an operation where the cutting accessory may create a risk of electric shock, fire, or serious injury. Always wear eye protection with specifically designated battery packs. GENERAL POWER TOOL SAFETY WARNINGS...
...; When servicing a power tool, use any other battery packs may contact hidden wiring. Do not use , keep it unstable and may create a risk of fire when used with the charger specified by insulated gripping surfaces, when performing an operation where the cutting accessory may create a risk of electric shock, fire, or serious injury. Always wear eye protection with specifically designated battery packs. GENERAL POWER TOOL SAFETY WARNINGS...
Operator's Manual
Page 7
... to the unit. Never cut . PRUNER SAFETY WARNINGS Use non-slip, heavy-duty protective gloves when operating the pruner and when installing or removing the blade. Replace any blade or other parts that are moving. When not in use, product should be recycled. If you loan someone hold or have someone this tool. Failure to do so can...
... to the unit. Never cut . PRUNER SAFETY WARNINGS Use non-slip, heavy-duty protective gloves when operating the pruner and when installing or removing the blade. Replace any blade or other parts that are moving. When not in use, product should be recycled. If you loan someone hold or have someone this tool. Failure to do so can...
Operator's Manual
Page 8
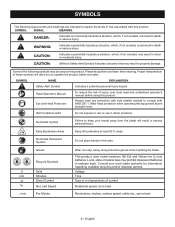
... Gloves Recycle Symbols Volts Minutes Direct Current No Load Speed Per Minute Wear non-slip, heavy-duty protective gloves when handling the blade. away. V min no load Revolutions, strokes, surface speed, orbits etc., per minute 6 - This product uses nickel-cadmium (Ni-Cd) and lithium-ion (Li-ion) batteries. SYMBOL NAME EXPLANATION Safety Alert Symbol Indicates a potential personal injury hazard. No Hands Placement Symbol Do...
... Gloves Recycle Symbols Volts Minutes Direct Current No Load Speed Per Minute Wear non-slip, heavy-duty protective gloves when handling the blade. away. V min no load Revolutions, strokes, surface speed, orbits etc., per minute 6 - This product uses nickel-cadmium (Ni-Cd) and lithium-ion (Li-ion) batteries. SYMBOL NAME EXPLANATION Safety Alert Symbol Indicates a potential personal injury hazard. No Hands Placement Symbol Do...
Operator's Manual
Page 9
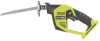
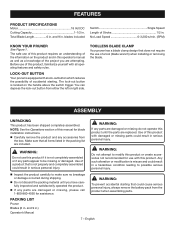
... Load Speed 0-3,200 s/min. (SPM) KNOW YOUR PRUNER See Figure 1. LOCK-OUT BUTTON Your pruner is misuse and could cause serious personal injury, always remove the battery pack from the product when assembling parts. 7 - TOOLLESS BLADE CLAMP Your pruner has a blade clamp design that could result in . n Do not discard the packing material until the parts are attempting. blades included Switch Single Speed Length of a tool (blade wrench) when installing...
... Load Speed 0-3,200 s/min. (SPM) KNOW YOUR PRUNER See Figure 1. LOCK-OUT BUTTON Your pruner is misuse and could cause serious personal injury, always remove the battery pack from the product when assembling parts. 7 - TOOLLESS BLADE CLAMP Your pruner has a blade clamp design that could result in . n Do not discard the packing material until the parts are attempting. blades included Switch Single Speed Length of a tool (blade wrench) when installing...
Operator's Manual
Page 10
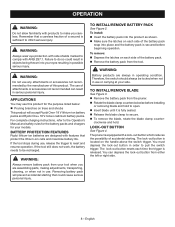
...; Release the blade clamp to make you are assembling parts, making adjustments, transporting, cleaning, or when not in order to reset and resume operation. If the tool stops during use . The lock-out button is located on each side of the battery pack snap into your models. You must depress the lock-out button in use , release the trigger to pull the switch trigger. TO INSTALL/REMOVE BLADE See Figure 3. Remove the battery pack from the tool. OPERATION...
...; Release the blade clamp to make you are assembling parts, making adjustments, transporting, cleaning, or when not in order to reset and resume operation. If the tool stops during use . The lock-out button is located on each side of the battery pack snap into your models. You must depress the lock-out button in use , release the trigger to pull the switch trigger. TO INSTALL/REMOVE BLADE See Figure 3. Remove the battery pack from the tool. OPERATION...
Operator's Manual
Page 11
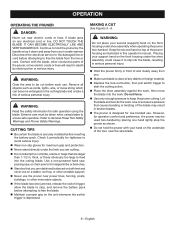
..., release the switch trigger, allow the blade to stop, and remove the battery pack before inserting the battery pack. n Make sure blade is securely installed before attempting to free the blade. n Maintain a proper grip on the underside of the blade may be used two-handed by the handle or lay it to cut limbs, stems or twigs that causes bending or twisting of the tool, near electric cords or lines. OPERATION OPERATING...
..., release the switch trigger, allow the blade to stop, and remove the battery pack before inserting the battery pack. n Make sure blade is securely installed before attempting to free the blade. n Maintain a proper grip on the underside of the blade may be used two-handed by the handle or lay it to cut limbs, stems or twigs that causes bending or twisting of the tool, near electric cords or lines. OPERATION OPERATING...
Operator's Manual
Page 12
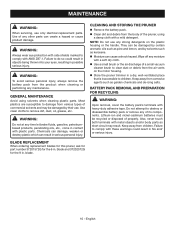
... remove dirt, dust, oil, grease, etc. Also, never touch both terminals with these warnings could result in objects being thrown into your eyes, resulting in . WARNING: To avoid serious personal injury, always remove the battery pack from various types of a small vacuum cleaner brush to comply with metal objects and/or body parts as kerosene. n Use a small brush or the air...
... remove dirt, dust, oil, grease, etc. Also, never touch both terminals with these warnings could result in objects being thrown into your eyes, resulting in . WARNING: To avoid serious personal injury, always remove the battery pack from various types of a small vacuum cleaner brush to comply with metal objects and/or body parts as kerosene. n Use a small brush or the air...

Operator's Manual
Page 13
...the owner. This warranty is limited to ninety (90) days from the date of original retail purchase for any RYOBI® brand outdoor product that is used for warranty work must be repaired or replaced ...operation, performance, or durability. Bump Knobs, Outer Spools, Cutting Lines, Inner Reels, Starter Pulleys, Starter Ropes, Drive Belts, Tines, Felt Washers, Hitch Pins, Mulching Blades, Blower Fans, Blower and Vacuum Tubes, Vacuum Bag and Straps, Guide Bars, Saw Chains, Blades Techtronic Industries North America, Inc., reserves the right to change or improve the design of any RYOBI...
...the owner. This warranty is limited to ninety (90) days from the date of original retail purchase for any RYOBI® brand outdoor product that is used for warranty work must be repaired or replaced ...operation, performance, or durability. Bump Knobs, Outer Spools, Cutting Lines, Inner Reels, Starter Pulleys, Starter Ropes, Drive Belts, Tines, Felt Washers, Hitch Pins, Mulching Blades, Blower Fans, Blower and Vacuum Tubes, Vacuum Bag and Straps, Guide Bars, Saw Chains, Blades Techtronic Industries North America, Inc., reserves the right to change or improve the design of any RYOBI...


