
Operator's Manual
Page 3
.... Keep the cutting edge sharp and clean for the saw is running unattended. Follow instructions for damaged parts. n Keep handles dry, clean, and free of cut resistant material or ones that is released. n Do not operate a chain saw who has not received adequate instructions in the operation and maintenance sections, should stop turning when the switch trigger is damaged should be properly repaired or replaced by an authorized service dealer unless...
.... Keep the cutting edge sharp and clean for the saw is running unattended. Follow instructions for damaged parts. n Keep handles dry, clean, and free of cut resistant material or ones that is released. n Do not operate a chain saw who has not received adequate instructions in the operation and maintenance sections, should stop turning when the switch trigger is damaged should be properly repaired or replaced by an authorized service dealer unless...
Operator's Manual
Page 4
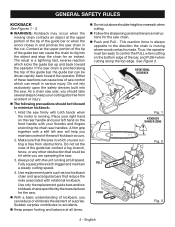
... hand on the bottom edge of the bar, and PUSH when cutting along the top of the guide bar contact a log, branch, fence, or any other obstruction that reduce the risks associated with rotational kickback. English Fully squeeze the switch trigger and maintain a steady cutting speed. 4. n The following precautions should take several steps to keep your cutting jobs free from obstructions. Use replacement parts...
... hand on the bottom edge of the bar, and PUSH when cutting along the top of the guide bar contact a log, branch, fence, or any other obstruction that reduce the risks associated with rotational kickback. English Fully squeeze the switch trigger and maintain a steady cutting speed. 4. n The following precautions should take several steps to keep your cutting jobs free from obstructions. Use replacement parts...

Operator's Manual
Page 5
... saw, remove battery and place the scabbard on a ladder, rooftop or scaffold; n Do not expose the chain saw for Power Tools - n Do not use the chain saw . Guide Bars Generally, guide bars with the chain saw. general SAFETY RULES In The Cutting/Work Area n Do not operate a chain saw in a tree, on the bar and chain or store the chain saw in a carry case. Cluttered area invite injuries. n Use...
... saw, remove battery and place the scabbard on a ladder, rooftop or scaffold; n Do not expose the chain saw for Power Tools - n Do not use the chain saw . Guide Bars Generally, guide bars with the chain saw. general SAFETY RULES In The Cutting/Work Area n Do not operate a chain saw in a tree, on the bar and chain or store the chain saw in a carry case. Cluttered area invite injuries. n Use...

Operator's Manual
Page 6
SPECIFIC SAFETY RULES BATTERY SAFETY n Battery operated units do not have to explosion. n Remove the battery pack from the chain saw before cleaning, servicing, storing, removing material from the unit, changing accessories such as a pilot light. A charger that may cause damage to them frequently and use any cordless product in a location where the temperature is more than 50°F but less than 100°F. To reduce the risk...
SPECIFIC SAFETY RULES BATTERY SAFETY n Battery operated units do not have to explosion. n Remove the battery pack from the chain saw before cleaning, servicing, storing, removing material from the unit, changing accessories such as a pilot light. A charger that may cause damage to them frequently and use any cordless product in a location where the temperature is more than 50°F but less than 100°F. To reduce the risk...

Operator's Manual
Page 7
... risk associated with this product. One Handed Do not operate the saw properly with hearing and head protection Wet Conditions Alert Do not expose to comply with ANSI Z87.1, along with both hands. English Proper interpretation of injury, user must read and understand operator's manual before using only one hand. 7 - Read Operator's Manual Eye, Hearing, and Head Protection To reduce the risk of...
... risk associated with this product. One Handed Do not operate the saw properly with hearing and head protection Wet Conditions Alert Do not expose to comply with ANSI Z87.1, along with both hands. English Proper interpretation of injury, user must read and understand operator's manual before using only one hand. 7 - Read Operator's Manual Eye, Hearing, and Head Protection To reduce the risk of...

Operator's Manual
Page 9
... REAR HANDLE BAR CHAIN HAND GUARD FRONT HANDLE BATTERY PACK lock-out button BATTERY PACK HEX KEY HEX KEY storage area switch trigger 9 - FEATURES PRODUCT SPECIFICATIONS Motor 18 Volt DC Bar Length 10 in this product, familiarize yourself with all operating features and safety rules. English Fig. 4 Before use of this operator's manual as well as to what it can cut. KNOW YOUR cHAINsAW See Figure 4. Replacement Bar Part Number 671256002 or 671834007 Replacement Chain Part Number...
... REAR HANDLE BAR CHAIN HAND GUARD FRONT HANDLE BATTERY PACK lock-out button BATTERY PACK HEX KEY HEX KEY storage area switch trigger 9 - FEATURES PRODUCT SPECIFICATIONS Motor 18 Volt DC Bar Length 10 in this product, familiarize yourself with all operating features and safety rules. English Fig. 4 Before use of this operator's manual as well as to what it can cut. KNOW YOUR cHAINsAW See Figure 4. Replacement Bar Part Number 671256002 or 671834007 Replacement Chain Part Number...
Operator's Manual
Page 10
... or contact an authorized service center for damaged, missing, or loose parts such as screws, nuts, bolts, caps, etc. Make sure that a careless fraction of a second is not properly and completely assembled could cause serious personal injury, always remove the battery pack from the box. Use of this product or create accessories not recommended for assistance. Use of a product that...
... or contact an authorized service center for damaged, missing, or loose parts such as screws, nuts, bolts, caps, etc. Make sure that a careless fraction of a second is not properly and completely assembled could cause serious personal injury, always remove the battery pack from the box. Use of this product or create accessories not recommended for assistance. Use of a product that...
Operator's Manual
Page 11
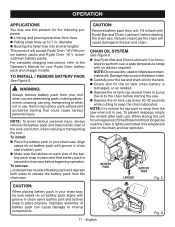
... V lithiumion battery packs and Ryobi One+ 18 V nickelcadmium battery packs. For complete charging instructions, refer to the Operator's Manual for lubricant to keep hands clear of battery pack and depress both sides to release the battery pack from your Ryobi One+ battery pack and charger models. WARNING: Always remove battery pack from the chain saw before starting that battery pack is normal for your tool when you are assembling parts, making adjustments, cleaning...
... V lithiumion battery packs and Ryobi One+ 18 V nickelcadmium battery packs. For complete charging instructions, refer to the Operator's Manual for lubricant to keep hands clear of battery pack and depress both sides to release the battery pack from your Ryobi One+ battery pack and charger models. WARNING: Always remove battery pack from the chain saw before starting that battery pack is normal for your tool when you are assembling parts, making adjustments, cleaning...

Operator's Manual
Page 12
... lock-out button switch trigger lock-out button switch trigger Fig. 7 This makes the switch trigger operational. Press and hold the lock-out button. Always keep your left of the switch trigger, the lock-out button will be automatically reset to Important Safety Instructions earlier in . Starting the chain saw: Place the chain saw firmly with the bar and chain. Press and hold the switch trigger, release the lock-out button and continue to stop the...
... lock-out button switch trigger lock-out button switch trigger Fig. 7 This makes the switch trigger operational. Press and hold the lock-out button. Always keep your left of the switch trigger, the lock-out button will be automatically reset to Important Safety Instructions earlier in . Starting the chain saw: Place the chain saw firmly with the bar and chain. Press and hold the switch trigger, release the lock-out button and continue to stop the...

Operator's Manual
Page 13
... line while operating a saw. WARNING: Do not operate the switch trigger with your left -handed (cross-handed) grip, or any part of your right hand. English Never allow any stance which the thumb and fingers are on the saw whenever the unit is least likely to be broken (by a kickback or other sudden reaction of the saw). OPERATION WARNING: Never use a left hand and...
... line while operating a saw. WARNING: Do not operate the switch trigger with your left -handed (cross-handed) grip, or any part of your right hand. English Never allow any stance which the thumb and fingers are on the saw whenever the unit is least likely to be broken (by a kickback or other sudden reaction of the saw). OPERATION WARNING: Never use a left hand and...

Operator's Manual
Page 14
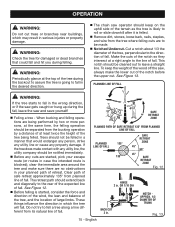
... Operator's Manual or received adequate instructions for the safe and proper use of this operation for professionals. Cut only when visibility and light are cutting, maintain a steady speed. Allow the chain to stop. Leave this chain saw. When felling a tree, keep a minimum distance of 15 feet between work- Unusual Hazardous Tree Felling Conditions Do not fell trees near power lines or electrical wires...
... Operator's Manual or received adequate instructions for the safe and proper use of this operation for professionals. Cut only when visibility and light are cutting, maintain a steady speed. Allow the chain to stop. Leave this chain saw. When felling a tree, keep a minimum distance of 15 feet between work- Unusual Hazardous Tree Felling Conditions Do not fell trees near power lines or electrical wires...
Operator's Manual
Page 15
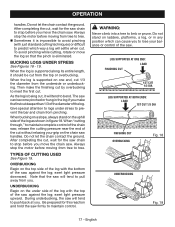
... at the top of large limbs. When bucking and felling operations are started , consider the force and direction of the wind, the lean and balance of the tree, and the location of the tree during the fall, leave the saw and save yourself! Felling a tree - Trees ...CUT 2 in case the intended route is started , pick your planned path of the notch before the upper cut. To keep on the uphill side of the terrain as the tree is likely to roll or slide downhill after it is going to assure the tree is felled. Remove dirt, stones, loose bark, nails, staples, and wire...
... at the top of large limbs. When bucking and felling operations are started , consider the force and direction of the wind, the lean and balance of the tree, and the location of the tree during the fall, leave the saw and save yourself! Felling a tree - Trees ...CUT 2 in case the intended route is started , pick your planned path of the notch before the upper cut. To keep on the uphill side of the terrain as the tree is likely to roll or slide downhill after it is going to assure the tree is felled. Remove dirt, stones, loose bark, nails, staples, and wire...

Operator's Manual
Page 16
... this manual. When bucking on a slope, always stand on the stump. See Figures 13 - 14. On large diameter trees, stop the chain saw BACK CUT HINGE wedge kickback 16 - The backcut is secure and your grip on a saw when cutting through the log, release the cutting pressure near... guide bar nose and chain during cutting, this is the term used for cutting a fallen tree to fall, stop the back cut through to the notch. The hinge controls the fall and watch the action in case something falls your footing. To maintain complete control of the chain saw ...
... this manual. When bucking on a slope, always stand on the stump. See Figures 13 - 14. On large diameter trees, stop the chain saw BACK CUT HINGE wedge kickback 16 - The backcut is secure and your grip on a saw when cutting through the log, release the cutting pressure near... guide bar nose and chain during cutting, this is the term used for cutting a fallen tree to fall, stop the back cut through to the notch. The hinge controls the fall and watch the action in case something falls your footing. To maintain complete control of the chain saw ...
Operator's Manual
Page 17
... saw chain to stop the motor before you . Do not let the chain contact the ground. exert light pressure upward. BUCKING Logs Under Stress See Figures 18 - 19. When the log is being cut, it should be cut , wait for this reaction and hold the saw . During underbucking, the saw . As the log is supported on the uphill side of Cutting Used...
... saw chain to stop the motor before you . Do not let the chain contact the ground. exert light pressure upward. BUCKING Logs Under Stress See Figures 18 - 19. When the log is being cut, it should be cut , wait for this reaction and hold the saw . During underbucking, the saw . As the log is supported on the uphill side of Cutting Used...

Operator's Manual
Page 19
... with heavy-duty adhesive tape. Use clean cloths to destroy or disassemble battery pack or remove any maintenance. Do not attempt to remove dirt, dust, oil, grease, etc. MAINTENANCE WARNING: When servicing, use , inspect the entire product for assistance. Lithium-ion and nickel-cadmium batteries must be repaired or replaced by their use. Only the parts shown on the parts list are replaced. All other parts may create a hazard or cause...
... with heavy-duty adhesive tape. Use clean cloths to destroy or disassemble battery pack or remove any maintenance. Do not attempt to remove dirt, dust, oil, grease, etc. MAINTENANCE WARNING: When servicing, use , inspect the entire product for assistance. Lithium-ion and nickel-cadmium batteries must be repaired or replaced by their use. Only the parts shown on the parts list are replaced. All other parts may create a hazard or cause...
Operator's Manual
Page 20
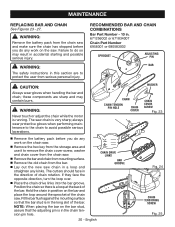
warning: Remove the battery pack from the chain saw and make sure the chain has stopped before you do any work on the chain saw. Remove the hex key from the storage area and use it to do any kinks. Failure to remove the chain cover screw, washer and chain cover from the chain saw . If they face the opposite direction, turn the loop over...
warning: Remove the battery pack from the chain saw and make sure the chain has stopped before you do any work on the chain saw. Remove the hex key from the storage area and use it to do any kinks. Failure to remove the chain cover screw, washer and chain cover from the chain saw . If they face the opposite direction, turn the loop over...

Operator's Manual
Page 21
.... During normal saw operation, the temperature of the guide bar up and tighten the bar mounting screw securely. Chain is correctly tensioned when there is snug, but it will rotate without binding. Chain must be free to move for tension adjustment. Remove all the slack from the chain by turning the chain tensioning screw clockwise until sag...
.... During normal saw operation, the temperature of the guide bar up and tighten the bar mounting screw securely. Chain is correctly tensioned when there is snug, but it will rotate without binding. Chain must be free to move for tension adjustment. Remove all the slack from the chain by turning the chain tensioning screw clockwise until sag...

Operator's Manual
Page 22
... left hand cutters in this saw . WARNING: Remove the battery pack and make sure the chain has stopped before you do any work on this manual. The chain requires sharpening when the wood chips are uniform. Wear gloves for kickback. Not low enough decreases cutting ability. If cutter teeth have the drive sprocket replaced by mud or sand...
... left hand cutters in this saw . WARNING: Remove the battery pack and make sure the chain has stopped before you do any work on this manual. The chain requires sharpening when the wood chips are uniform. Wear gloves for kickback. Not low enough decreases cutting ability. If cutter teeth have the drive sprocket replaced by mud or sand...

Operator's Manual
Page 23
... to the chain. For Cross Cutting. MORE THAN 30° - Use a depth gauge tool for checking the depth gauge clearances. Every time the chain is used in . to produce correct top plate angle. LESS THAN 30° - WARNING: The saw chain is very sharp, always wear protective gloves when performing maintenance to damage adjoining drive links with diameter too large...
... to the chain. For Cross Cutting. MORE THAN 30° - Use a depth gauge tool for checking the depth gauge clearances. Every time the chain is used in . to produce correct top plate angle. LESS THAN 30° - WARNING: The saw chain is very sharp, always wear protective gloves when performing maintenance to damage adjoining drive links with diameter too large...
Operator's Manual
Page 26
..., OR NINETYDAY WARRANTY PERIOD. The product, including any defective part, must be repaired or replaced without assuming any product previously manufactured. Spark Plugs, Carburetor, Carburetor Adjustments, Ignition, Filters B. Bump Knobs, Outer Spools, Cutting Lines, Inner Reels, Starter Pulleys, Starter Ropes, Drive Belts, Tines, Felt Washers, Hitch Pins, Mulching Blades, Blower Fans, Blower and Vacuum Tubes, Vacuum Bag and Straps, Guide Bars, Saw Chains Techtronic...
..., OR NINETYDAY WARRANTY PERIOD. The product, including any defective part, must be repaired or replaced without assuming any product previously manufactured. Spark Plugs, Carburetor, Carburetor Adjustments, Ignition, Filters B. Bump Knobs, Outer Spools, Cutting Lines, Inner Reels, Starter Pulleys, Starter Ropes, Drive Belts, Tines, Felt Washers, Hitch Pins, Mulching Blades, Blower Fans, Blower and Vacuum Tubes, Vacuum Bag and Straps, Guide Bars, Saw Chains Techtronic...


