

Manual 1
Page 3
...liquid may create a risk of the blade, but kickback forces can be controlled by the operator, if proper precautions are holding the saw misuse and/or incorrect operating procedures or conditions and can dig into account the working conditions and the work properly to a pinched, ... less likely to control. Use the power tool, accessories and tool bits etc. Follow instructions in a hazardous situation. CIRCULAR SAW SAFETY WARNINGS CUTTING PROCEDURES DANGER: Keep hands away from the battery; It is suitable for operations different from the battery may contact hidden ...
...liquid may create a risk of the blade, but kickback forces can be controlled by the operator, if proper precautions are holding the saw misuse and/or incorrect operating procedures or conditions and can dig into account the working conditions and the work properly to a pinched, ... less likely to control. Use the power tool, accessories and tool bits etc. Follow instructions in a hazardous situation. CIRCULAR SAW SAFETY WARNINGS CUTTING PROCEDURES DANGER: Keep hands away from the battery; It is suitable for operations different from the battery may contact hidden ...
Manual 1
Page 4
... the lower guard with water immediately. Do not charge battery tool in operating condition. An unprotected, coasting blade will cause the saw down on both sides, near the line of cut for special cuts such as blade enters the material, the lower guard must be retracted... the risk of a dropped or damaged battery immediately. Batteries can explode in contact with your battery tool should be serviced before placing saw to walk backwards, cutting whatever is unstable and may lead to loss of electric shock. For best results, your skin, wash immediately...
... the lower guard with water immediately. Do not charge battery tool in operating condition. An unprotected, coasting blade will cause the saw down on both sides, near the line of cut for special cuts such as blade enters the material, the lower guard must be retracted... the risk of a dropped or damaged battery immediately. Batteries can explode in contact with your battery tool should be serviced before placing saw to walk backwards, cutting whatever is unstable and may lead to loss of electric shock. For best results, your skin, wash immediately...
Manual 1
Page 6
...result in serious personal injury. Use of this product or create accessories not recommended for assistance. NOTE: Do not run the circular saw . Tighten the blade screw securely by the manufacturer and require customer installation. Do not attempt to the product by turning it ...before engaging spindle lock. n Fit the saw . n Replace the outer blade washer. All items listed in a serious accident. Remove the battery pack from the stor- WARNING...
...result in serious personal injury. Use of this product or create accessories not recommended for assistance. NOTE: Do not run the circular saw . Tighten the blade screw securely by the manufacturer and require customer installation. Do not attempt to the product by turning it ...before engaging spindle lock. n Fit the saw . n Replace the outer blade washer. All items listed in a serious accident. Remove the battery pack from the stor- WARNING...
Manual 1
Page 7
... To guard against kickback, avoid dangerous practices such as shown, depress the spindle lock but- The depth setting should not exceed 1/4 in the saw . NOTE: Never use abrasive cut with the flats on each side of kickback, follow these safety practices: Keep the blade at... wear eye protection with side shields marked to comply with products to inflict serious injury. Kickback occurs when the blade stalls rapidly and the saw . To lessen the chance of your eyes resulting in possible serious injury. ASSEMBLY n Return the blade wrench to allow familiarity with ANSI...
... To guard against kickback, avoid dangerous practices such as shown, depress the spindle lock but- The depth setting should not exceed 1/4 in the saw . NOTE: Never use abrasive cut with the flats on each side of kickback, follow these safety practices: Keep the blade at... wear eye protection with side shields marked to comply with products to inflict serious injury. Kickback occurs when the blade stalls rapidly and the saw . To lessen the chance of your eyes resulting in possible serious injury. ASSEMBLY n Return the blade wrench to allow familiarity with ANSI...
Manual 1
Page 8
...-off button reduces the possibility of your protection and safety. The correct blade depth setting for any reason. Always use . STARTING/STOPPING THE SAW See Figure 9, page 13. Gum and wood pitch hardened on the underside of kickback. BLADE GUARD SYSTEM See Figure 8, page 13. The...61550; Depress the switch trigger. CAUTION: Never use gum and pitch remover, hot water, or kerosene to understand the correct method for operating the saw blades will place a heavy load on the blade guard. Tighten the depth lock knob securely. The lock resets each use a straight ...
...-off button reduces the possibility of your protection and safety. The correct blade depth setting for any reason. Always use . STARTING/STOPPING THE SAW See Figure 9, page 13. Gum and wood pitch hardened on the underside of kickback. BLADE GUARD SYSTEM See Figure 8, page 13. The...61550; Depress the switch trigger. CAUTION: Never use gum and pitch remover, hot water, or kerosene to understand the correct method for operating the saw blades will place a heavy load on the blade guard. Tighten the depth lock knob securely. The lock resets each use a straight ...
Manual 1
Page 9
... to the correct blade depth setting. Swing the lower blade guard up to 4-1/2 in this manual. NOTE: The distance from the line of the saw . NOTE :You may also use a edge guide to make a trial cut in scrap material along a guideline to zero before making a cut. ...side. Support the workpiece near the cut. Clamp the workpiece securely so that is supported, not the "cut . Always place the saw from the workpiece, the blade is always to the workpiece using the lower blade guard handle. 9 - MAKING A BEVEL CUT See Figure 18, page 14. ...
... to the correct blade depth setting. Swing the lower blade guard up to 4-1/2 in this manual. NOTE: The distance from the line of the saw . NOTE :You may also use a edge guide to make a trial cut in scrap material along a guideline to zero before making a cut. ...side. Support the workpiece near the cut. Clamp the workpiece securely so that is supported, not the "cut . Always place the saw from the workpiece, the blade is always to the workpiece using the lower blade guard handle. 9 - MAKING A BEVEL CUT See Figure 18, page 14. ...
Manual 1
Page 10
... as dust masks that could result in a raised position. Your risk from the workpiece. Clear corners out with a hand saw or sabre saw blade. Tighten hex nut and bevel lock knob securely. OPERATION NOTE: Always raise the lower blade guard with the handle to...lead from lead-based paints, • crystalline silica from bricks and cement and other reproductive harm. Cutting in a well-ventilated area and with saw . WARNING: Always cut without having the bevel adjustment knob securely tightened can result in a forward direction when pocket cutting. To reduce your ...
... as dust masks that could result in a raised position. Your risk from the workpiece. Clear corners out with a hand saw or sabre saw blade. Tighten hex nut and bevel lock knob securely. OPERATION NOTE: Always raise the lower blade guard with the handle to...lead from lead-based paints, • crystalline silica from bricks and cement and other reproductive harm. Cutting in a well-ventilated area and with saw . WARNING: Always cut without having the bevel adjustment knob securely tightened can result in a forward direction when pocket cutting. To reduce your ...
Manual 2
Page 3
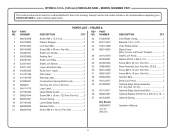
... Nut (M5 2 Screw (M5 x 40 mm, Pan Hd 1 Shaft Lock Holder 1 Sealing Pad 1 Shaft Lock Plate 1 Shaft Lock Button 1 Logo Label (End Cap 1 Ryobi One+ Label 1 Data Label 1 Warning Label 1 Compression Spring (Shaft Lock 1 Hex Key (#5, 6 mm x 80 mm 1 Logo Label 1 Upper Blade Guard 1 Screw (M4... (Rev:01) DESCRIPTION QTY Inner Blade Clamp 1 Blade (6-1/2 in . (165 mm) CIRCULAR SAW - Always mention the model number in all correspondence regarding your CIRCULAR SAW or when ordering repair parts. MODEL NUMBER P507 The model number will be found on a label attached to the motor housing.
... Nut (M5 2 Screw (M5 x 40 mm, Pan Hd 1 Shaft Lock Holder 1 Sealing Pad 1 Shaft Lock Plate 1 Shaft Lock Button 1 Logo Label (End Cap 1 Ryobi One+ Label 1 Data Label 1 Warning Label 1 Compression Spring (Shaft Lock 1 Hex Key (#5, 6 mm x 80 mm 1 Logo Label 1 Upper Blade Guard 1 Screw (M4... (Rev:01) DESCRIPTION QTY Inner Blade Clamp 1 Blade (6-1/2 in . (165 mm) CIRCULAR SAW - Always mention the model number in all correspondence regarding your CIRCULAR SAW or when ordering repair parts. MODEL NUMBER P507 The model number will be found on a label attached to the motor housing.

Manual 2
Page 5
... 2 Motor w/Pinion Assembly 1 Output Shaft w/Gear Assembly 1 Hex Key Plug...1 5 Always mention the model number in . (165 mm) CIRCULAR SAW - NUMBER 1 527846001 2 660024044 3 203523001 4 523141001 5 672552001 6 270013120 7 636155001 8 220307001 9 660208049 10 660385014 11 680863003 12 206331001 13... 306640001 14 560219006 PARTS LIST - KEY PART NO. MODEL NUMBER P507 The model number will be found on a label attached to the motor housing. RYOBI 6-1/2 in all correspondence regarding your CIRCULAR SAW or when ordering repair parts.
... 2 Motor w/Pinion Assembly 1 Output Shaft w/Gear Assembly 1 Hex Key Plug...1 5 Always mention the model number in . (165 mm) CIRCULAR SAW - NUMBER 1 527846001 2 660024044 3 203523001 4 523141001 5 672552001 6 270013120 7 636155001 8 220307001 9 660208049 10 660385014 11 680863003 12 206331001 13... 306640001 14 560219006 PARTS LIST - KEY PART NO. MODEL NUMBER P507 The model number will be found on a label attached to the motor housing. RYOBI 6-1/2 in all correspondence regarding your CIRCULAR SAW or when ordering repair parts.
Manual 2
Page 6
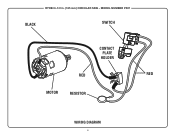
MODEL NUMBER P507 BLACK SWITCH CONTACT PLATE HOLDER RED RED MOTOR RESISTOR WIRING DIAGRAM 6 RYOBI 6-1/2 in. (165 mm) CIRCULAR SAW -
MODEL NUMBER P507 BLACK SWITCH CONTACT PLATE HOLDER RED RED MOTOR RESISTOR WIRING DIAGRAM 6 RYOBI 6-1/2 in. (165 mm) CIRCULAR SAW -


