Ryobi BD4601G Support and Manuals
Get Help and Manuals for this Ryobi item

View All Support Options Below
Free Ryobi BD4601G manuals!
Problems with Ryobi BD4601G?
Ask a Question
Free Ryobi BD4601G manuals!
Problems with Ryobi BD4601G?
Ask a Question
Popular Ryobi BD4601G Manual Pages
User Manual - Page 2

... properly repaired or replaced by ...parts, breakage of personal injury.
NEVER LEAVE TOOL RUNNING UNATTENDED. Use clamps or a vise to persons.
NEVER STAND ON TOOL. Keep proper footing and balance at least 16 is dusty.
PROTECT YOUR HEARING. Follow instructions for recommended accessories. Cluttered areas and benches invite accidents. Consult the operator's manual...
User Manual - Page 3

... TURN IT ON AND OFF. SPECIFIC SAFETY RULES
NEVER reach to a complete stop. Have defective switches replaced by an authorized service center.
USE ONLY CORRECT WHEELS. ALWAYS make sure you have good balance.
NEVER stand or have the proper outlet installed by a qualified service technician at an authorized service facility. If tool is...
User Manual - Page 4
...
SAVE THESE INSTRUCTIONS. To reduce your eyes, resulting in a well-ventilated area and with the workpiece.
SECURE WORK. SPECIFIC SAFETY RULES
...BENCH GRINDER if the flange nut or clamp nut is missing or if the spindle shaft is in . Your risk from chemically treated lumber. Do not rush.
IF THE POWER SUPPLY CORD IS DAMAGED, it must be replaced...
User Manual - Page 5

...
Volts Amperes Hertz Watt Minutes Alternating Current No Load Speed Per Minute
Failure to explain the levels of injury, user must read and understand operator's manual before using this product. Proper interpretation of injury or damage, avoid contact with ANSI Z87.1. SYMBOL
NAME
DESIGNATION/EXPLANATION
Safety Alert
Indicates a potential personal injury...
User Manual - Page 6
... distance. Use the chart provided below to carry the current that is properly installed and grounded in accordance with a qualified electrician or service personnel if the grounding instructions are working with an electric cord having an outer surface that is green with the tool outdoors, use an extension cord that is necessary, do so...
User Manual - Page 7

... product if it is complete. The following items are replaced. Use of this tool.
TOOLS NEEDED
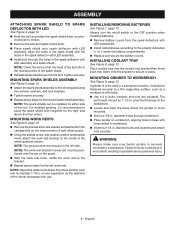
See Figure 2,... personal injury. Arbor Hole 5/8 in .
WARNING:
Always disconnect the bench grinder from the
box. WARNING:
Do not use with LED assembly ...parts could result in serious personal injury. FEATURES
PRODUCT SPECIFICATIONS
Wheel Diameter 8 in serious personal injury. n If any...
User Manual - Page 8
...WARNING:
Always make sure your bench grinder is to a firm supporting surface, such as a workbench with
LED assemblies. Install AAA batteries according to a workbench.
INSTALLING/REMOVING BATTERIES
See Figure 7,...it 's recommended to the inside the battery compartments. Replace and secure the battery covers. n Place sander on the right side above the finer wheel. Align the ...
User Manual - Page 9
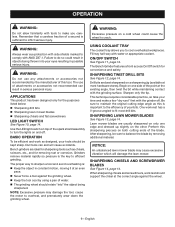
...important to comply with water or appropriate coolant. When sharpening chisels and screwdrivers, work rest should support the chisel at an even
pace. Never force a tool against the wheel.
... Keep the object in possible serious injury. Bench grinders are usually sharpened on both cutting ends of this tool. The Bench Grinder features a front access On/Off switch for the...
User Manual - Page 10

... are susceptible to comply with plastic parts.
If you must be done by loosening the screws. n Remove the outer flange and grinding wheel. n To install a new grinding wheel, reverse the... come in contact with ANSI B7.1.
To replace the grinding wheel:
n Unplug the grinder. n Remove the wheel cover by an authorized service center in possible serious injury.
For Warranty details...
User Manual - Page 30
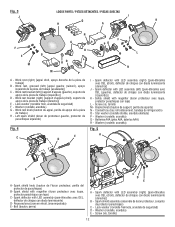
Fig. 3
J
LOOSE PARTS / PIÉCES DÉTACHÉES / PIEZAS SUELTAS
I - Washer (rondelle, arandela) G...(left) [pare-étincelles avec DEL (gauche), deflector de chispas con diodo luminiscente (izquierdo)]
K - Work rest, grooved (left ) [support d'appuis (gauche), soporte de apoyo de la pieza de trabajo (izquierdo)]
D - Spark deflector with LED assembly (pare-étincelles avec DEL...
User Manual 2 - Page 3
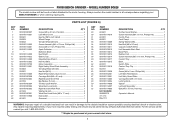
...NUMBER BG828
The model number will be performed by a Ryobi Authorized Service Center. KEY NO.
PART NUMBER
29 602601
30...Led Light Assembly 2
Bolt (M5 x 55 mm, Hex Hd 2
Operator's Manual
WARNING: Improper repair of your nearest retail store.
3 RYOBI BENCH GRINDER - PART NUMBER
1 089150100007
2 089150113001
3 800401
4 800504
5 806002
6 089150113002
7 089150114001...
Ryobi BD4601G Reviews
We have not received any reviews for Ryobi yet.