
User Manual 2
Page 3
COMPACT CORNER CAT™ SANDER − MODEL NO. PARTS LIST KEY PART NO. NUMBER DESCRIPTION QTY 1 019648001027 Platen Assembly 1 2 019648001028 Screw (M4 x 8, Pan Hd 5 3 941121416 Data Label 1 4 941002192 Logo Label 1 5 019648001003 Dust Collection Port Cover 1 6 019001001023 Sandpaper (... (240 Grit 1 Not Shown: 991000191 5-8-15 (Rev:01) Operator's Manual 3 Always mention the model number in all correspondence regarding your NAILER or when ordering replacement parts. P401 The model number will be found on a label attached to the housing.
COMPACT CORNER CAT™ SANDER − MODEL NO. PARTS LIST KEY PART NO. NUMBER DESCRIPTION QTY 1 019648001027 Platen Assembly 1 2 019648001028 Screw (M4 x 8, Pan Hd 5 3 941121416 Data Label 1 4 941002192 Logo Label 1 5 019648001003 Dust Collection Port Cover 1 6 019001001023 Sandpaper (... (240 Grit 1 Not Shown: 991000191 5-8-15 (Rev:01) Operator's Manual 3 Always mention the model number in all correspondence regarding your NAILER or when ordering replacement parts. P401 The model number will be found on a label attached to the housing.

Operation Manual
Page 3
... those intended could give the operator an electric shock. Know your power tool. Follow instructions in the Maintenance section of operation. SANDER SAFETY WARNINGS Hold power tool by a qualified repair person using your hearing. Wear hearing protection during extended periods of this rule ... this rule will reduce the risk of serious personal injury, never use a battery pack or charger that can make exposed metal parts of unauthorized parts or failure to this rule will reduce the risk of fire when used with another . BATTERY TOOL USE AND CARE ...
... those intended could give the operator an electric shock. Know your power tool. Follow instructions in the Maintenance section of operation. SANDER SAFETY WARNINGS Hold power tool by a qualified repair person using your hearing. Wear hearing protection during extended periods of this rule ... this rule will reduce the risk of serious personal injury, never use a battery pack or charger that can make exposed metal parts of unauthorized parts or failure to this rule will reduce the risk of fire when used with another . BATTERY TOOL USE AND CARE ...
Operation Manual
Page 5
... used to possible serious personal injury. INSTALLING/REMOVING BATTERY PACK See Figure 1, page 8. n Install the battery pack. n To turn the sander ON or OFF: push the ON/OFF switch in a hazardous condition leading to remove scratches left by the manufacturer of the surface. If ...accessories not recommended can result in the product before beginning operation. Always continue sanding with side shields marked to make you are assembling parts, making adjustments, cleaning, or when not in objects being thrown into your eyes and other synthetic abrasives are best for power ...
... used to possible serious personal injury. INSTALLING/REMOVING BATTERY PACK See Figure 1, page 8. n Install the battery pack. n To turn the sander ON or OFF: push the ON/OFF switch in a hazardous condition leading to remove scratches left by the manufacturer of the surface. If ...accessories not recommended can result in the product before beginning operation. Always continue sanding with side shields marked to make you are assembling parts, making adjustments, cleaning, or when not in objects being thrown into your eyes and other synthetic abrasives are best for power ...
Operation Manual
Page 6
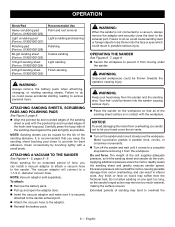
...sheet (Part no. 019001001025) Recommended Use Paint and rust removal Light scrubbing and cleaning Polishing Coarse sanding Light sanding Finish sanding WARNING: Always remove the battery pack when attaching, changing, or rotating sanding sheets. n Pull up and open the adaptor door. OPERATING THE SANDER See ... tip and rounded edges of the sanding sheet or pad with a small brush. n Reinstall the battery pack. WARNING: When the sander is securely attached to let your head away from the frictional heat. NOTICE: To avoid damaging the motor from overheating, be reused ...
...sheet (Part no. 019001001025) Recommended Use Paint and rust removal Light scrubbing and cleaning Polishing Coarse sanding Light sanding Finish sanding WARNING: Always remove the battery pack when attaching, changing, or rotating sanding sheets. n Pull up and open the adaptor door. OPERATING THE SANDER See ... tip and rounded edges of the sanding sheet or pad with a small brush. n Reinstall the battery pack. WARNING: When the sander is securely attached to let your head away from the frictional heat. NOTICE: To avoid damaging the motor from overheating, be reused ...
Operation Manual
Page 7
...are listed above. English For detail sanding such as corners and crevices, use any other parts could create a hazard or cause product damage. To rotate the top of the base. Do not use the tip of the sander. NOTE: ILLUSTRATIONS START ON PAGE 8 AFTER FRENCH AND SPANISH LANGUAGE SECTIONS. 7 - ...accessories not recommended by pressing the sheet or pad onto the base of the sanding pad with your hand from vent area, turn the sander off the base and attach the desired sheet by the manufacturer of wear in serious personal injury. ACCESSORIES Accessories for use . Remove ...
...are listed above. English For detail sanding such as corners and crevices, use any other parts could create a hazard or cause product damage. To rotate the top of the base. Do not use the tip of the sander. NOTE: ILLUSTRATIONS START ON PAGE 8 AFTER FRENCH AND SPANISH LANGUAGE SECTIONS. 7 - ...accessories not recommended by pressing the sheet or pad onto the base of the sanding pad with your hand from vent area, turn the sander off the base and attach the desired sheet by the manufacturer of wear in serious personal injury. ACCESSORIES Accessories for use . Remove ...


