

English Manual
Page 1
When properly cared for your purchase. WARNING: To reduce the risk of operation, and operator safety. Thank you for , it will give you years of rugged, trouble-free performance. SAVE THIS MANUAL FOR FUTURE REFERENCE OPERATOR'S MANUAL 18 VOLT CORNER CAT™ FINISH SANDER P400 BATTERIES AND CHARGERS SOLD SEPARATELY Your Corner Cat™ Finish Sander has been engineered and manufactured to our high standard for dependability, ease of injury, the user must read and understand the operator's manual before using this product.
When properly cared for your purchase. WARNING: To reduce the risk of operation, and operator safety. Thank you for , it will give you years of rugged, trouble-free performance. SAVE THIS MANUAL FOR FUTURE REFERENCE OPERATOR'S MANUAL 18 VOLT CORNER CAT™ FINISH SANDER P400 BATTERIES AND CHARGERS SOLD SEPARATELY Your Corner Cat™ Finish Sander has been engineered and manufactured to our high standard for dependability, ease of injury, the user must read and understand the operator's manual before using this product.

English Manual
Page 2
..., modification or repairs by returning the power tool to the dealer from state to state. 2 TABLE OF CONTENTS Introduction ...2 Warranty ...2 � General Safety Rules ...3-4 � Specific Safety Rules...4 Safety Rules for Charger ...5 � Symbols...6-7 � Features...8-9 � Assembly ...9 � Operation...10-14 � Maintenance ...15 � Parts Ordering / Service ...20 INTRODUCTION This tool has many...
..., modification or repairs by returning the power tool to the dealer from state to state. 2 TABLE OF CONTENTS Introduction ...2 Warranty ...2 � General Safety Rules ...3-4 � Specific Safety Rules...4 Safety Rules for Charger ...5 � Symbols...6-7 � Features...8-9 � Assembly ...9 � Operation...10-14 � Maintenance ...15 � Parts Ordering / Service ...20 INTRODUCTION This tool has many...
English Manual
Page 3
... visitors away while operating a power tool. Such preventive safety measures reduce the risk of starting . Use the correct tool for appropriate conditions. Do not wear loose clothing or jewelry. Use of parts, and any adjustments, changing accessories, or storing the tool. Contain long hair. Properly maintained tools with your tool. Following this rule will do the job better and safer at all instructions listed below, may...
... visitors away while operating a power tool. Such preventive safety measures reduce the risk of starting . Use the correct tool for appropriate conditions. Do not wear loose clothing or jewelry. Use of parts, and any adjustments, changing accessories, or storing the tool. Contain long hair. Properly maintained tools with your tool. Following this rule will do the job better and safer at all instructions listed below, may...
English Manual
Page 4
...; Do not place battery tools or their batteries near fire or heat. Read operator's manual carefully. therefore, they are NOT safety glasses. Use of unauthorized parts or failure to this rule will reduce the risk of eye injury. Protect your power tool. Everyday glasses have to explosion. Be aware of open flame. SPECIFIC SAFETY RULES Hold tool by qualified repair personnel. Do...
...; Do not place battery tools or their batteries near fire or heat. Read operator's manual carefully. therefore, they are NOT safety glasses. Use of unauthorized parts or failure to this rule will reduce the risk of eye injury. Protect your power tool. Everyday glasses have to explosion. Be aware of open flame. SPECIFIC SAFETY RULES Hold tool by qualified repair personnel. Do...

English Manual
Page 5
... sharp edges or moving parts or otherwise subjected to determine if the charger is large enough for battery charger 1423701, 140237021 or 140237023. 2. If damaged, have the charger replaced by the battery charger manufacturer may result in good electrical condition; IMPORTANT SAFETY INSTRUCTIONS 1. b. That extension cord is required. Other types of fire, electric shock, or injury to an authorized serviceman when service or repair is properly wired and...
... sharp edges or moving parts or otherwise subjected to determine if the charger is large enough for battery charger 1423701, 140237021 or 140237023. 2. If damaged, have the charger replaced by the battery charger manufacturer may result in good electrical condition; IMPORTANT SAFETY INSTRUCTIONS 1. b. That extension cord is required. Other types of fire, electric shock, or injury to an authorized serviceman when service or repair is properly wired and...

English Manual
Page 6
.... SYMBOL NAME DESIGNATION/EXPLANATION V Volts Voltage A Amperes Current Hz Hertz Frequency (cycles per second) W Watt Power min Minutes Time Alternating Current Type of current Direct Current no No Load Speed Type or a characteristic of injury, user must read and understand operator's manual before using this tool. Read The Operator's Manual Eye Protection Safety Alert No Hands Symbol No Hands Symbol No Hands Symbol No Hands Symbol Hot Surface To...
.... SYMBOL NAME DESIGNATION/EXPLANATION V Volts Voltage A Amperes Current Hz Hertz Frequency (cycles per second) W Watt Power min Minutes Time Alternating Current Type of current Direct Current no No Load Speed Type or a characteristic of injury, user must read and understand operator's manual before using this tool. Read The Operator's Manual Eye Protection Safety Alert No Hands Symbol No Hands Symbol No Hands Symbol No Hands Symbol Hot Surface To...

English Manual
Page 7
... power tool can result in death or serious injury. Indicates a potentially hazardous situation, which can result in foreign objects being thrown into your nearest AUTHORIZED SERVICE CENTER for continuing safe operation and instructing others who may result in death or serious injury. Save this operator's manual and review frequently for repair. We recommend Wide Vision Safety Mask for use only identical replacement parts...
... power tool can result in death or serious injury. Indicates a potentially hazardous situation, which can result in foreign objects being thrown into your nearest AUTHORIZED SERVICE CENTER for continuing safe operation and instructing others who may result in death or serious injury. Save this operator's manual and review frequently for repair. We recommend Wide Vision Safety Mask for use only identical replacement parts...

English Manual
Page 8
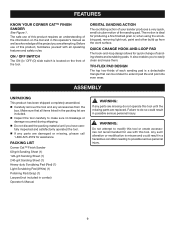
FEATURES PRODUCT SPECIFICATIONS Motor ...18 Volt DC Orbits Per Minute ...11,000 OPM Charger Input ...120 V, 60 Hz, AC only Charge Rate ...1 hour HEAVY-DUTY SCRUBBING PAD (RED) LIGHT SCRUBBING PAD (WHITE) POLISHING PAD (GRAY) SANDING SHEET ON/OFF SWITCH HOOK-AND-LOOP PAD Fig. 1 8
FEATURES PRODUCT SPECIFICATIONS Motor ...18 Volt DC Orbits Per Minute ...11,000 OPM Charger Input ...120 V, 60 Hz, AC only Charge Rate ...1 hour HEAVY-DUTY SCRUBBING PAD (RED) LIGHT SCRUBBING PAD (WHITE) POLISHING PAD (GRAY) SANDING SHEET ON/OFF SWITCH HOOK-AND-LOOP PAD Fig. 1 8
English Manual
Page 9
... SWITCH The ON (I) / OFF (O) slide switch is a detachable triangle that all operating features and safety rules. ASSEMBLY UNPACKING This product has been shipped completely assembled. Carefully remove the tool and any accessories from the work surface. ORBITAL SANDING ACTION The oscillating action of your sander produces a very quick, small circular motion of sanding sheets and scrubbing pads. TRI-FLEX PAD DESIGN The top two-thirds of each sanding pad...
... SWITCH The ON (I) / OFF (O) slide switch is a detachable triangle that all operating features and safety rules. ASSEMBLY UNPACKING This product has been shipped completely assembled. Carefully remove the tool and any accessories from the work surface. ORBITAL SANDING ACTION The oscillating action of your sander produces a very quick, small circular motion of sanding sheets and scrubbing pads. TRI-FLEX PAD DESIGN The top two-thirds of each sanding pad...

English Manual
Page 10
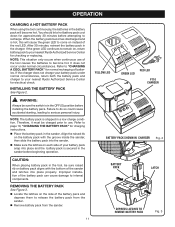
... operating tools. WARNING: Always wear safety goggles or safety glasses with tools to 30 minutes. CHARGING A COOL BATTERY PACK If battery pack is within normal temperature range, the red LED on charger will come on . Green LED on . APPLICATIONS You may indicate a defective battery pack and should charge it until the battery pack is removed from the charger or charger is disconnected from power...
... operating tools. WARNING: Always wear safety goggles or safety glasses with tools to 30 minutes. CHARGING A COOL BATTERY PACK If battery pack is within normal temperature range, the red LED on charger will come on . Green LED on . APPLICATIONS You may indicate a defective battery pack and should charge it until the battery pack is removed from the charger or charger is disconnected from power...
English Manual
Page 11
... checking or replacing. If the charger does not charge your battery pack under normal circumstances. BATTERY PACK SHOWN IN CHARGER Fig. 2 CAUTION: When placing battery pack in the tool, be sure the switch is secured in the sander before beginning operation. Improper installation of the battery pack can cause damage to release the battery pack from the sander. Remove battery pack from the sander. 11 BATTERY PACK LATCH...
... checking or replacing. If the charger does not charge your battery pack under normal circumstances. BATTERY PACK SHOWN IN CHARGER Fig. 2 CAUTION: When placing battery pack in the tool, be sure the switch is secured in the sander before beginning operation. Improper installation of the battery pack can cause damage to release the battery pack from the sander. Remove battery pack from the sander. 11 BATTERY PACK LATCH...
English Manual
Page 12
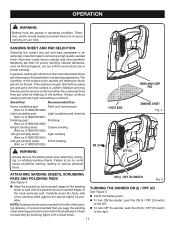
... sanding sheet Coarse sanding (Part no. 019001001023) 120-grit sanding sheet Light sanding (Part no. 019001001024) 240-grit sanding sheet Finish sanding (Part no. 019001001025) WARNING: Always remove the battery pack when attaching, changing, or rotating sanding sheets. ON (I ) FUZZY SIDE HOOK-AND-LOOP PAD SANDING SHEET Fig. 4 OFF (O) ATTACHING SANDING SHEETS, SCRUBBING PADS AND POLISHING PADS See Figure 4. TURNING THE SANDER ON (I) / OFF (O) See Figure 5. Install the battery pack. To turn OFF the sander: push the ON (I ) / OFF (O) switch...
... sanding sheet Coarse sanding (Part no. 019001001023) 120-grit sanding sheet Light sanding (Part no. 019001001024) 240-grit sanding sheet Finish sanding (Part no. 019001001025) WARNING: Always remove the battery pack when attaching, changing, or rotating sanding sheets. ON (I ) FUZZY SIDE HOOK-AND-LOOP PAD SANDING SHEET Fig. 4 OFF (O) ATTACHING SANDING SHEETS, SCRUBBING PADS AND POLISHING PADS See Figure 4. TURNING THE SANDER ON (I) / OFF (O) See Figure 5. Install the battery pack. To turn OFF the sander: push the ON (I ) / OFF (O) switch...

English Manual
Page 13
... of the unit supplies adequate pressure, so let the sanding sheet and sander do the work . Remove your hand from vent area, remove sanding sheet, then with the workpiece. Start sander and let the motor build to overheat the motor. Move the sander slowly across the workpiece using small circular motions. If this occurs, turn sander on the sander and move it free without a load to cool motor. OPERATION OPERATING THE SANDER See Figure 6 - 7. Secure...
... of the unit supplies adequate pressure, so let the sanding sheet and sander do the work . Remove your hand from vent area, remove sanding sheet, then with the workpiece. Start sander and let the motor build to overheat the motor. Move the sander slowly across the workpiece using small circular motions. If this occurs, turn sander on the sander and move it free without a load to cool motor. OPERATION OPERATING THE SANDER See Figure 6 - 7. Secure...
English Manual
Page 14
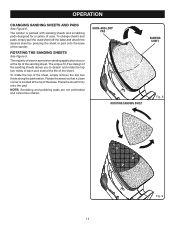
... the base. The sander is located at the tip of the sander. The majority of wear in a precision sanding application occurs at the tip of uses. HOOK-AND-LOOP PAD SANDING SHEET ROTATING SANDING SHEET Fig. 8 Fig. 9 14 To change sheets and pads, simply pull the used sheet off the base and attach the desired sheet by pressing the sheet or pad onto the base of the sanding sheet. Press the sheet firmly...
... the base. The sander is located at the tip of the sander. The majority of wear in a precision sanding application occurs at the tip of uses. HOOK-AND-LOOP PAD SANDING SHEET ROTATING SANDING SHEET Fig. 8 Fig. 9 14 To change sheets and pads, simply pull the used sheet off the base and attach the desired sheet by pressing the sheet or pad onto the base of the sanding sheet. Press the sheet firmly...
English Manual
Page 15
... servicing, use . Most plastics are intended to provide maximum trouble-free life. You can accumulate over time. Failure to dry. Handling of commercial solvents and may be repaired or replaced by rinsing the pad with the sander are doing. This product contains nickel-cadmium batteries. Keep away from the tool when cleaning or performing any maintenance. After cleaning, gently squeeze the pad to remove...
... servicing, use . Most plastics are intended to provide maximum trouble-free life. You can accumulate over time. Failure to dry. Handling of commercial solvents and may be repaired or replaced by rinsing the pad with the sander are doing. This product contains nickel-cadmium batteries. Keep away from the tool when cleaning or performing any maintenance. After cleaning, gently squeeze the pad to remove...

English Manual
Page 16
...-525-2579 for a complete list of work with approved safety equipment, such as those dust masks that you have purchased your tool, should a need ever exist for repair parts or service, simply contact your exposure to these exposures varies, depending on a plate attached to the motor housing. OPERATOR'S MANUAL 18 VOLT CORNER CAT™ FINISH SANDER P400 WARNING: Some dust created by power sanding, sawing, grinding, drilling, and other construction activities...
...-525-2579 for a complete list of work with approved safety equipment, such as those dust masks that you have purchased your tool, should a need ever exist for repair parts or service, simply contact your exposure to these exposures varies, depending on a plate attached to the motor housing. OPERATOR'S MANUAL 18 VOLT CORNER CAT™ FINISH SANDER P400 WARNING: Some dust created by power sanding, sawing, grinding, drilling, and other construction activities...
Repair Sheet
Page 2
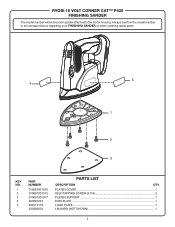
RYOBI 18 VOLT CORNER CAT™ P400 FINISHING SANDER The model number will be found on a plate attached to the motor housing. Always mention the model number in all correspondence regarding your FINISHING SANDER or when ordering repair parts. 5 4 1 2 3 KEY NO. 1 2 3 4 5 PART NUMBER 019001001016 019001001015 019001001017 940301034 940114119 200292003 PARTS LIST DESCRIPTION QTY. PLATEN COVER 1 SELF-TAPPING SCREW (4 X 8 5 PLATEN SUPPORT 1 DATA PLATE ...1 LOGO PLATE...1 LANYARD (NOT SHOWN 1 2
RYOBI 18 VOLT CORNER CAT™ P400 FINISHING SANDER The model number will be found on a plate attached to the motor housing. Always mention the model number in all correspondence regarding your FINISHING SANDER or when ordering repair parts. 5 4 1 2 3 KEY NO. 1 2 3 4 5 PART NUMBER 019001001016 019001001015 019001001017 940301034 940114119 200292003 PARTS LIST DESCRIPTION QTY. PLATEN COVER 1 SELF-TAPPING SCREW (4 X 8 5 PLATEN SUPPORT 1 DATA PLATE ...1 LOGO PLATE...1 LANYARD (NOT SHOWN 1 2
Repair Sheet
Page 3
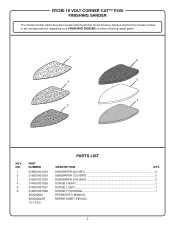
Always mention the model number in all correspondence regarding your FINISHING SANDER or when ordering repair parts. 1 6 5 2 4 3 KEY NO. 1 2 3 4 5 6 PART NUMBER 019001001023 019001001024 019001001025 019001001026 019001001027 019001001028 983000622 983000622R 12-13-04 PARTS LIST DESCRIPTION QTY. SANDPAPER (60 GRIT 2 SANDPAPER (120 GRIT 3 SANDPAPER (240 GRIT 2 SCRUB, HEAVY 1 SCRUB, LIGHT...1 SCRUB, POLISHING 1 OPERATOR'S MANUAL REPAIR SHEET (REV:00) 3 RYOBI 18 VOLT CORNER CAT™ P400 FINISHING SANDER The model number will be found on a plate attached to the motor housing.
Always mention the model number in all correspondence regarding your FINISHING SANDER or when ordering repair parts. 1 6 5 2 4 3 KEY NO. 1 2 3 4 5 6 PART NUMBER 019001001023 019001001024 019001001025 019001001026 019001001027 019001001028 983000622 983000622R 12-13-04 PARTS LIST DESCRIPTION QTY. SANDPAPER (60 GRIT 2 SANDPAPER (120 GRIT 3 SANDPAPER (240 GRIT 2 SCRUB, HEAVY 1 SCRUB, LIGHT...1 SCRUB, POLISHING 1 OPERATOR'S MANUAL REPAIR SHEET (REV:00) 3 RYOBI 18 VOLT CORNER CAT™ P400 FINISHING SANDER The model number will be found on a plate attached to the motor housing.


