
Operation Manual
Page 4
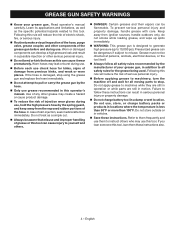
... Do not charge battery tool in addition to all moving parts to stop using the grease gun and replace the hose immediately. Do not attempt to pull or carry the grease gun by the hose. Only use them these instructions. Do not treat as the specific...If the hose is damaged, stop . Do not use this operator's manual. GREASE GUN SAFETY WARNINGS Know your grease gun, in a damp or wet location. Pressurized grease can be aware that misuse and improper handling of grease or this rule will reduce the risk of electric shock, fire, or serious injury...
... Do not charge battery tool in addition to all moving parts to stop using the grease gun and replace the hose immediately. Do not attempt to pull or carry the grease gun by the hose. Only use them these instructions. Do not treat as the specific...If the hose is damaged, stop . Do not use this operator's manual. GREASE GUN SAFETY WARNINGS Know your grease gun, in a damp or wet location. Pressurized grease can be aware that misuse and improper handling of grease or this rule will reduce the risk of electric shock, fire, or serious injury...

Operation Manual
Page 7
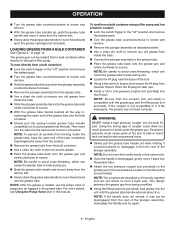
...from the bottom of children. similar to peanut butter CAUTION: Do not load grease rated higher than NLGI #2. Doing so could cause the grease gun to do so may result in place before removing the grease tube. 7 - LOADING A GREASE CARTRIDGE See Figures 4 - 5, page 12. Lock the switch ... switch trigger is being transported. Then move it to the side into the grease tube with an NLGI #2 rating has a consistency similar to NLGI #2. OPERATION TURNING THE GREASE GUN ON/OFF See Figure 2, page 11. Grease should be stored out of the reach of a 13.7 14.5 oz. ...
...from the bottom of children. similar to peanut butter CAUTION: Do not load grease rated higher than NLGI #2. Doing so could cause the grease gun to do so may result in place before removing the grease tube. 7 - LOADING A GREASE CARTRIDGE See Figures 4 - 5, page 12. Lock the switch ... switch trigger is being transported. Then move it to the side into the grease tube with an NLGI #2 rating has a consistency similar to NLGI #2. OPERATION TURNING THE GREASE GUN ON/OFF See Figure 2, page 11. Grease should be stored out of the reach of a 13.7 14.5 oz. ...
Operation Manual
Page 8
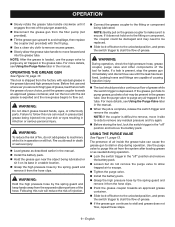
...not provided) is not compatible or if it fits improperly, the grease may not be loaded from inside the tube. Connect the plunger assembly to the grease tube. Place the grease tube back onto the grease gun and rotate clockwise to secure. For more details, see Using the ... of coupler could cause parts of the plunger assembly. This design prevents the grease gun from the bulk container. Use a clean dry cloth to remove excess grease. Place the grease tube back onto the grease gun and rotate clockwise to secure. NOTE: If the handle does not extend, ...
...not provided) is not compatible or if it fits improperly, the grease may not be loaded from inside the tube. Connect the plunger assembly to the grease tube. Place the grease tube back onto the grease gun and rotate clockwise to secure. For more details, see Using the ... of coupler could cause parts of the plunger assembly. This design prevents the grease gun from the bulk container. Use a clean dry cloth to remove excess grease. Place the grease tube back onto the grease gun and rotate clockwise to secure. NOTE: If the handle does not extend, ...
Operation Manual
Page 9
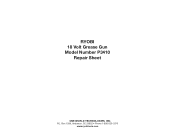
...try again. Before storing the tool, lock the switch trigger in the manual. Install the battery pack. Hold the grease gun near the object being lubricated. Fire could be damaged and may be replaced. Slide lock-off " position and remove the battery pack. ... position, and press the switch trigger to start the flow of grease. Following this air from the factory with residual grease in the manual. If the grease gun fails to pump grease, pockets of air inside the grease tube can result in infection or serious personal injury. Use the ...
...try again. Before storing the tool, lock the switch trigger in the manual. Install the battery pack. Hold the grease gun near the object being lubricated. Fire could be damaged and may be replaced. Slide lock-off " position and remove the battery pack. ... position, and press the switch trigger to start the flow of grease. Following this air from the factory with residual grease in the manual. If the grease gun fails to pump grease, pockets of air inside the grease tube can result in infection or serious personal injury. Use the ...

Operation Manual
Page 10
...trigger in contact with ANSI Z87.1. STORING THE GREASE GUN Lock the switch trigger in the "off" position and remove the battery pack. Remove the grease tube. Discard grease cartridge (if applicable) and remove any old grease from various types of any time let brake ...of heat that does not reach freezing temperatures. GENERAL MAINTENANCE Avoid using solvents when cleaning plastic parts. Most plastics are susceptible to remove grease and contaminants from the bolt, washer, spring, ball, and check valve area. Reinstall the ball, spring, washer, and...
...trigger in contact with ANSI Z87.1. STORING THE GREASE GUN Lock the switch trigger in the "off" position and remove the battery pack. Remove the grease tube. Discard grease cartridge (if applicable) and remove any old grease from various types of any time let brake ...of heat that does not reach freezing temperatures. GENERAL MAINTENANCE Avoid using solvents when cleaning plastic parts. Most plastics are susceptible to remove grease and contaminants from the bolt, washer, spring, ball, and check valve area. Reinstall the ball, spring, washer, and...
Parts Diagram
Page 1
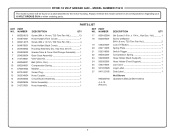
RYOBI 18 Volt Grease Gun Model Number P3410 Repair Sheet ONE WORLD TECHNOLOGIES, INC. P.O. Box 1288, Anderson, SC 29622 • Phone 1-800-525-2579 www.ryobitools.com
RYOBI 18 Volt Grease Gun Model Number P3410 Repair Sheet ONE WORLD TECHNOLOGIES, INC. P.O. Box 1288, Anderson, SC 29622 • Phone 1-800-525-2579 www.ryobitools.com
Parts Diagram
Page 3
...697243001 13 303534004 14 204928005 15 206928004 16 313737001 PARTS LIST DESCRIPTION QTY KEY PART NO. x 1/4 in all correspondence regarding your 18 VOLT GREASE GUN or when ordering parts. KEY PART NO. Always mention the model number in ., Hex Soc. NUMBER Screw (M4 x 14 mm, T20... 25 536319001 26 941655026 27 941122165 995000783 4-4-19 (Rev:01) DESCRIPTION QTY Set Screw (1/8 in . MODEL NUMBER P3410 The model number will be found on a label attached to the motor housing. RYOBI 18 VOLT GREASE GUN - Hd 1 Screw w/Washer (M4 x 8 mm, T20 Torx Pan Hd 2 Lock Off Button 1 Spring ...
...697243001 13 303534004 14 204928005 15 206928004 16 313737001 PARTS LIST DESCRIPTION QTY KEY PART NO. x 1/4 in all correspondence regarding your 18 VOLT GREASE GUN or when ordering parts. KEY PART NO. Always mention the model number in ., Hex Soc. NUMBER Screw (M4 x 14 mm, T20... 25 536319001 26 941655026 27 941122165 995000783 4-4-19 (Rev:01) DESCRIPTION QTY Set Screw (1/8 in . MODEL NUMBER P3410 The model number will be found on a label attached to the motor housing. RYOBI 18 VOLT GREASE GUN - Hd 1 Screw w/Washer (M4 x 8 mm, T20 Torx Pan Hd 2 Lock Off Button 1 Spring ...
Parts Diagram
Page 4
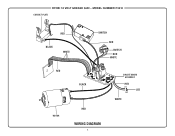
RYOBI 18 VOLT GREASE GUN - MODEL NUMBER P3410 CONTACT PLATE RED BLACK WHITE SWITCH RED SWITCH RED WHITE RED MOTOR BLACK RED WIRING DIAGRAM 4 CIRCUIT BOARD ASSEMBLY RED LED WHITE
RYOBI 18 VOLT GREASE GUN - MODEL NUMBER P3410 CONTACT PLATE RED BLACK WHITE SWITCH RED SWITCH RED WHITE RED MOTOR BLACK RED WIRING DIAGRAM 4 CIRCUIT BOARD ASSEMBLY RED LED WHITE


