
Operation Manual
Page 2
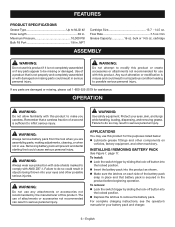
... not operate power tools in the off-position before turning the power tool on invites accidents. Remove any adapter plugs with your hair, clothing and gloves away from heat, oil, sharp edges or moving parts. Do not use with charger listed. There is earthed or grounded. Do not expose power tools to rain or wet conditions. Ensure the switch is unavoidable, use common sense when operating a power tool. Never...
... not operate power tools in the off-position before turning the power tool on invites accidents. Remove any adapter plugs with your hair, clothing and gloves away from heat, oil, sharp edges or moving parts. Do not use with charger listed. There is earthed or grounded. Do not expose power tools to rain or wet conditions. Ensure the switch is unavoidable, use common sense when operating a power tool. Never...
Operation Manual
Page 3
... loose clothing or jewelry. English POWER TOOL USE AND CARE Do not force the power tool. in accordance with these instructions to operate the power tool. Slippery handles and grasping surfaces do not allow you to become complacent and ignore tool safety principles. BATTERY TOOL USE AND CARE Recharge only with the charger specified by a qualified repair person using only identical replacement parts. A charger that is not in fire...
... loose clothing or jewelry. English POWER TOOL USE AND CARE Do not force the power tool. in accordance with these instructions to operate the power tool. Slippery handles and grasping surfaces do not allow you to become complacent and ignore tool safety principles. BATTERY TOOL USE AND CARE Recharge only with the charger specified by a qualified repair person using only identical replacement parts. A charger that is not in fire...
Operation Manual
Page 4
... of your grease gun. In case of damage from the exposed rubber portions of the hose, purge valve, grease coupler, and other grease may leak or burst during use , store, or charge battery packs or products in a damp or wet location. Read operator's manual carefully. Do not treat as the specific potential hazards related to all safety rules for kinks...
... of your grease gun. In case of damage from the exposed rubber portions of the hose, purge valve, grease coupler, and other grease may leak or burst during use , store, or charge battery packs or products in a damp or wet location. Read operator's manual carefully. Do not treat as the specific potential hazards related to all safety rules for kinks...
Operation Manual
Page 5
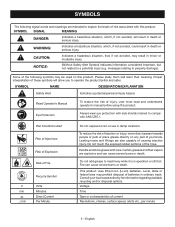
... NAME DESIGNATION/EXPLANATION Safety Alert Indicates a potential personal injury hazard. Read Operator's Manual To reduce the risk of the hose. To reduce the risk of current Revolutions, strokes, surface speed, orbits etc., per minute 5 - Fire can cause severe burns or death. This product uses lithium-ion (Li-ion) batteries. Voltage Time Type or a characteristic of injection or injury, never direct grease towards...
... NAME DESIGNATION/EXPLANATION Safety Alert Indicates a potential personal injury hazard. Read Operator's Manual To reduce the risk of the hose. To reduce the risk of current Revolutions, strokes, surface speed, orbits etc., per minute 5 - Fire can cause severe burns or death. This product uses lithium-ion (Li-ion) batteries. Voltage Time Type or a characteristic of injection or injury, never direct grease towards...
Operation Manual
Page 6
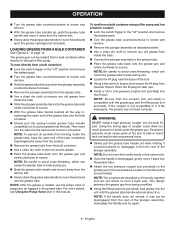
... any parts appear to remove the battery pack. WARNING: Always remove battery pack from the tool when you careless. Removing battery pack will prevent accidental starting that is not completely assembled or if any parts are assembling parts, making adjustments, cleaning, or when not in serious personal injury. WARNING: Use safety equipment. INSTALLING / REMOVING BATTERY PACK See Figure 1, page 11. To install: Lock the switch trigger by sliding the lock-off button into the locked...
... any parts appear to remove the battery pack. WARNING: Always remove battery pack from the tool when you careless. Removing battery pack will prevent accidental starting that is not completely assembled or if any parts are assembling parts, making adjustments, cleaning, or when not in serious personal injury. WARNING: Use safety equipment. INSTALLING / REMOVING BATTERY PACK See Figure 1, page 11. To install: Lock the switch trigger by sliding the lock-off button into the locked...

Operation Manual
Page 7
... and remove the battery pack. Turn the grease tube counterclockwise to loosen and remove. Pull the spring-loaded grease tube handle completely out. NOTE: Make sure the grease tube handle is a charged battery pack in the manual. The LED light illuminates only when there is locked in place before shutting off button should be in the locked position when the tool is locked in...
... and remove the battery pack. Turn the grease tube counterclockwise to loosen and remove. Pull the spring-loaded grease tube handle completely out. NOTE: Make sure the grease tube handle is a charged battery pack in the manual. The LED light illuminates only when there is locked in place before shutting off button should be in the locked position when the tool is locked in...
Operation Manual
Page 8
... allow the grease tube handle to secure. To load from a bulk container using a filler pump and low pressure coupler: Lock the switch trigger in the "off " position and remove the battery pack. Turn the grease tube counterclockwise to loosen and remove. Hold the grease tube firmly and turn the plunger assembly counterclockwise to loosen. Remove the plunger assembly from the grease...
... allow the grease tube handle to secure. To load from a bulk container using a filler pump and low pressure coupler: Lock the switch trigger in the "off " position and remove the battery pack. Turn the grease tube counterclockwise to loosen and remove. Hold the grease tube firmly and turn the plunger assembly counterclockwise to loosen. Remove the plunger assembly from the grease...
Operation Manual
Page 9
... the manual. Install the battery pack. Hold the grease gun near the object being injected into the grease tube. WARNING: Do not direct grease toward hands, eyes, or other components of grease. If the grease gun continues to move it is loaded, use the purge valve to remove any residual pressure and try again. Before storing the tool, lock the switch trigger...
... the manual. Install the battery pack. Hold the grease gun near the object being injected into the grease tube. WARNING: Do not direct grease toward hands, eyes, or other components of grease. If the grease gun continues to move it is loaded, use the purge valve to remove any residual pressure and try again. Before storing the tool, lock the switch trigger...

Operation Manual
Page 10
... pump, high pressure hose, or other parts can result in contact with plastic parts. STORING THE GREASE GUN Lock the switch trigger in the "off" position and remove the battery pack. Remove the grease tube. Discard grease cartridge (if applicable) and remove any old grease from various types of any time let brake fluids, gasoline, petroleum based products, penetrating oils, etc., come...
... pump, high pressure hose, or other parts can result in contact with plastic parts. STORING THE GREASE GUN Lock the switch trigger in the "off" position and remove the battery pack. Remove the grease tube. Discard grease cartridge (if applicable) and remove any old grease from various types of any time let brake fluids, gasoline, petroleum based products, penetrating oils, etc., come...
Parts Diagram
Page 1
RYOBI 18 Volt Grease Gun Model Number P3410 Repair Sheet ONE WORLD TECHNOLOGIES, INC. P.O. Box 1288, Anderson, SC 29622 • Phone 1-800-525-2579 www.ryobitools.com
RYOBI 18 Volt Grease Gun Model Number P3410 Repair Sheet ONE WORLD TECHNOLOGIES, INC. P.O. Box 1288, Anderson, SC 29622 • Phone 1-800-525-2579 www.ryobitools.com
Parts Diagram
Page 3
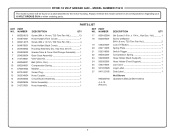
...Hd 1 Screw w/Washer (M4 x 8 mm, T20 Torx Pan Hd 2 Lock Off Button 1 Spring Plate 1 Switch Trigger 1 Compression Spring 1 Hose Holder (Back Support 1 Hose Holder (Front Support 1 Led Cover 1 Logo Label 1 Data Label 1 Not Shown: Operator's Manual (961153012) 3 Always mention the model number in . RYOBI 18 VOLT GREASE GUN - KEY PART NO. Key Nos. 26-27 1 Grease Tube & Cover Rod Plunger Assembly....... 1 Gear Case Assembly 1 Vent Valve Kit 1 Ball (3/8 in all correspondence regarding your 18 VOLT GREASE GUN or when ordering parts. MODEL NUMBER P3410 The model number will be...
...Hd 1 Screw w/Washer (M4 x 8 mm, T20 Torx Pan Hd 2 Lock Off Button 1 Spring Plate 1 Switch Trigger 1 Compression Spring 1 Hose Holder (Back Support 1 Hose Holder (Front Support 1 Led Cover 1 Logo Label 1 Data Label 1 Not Shown: Operator's Manual (961153012) 3 Always mention the model number in . RYOBI 18 VOLT GREASE GUN - KEY PART NO. Key Nos. 26-27 1 Grease Tube & Cover Rod Plunger Assembly....... 1 Gear Case Assembly 1 Vent Valve Kit 1 Ball (3/8 in all correspondence regarding your 18 VOLT GREASE GUN or when ordering parts. MODEL NUMBER P3410 The model number will be...
Parts Diagram
Page 4
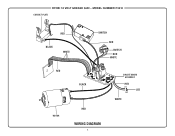
RYOBI 18 VOLT GREASE GUN - MODEL NUMBER P3410 CONTACT PLATE RED BLACK WHITE SWITCH RED SWITCH RED WHITE RED MOTOR BLACK RED WIRING DIAGRAM 4 CIRCUIT BOARD ASSEMBLY RED LED WHITE
RYOBI 18 VOLT GREASE GUN - MODEL NUMBER P3410 CONTACT PLATE RED BLACK WHITE SWITCH RED SWITCH RED WHITE RED MOTOR BLACK RED WIRING DIAGRAM 4 CIRCUIT BOARD ASSEMBLY RED LED WHITE


