
User Manual 2
Page 3
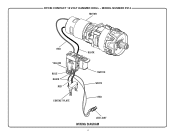
...1 NOT SHOWN: 991000307 4-8-15 (Rev:01) Operator's Manual 3 MODEL NUMBER P214 The model number will be found on a label attached to the motor housing. NUMBER 1 203494001 2 203496001 3 520413002 4 203497001 5 T662103001 6 520414002 7 203495001 8 670764001 9 660134006 10 940114178 11 660206041 PARTS LIST DESCRIPTION QTY Housing Assembly 1 Switch Assembly 1 Forward/Reverse Button 1 Motor Assembly 1 Screw (M4 x 8 mm 2 Gear Change Knob 1 Gear Box Assembly 1 Chuck 1 Screw (M6 x 18 mm 1 Logo Label 1 Screw (M3.5 x 14 mm 10 KEY PART NO. RYOBI COMPACT 18 VOLT HAMMER DRILL -
...1 NOT SHOWN: 991000307 4-8-15 (Rev:01) Operator's Manual 3 MODEL NUMBER P214 The model number will be found on a label attached to the motor housing. NUMBER 1 203494001 2 203496001 3 520413002 4 203497001 5 T662103001 6 520414002 7 203495001 8 670764001 9 660134006 10 940114178 11 660206041 PARTS LIST DESCRIPTION QTY Housing Assembly 1 Switch Assembly 1 Forward/Reverse Button 1 Motor Assembly 1 Screw (M4 x 8 mm 2 Gear Change Knob 1 Gear Box Assembly 1 Chuck 1 Screw (M6 x 18 mm 1 Logo Label 1 Screw (M3.5 x 14 mm 10 KEY PART NO. RYOBI COMPACT 18 VOLT HAMMER DRILL -
User Manual 2
Page 4
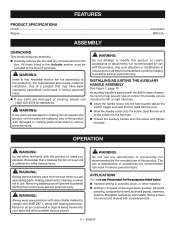
MODEL NUMBER P214 MOTOR RED YELLOW BLUE BLACK RED CONTACT PLATE BLACK + + ++ SWITCH WHITE RED LED LIGHT WIRING DIAGRAM 4 RYOBI COMPACT 18 VOLT HAMMER DRILL -
MODEL NUMBER P214 MOTOR RED YELLOW BLUE BLACK RED CONTACT PLATE BLACK + + ++ SWITCH WHITE RED LED LIGHT WIRING DIAGRAM 4 RYOBI COMPACT 18 VOLT HAMMER DRILL -

Operation Manual
Page 2
... instructions may affect the power tool's operation. Contain long hair. The correct power tool will reduce personal injuries. Prevent unintentional starting the power tool accidentally. Store idle power tools out of the reach of parts and any adapter plugs with 18V lithium-ion battery packs, see tool/appliance/battery pack/charger correlation supplement 987000-432. If damaged, have the switch on invites accidents. Remove any adjusting key or wrench before turning the power tool...
... instructions may affect the power tool's operation. Contain long hair. The correct power tool will reduce personal injuries. Prevent unintentional starting the power tool accidentally. Store idle power tools out of the reach of parts and any adapter plugs with 18V lithium-ion battery packs, see tool/appliance/battery pack/charger correlation supplement 987000-432. If damaged, have the switch on invites accidents. Remove any adjusting key or wrench before turning the power tool...

Operation Manual
Page 3
... servicing a power tool, use , keep it away from the battery may create a risk of unauthorized parts or failure to control. Use the power tool, accessories and tool bits etc. Shorting the battery terminals together may cause burns or a fire. Under abusive conditions, liquid may occur. HAMMER DRILL SAFETY WARNINGS Wear ear protectors with soap and water. Following this manual. GENERAL POWER TOOL SAFETY WARNINGS Keep cutting tools sharp...
... servicing a power tool, use , keep it away from the battery may create a risk of unauthorized parts or failure to control. Use the power tool, accessories and tool bits etc. Shorting the battery terminals together may cause burns or a fire. Under abusive conditions, liquid may occur. HAMMER DRILL SAFETY WARNINGS Wear ear protectors with soap and water. Following this manual. GENERAL POWER TOOL SAFETY WARNINGS Keep cutting tools sharp...

Operation Manual
Page 4
... with ANSI Z87.1. SYMBOL NAME DESIGNATION/EXPLANATION Safety Alert Indicates a potential personal injury hazard. Always wear eye protection with this product. Read Operator's Manual Eye Protection To reduce the risk of current Rotational speed, at no .../min Recycle Symbol Volts Minutes Direct Current No Load Speed Per Minute This product uses lithium-ion (Li-ion) batteries. SYMBOL SIGNAL MEANING DANGER: Indicates a hazardous situation...
... with ANSI Z87.1. SYMBOL NAME DESIGNATION/EXPLANATION Safety Alert Indicates a potential personal injury hazard. Always wear eye protection with this product. Read Operator's Manual Eye Protection To reduce the risk of current Rotational speed, at no .../min Recycle Symbol Volts Minutes Direct Current No Load Speed Per Minute This product uses lithium-ion (Li-ion) batteries. SYMBOL SIGNAL MEANING DANGER: Indicates a hazardous situation...
Operation Manual
Page 5
... injury. INSTALLING/ADJUSTING THE AUXILIARY HANDLE ASSEMBLY See Figure 1, page 10. Any such alteration or modification is packed with this product with screwdriver bits 5 - OPERATION WARNING: Do not allow familiarity with the drill for the purposes listed below: Hammer drilling in concrete, brick, or other possible serious injuries. ASSEMBLY UNPACKING This product requires assembly. n Insert the handle screw into the hole located above the switch trigger and...
... injury. INSTALLING/ADJUSTING THE AUXILIARY HANDLE ASSEMBLY See Figure 1, page 10. Any such alteration or modification is packed with this product with screwdriver bits 5 - OPERATION WARNING: Do not allow familiarity with the drill for the purposes listed below: Hammer drilling in concrete, brick, or other possible serious injuries. ASSEMBLY UNPACKING This product requires assembly. n Insert the handle screw into the hole located above the switch trigger and...
Operation Manual
Page 6
... before changing the direction of the drill slightly and insert the drill bit. TWO-SPEED GEAR TRAIN (HI-LO SWITCH) See Figure 6, page 11. Select LOW (1) speed for applications requiring higher power and torque. Select HIGH (2) speed for driving screws. Drill mode should be used for fast drilling, hammer drilling or driving applications. Hammer mode should be used for drilling and other , turn the chuck by running . Do not use is running it OFF, release the switch trigger...
... before changing the direction of the drill slightly and insert the drill bit. TWO-SPEED GEAR TRAIN (HI-LO SWITCH) See Figure 6, page 11. Select LOW (1) speed for applications requiring higher power and torque. Select HIGH (2) speed for driving screws. Drill mode should be used for fast drilling, hammer drilling or driving applications. Hammer mode should be used for drilling and other , turn the chuck by running . Do not use is running it OFF, release the switch trigger...
Operation Manual
Page 7
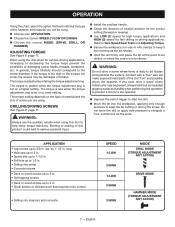
... torque reactions. The torque is set on the type of material and the size of this tool to keep the bit cutting or driving the screw. WARNING: Always use the auxiliary handle when using . Choose your APPLICATION. Choose the correct SPEED: (1/LOW OR 2/HIGH) Choose the correct MODE: (DRIVE, DRILL, OR HAMMER) ADJUSTING TORQUE See Figure 8, page 11. Binding or stalling of screw you must drive a screw where hidden wire...
... torque reactions. The torque is set on the type of material and the size of this tool to keep the bit cutting or driving the screw. WARNING: Always use the auxiliary handle when using . Choose your APPLICATION. Choose the correct SPEED: (1/LOW OR 2/HIGH) Choose the correct MODE: (DRIVE, DRILL, OR HAMMER) ADJUSTING TORQUE See Figure 8, page 11. Binding or stalling of screw you must drive a screw where hidden wire...
Operation Manual
Page 8
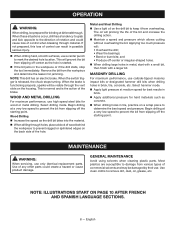
... and may be damaged by their use only identical replacement parts. Select hammer mode. Apply light pressure at medium speed for best results in brick. Apply additional pressure for binding at bit breakthrough. Begin drilling at a very low speed to prevent the bit from slipping off the starting point. MAINTENANCE WARNING: When servicing, use . When the switch trigger is functioning properly, sparks will prevent...
... and may be damaged by their use only identical replacement parts. Select hammer mode. Apply light pressure at medium speed for best results in brick. Apply additional pressure for binding at bit breakthrough. Begin drilling at a very low speed to prevent the bit from slipping off the starting point. MAINTENANCE WARNING: When servicing, use . When the switch trigger is functioning properly, sparks will prevent...


