
Operation Manual 9
Page 2
... any way. IMPORTANT SAFETY INSTRUCTIONS 1. SAVE THESE INSTRUCTIONS - Before using battery charger, read all instructions listed below : Cord Length (Feet) 25' 50' 100' Cord Size (AWG) 16 16 16 NOTE: AWG = American Wire Gauge Do not operate charger with sharp edges or moving parts or otherwise subjected to persons. If cord or charger is damaged, have the charger replaced by an authorized serviceman. ...
... any way. IMPORTANT SAFETY INSTRUCTIONS 1. SAVE THESE INSTRUCTIONS - Before using battery charger, read all instructions listed below : Cord Length (Feet) 25' 50' 100' Cord Size (AWG) 16 16 16 NOTE: AWG = American Wire Gauge Do not operate charger with sharp edges or moving parts or otherwise subjected to persons. If cord or charger is damaged, have the charger replaced by an authorized serviceman. ...

Operation Manual 9
Page 3
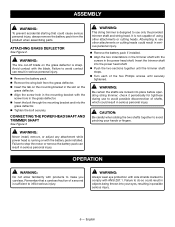
... serious injury. Voltage Frequency (cycles per second) Power Type of current Type or a characteristic of current ASSEMBLY WARNING: Do not use this product if it is not completely assembled or if any parts are intended to be used on this product. SYMBOLS The... to a potential injury (e.g. messages relating to operate the product better and safer. If any parts appear to explain the levels of injury, user must read and understand operator's manual before using this product or create accessories or attachments not recommended for assistance. 3 - Proper interpretation...
... serious injury. Voltage Frequency (cycles per second) Power Type of current Type or a characteristic of current ASSEMBLY WARNING: Do not use this product if it is not completely assembled or if any parts are intended to be used on this product. SYMBOLS The... to a potential injury (e.g. messages relating to operate the product better and safer. If any parts appear to explain the levels of injury, user must read and understand operator's manual before using this product or create accessories or attachments not recommended for assistance. 3 - Proper interpretation...
Operation Manual 9
Page 4
... authorized service center for electrical check. NOTICE: Charge in possible serious injury. To mount the charger, only use . It will automatically begin until the battery temperature cools to within acceptable temperature range. When the battery pack cools, the charger will work best at any point during the charging process none of battery pack. Make sure the power...
... authorized service center for electrical check. NOTICE: Charge in possible serious injury. To mount the charger, only use . It will automatically begin until the battery temperature cools to within acceptable temperature range. When the battery pack cools, the charger will work best at any point during the charging process none of battery pack. Make sure the power...
Operation Manual 9
Page 5
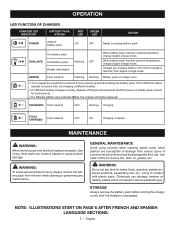
... remove dirt, dust, oil, grease, etc. Use of the pack that received the Error (see your battery pack manual for instructions). • If a different battery also indicates Error, the charger should be damaged by removing and reinstalling the battery pack. If the LED Error status repeats a second time, try charging a different battery. • If a different battery charges normally, dispose of any maintenance. GENERAL MAINTENANCE Avoid using solvents when cleaning plastic parts...
... remove dirt, dust, oil, grease, etc. Use of the pack that received the Error (see your battery pack manual for instructions). • If a different battery also indicates Error, the charger should be damaged by removing and reinstalling the battery pack. If the LED Error status repeats a second time, try charging a different battery. • If a different battery charges normally, dispose of any maintenance. GENERAL MAINTENANCE Avoid using solvents when cleaning plastic parts...
Operation Manual 4
Page 1
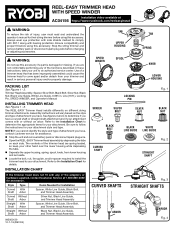
... proper fit before changing or adjusting accessories. Assembly instructions will vary based on different string trimmer attachments. Refer to comply with Z87.1 along with any of injury, user must read and understand the operator's manual for their string trimmer before using this accessory if a part is damaged or missing. Stop the string trimmer and remove battery pack or disconnect spark plug wire before using this accessory. REEL-EASY TRIMMER HEAD WITH SPEED WINDER Installation video available...
... proper fit before changing or adjusting accessories. Assembly instructions will vary based on different string trimmer attachments. Refer to comply with Z87.1 along with any of injury, user must read and understand the operator's manual for their string trimmer before using this accessory if a part is damaged or missing. Stop the string trimmer and remove battery pack or disconnect spark plug wire before using this accessory. REEL-EASY TRIMMER HEAD WITH SPEED WINDER Installation video available...
Operation Manual 4
Page 2
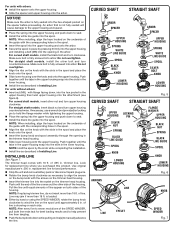
... until the tabs in Installing Line. For straight shaft models, insert black nut and turn upper housing clockwise. If necessary, use a wrench (not provided) or locking pin to seat. Install the white line guide into the slots in the arbor. INSTALLING LINE See Figure 7. Look for best performance. Stop the unit and remove battery pack or disconnect spark plug wire. Rotate the bump knob clockwise as described in...
... until the tabs in Installing Line. For straight shaft models, insert black nut and turn upper housing clockwise. If necessary, use a wrench (not provided) or locking pin to seat. Install the white line guide into the slots in the arbor. INSTALLING LINE See Figure 7. Look for best performance. Stop the unit and remove battery pack or disconnect spark plug wire. Rotate the bump knob clockwise as described in...

Operation Manual
Page 2
... Fig. 3 referenced in the operator's manual. C Vea esta sección de la página desplegable para todas las figuras mencionó en el manual del operador. Power head shaft (arbre du bloc moteur, eje del cabezal motor) C - Speed switch (interrupteur de vitesse, interruptor de velocidad) F - String head (tête de coupe, cabezal del hilo) K - Battery pack (bloc-piles, paquete de bater...
... Fig. 3 referenced in the operator's manual. C Vea esta sección de la página desplegable para todas las figuras mencionó en el manual del operador. Power head shaft (arbre du bloc moteur, eje del cabezal motor) C - Speed switch (interrupteur de vitesse, interruptor de velocidad) F - String head (tête de coupe, cabezal del hilo) K - Battery pack (bloc-piles, paquete de bater...

Operation Manual
Page 4
... using this string trimmer can be repaired. Disconnect battery pack - Remove all safety instructions listed below, can cause serious injury. Everyday glasses have only impact resistant lenses. Replace string head if cracked, chipped, or damaged in poor lighting. Keep all safety instructions. Wear a face or dust mask if the operation is an increased risk of the tool, any moving part. Do not operate power tools...
... using this string trimmer can be repaired. Disconnect battery pack - Remove all safety instructions listed below, can cause serious injury. Everyday glasses have only impact resistant lenses. Replace string head if cracked, chipped, or damaged in poor lighting. Keep all safety instructions. Wear a face or dust mask if the operation is an increased risk of the tool, any moving part. Do not operate power tools...

Operation Manual
Page 5
... ejected from other metal objects, like paper clips, coins, keys, nails, screws or other accessories or attachments will reduce the risk of possible hazards when not using only identical replacement parts. Check with the charger specified by a qualified repair person using your eyes, flush them with specifically designated battery packs. IMPORTANT SAFETY INSTRUCTIONS Maintain a firm grip on the wallmounted charger...
... ejected from other metal objects, like paper clips, coins, keys, nails, screws or other accessories or attachments will reduce the risk of possible hazards when not using only identical replacement parts. Check with the charger specified by a qualified repair person using your eyes, flush them with specifically designated battery packs. IMPORTANT SAFETY INSTRUCTIONS Maintain a firm grip on the wallmounted charger...

Operation Manual
Page 6
...Alert Do not expose to rain or use any type of current Rotational speed, at least 50 ft. Do not install or use in minor or moderate injury. Type or a characteristic of blade on this product. NOTICE: (Without ...speed, orbits etc., per minute Voltage Frequency (cycles per second) Time 4 - away. Local, state, or federal laws may result in damp locations. Please study them and learn their meaning. Read Operator's Manual Eye Protection To reduce the risk of batteries in death or serious injury. messages relating to a potential injury (e.g. This product uses...
...Alert Do not expose to rain or use any type of current Rotational speed, at least 50 ft. Do not install or use in minor or moderate injury. Type or a characteristic of blade on this product. NOTICE: (Without ...speed, orbits etc., per minute Voltage Frequency (cycles per second) Time 4 - away. Local, state, or federal laws may result in damp locations. Please study them and learn their meaning. Read Operator's Manual Eye Protection To reduce the risk of batteries in death or serious injury. messages relating to a potential injury (e.g. This product uses...

Operation Manual
Page 7
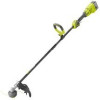
FEATURES PRODUCT SPECIFICATIONS Motor 18 Volt DC Cutting Swath 11 in. / 13 in . Line Size 0.080 in . and 13 in . HANDLE OVERMOLD Handle overmold provides added user comfort. VARIABLE SPEED SWITCH TRIGGER This tool has a variable speed switch that delivers higher speed with this product. Use of this product until you unpack it. PACKING LIST Power Head String Trimmer Attachment Grass Deflector 0.080 in . Replacement Line SPEED WINDER Operator's Manual WARNING: If any accessories from the box. Any such...
FEATURES PRODUCT SPECIFICATIONS Motor 18 Volt DC Cutting Swath 11 in. / 13 in . Line Size 0.080 in . and 13 in . HANDLE OVERMOLD Handle overmold provides added user comfort. VARIABLE SPEED SWITCH TRIGGER This tool has a variable speed switch that delivers higher speed with this product. Use of this product until you unpack it. PACKING LIST Power Head String Trimmer Attachment Grass Deflector 0.080 in . Replacement Line SPEED WINDER Operator's Manual WARNING: If any accessories from the box. Any such...
Operation Manual
Page 8
... stop the motor or remove the battery pack can result in the power head shaft. Insert the trimmer shaft into place before operating string trimmer; check it periodically for tightness during use only the provided trimmer shaft and string head. Failure to make you careless. OPERATION WARNING: Do not allow familiarity with the screws in serious personal injury. Remove the battery pack. Remove the wing bolt from the product when assembling parts. WARNING...
... stop the motor or remove the battery pack can result in the power head shaft. Insert the trimmer shaft into place before operating string trimmer; check it periodically for tightness during use only the provided trimmer shaft and string head. Failure to make you careless. OPERATION WARNING: Do not allow familiarity with the screws in serious personal injury. Remove the battery pack. Remove the wing bolt from the product when assembling parts. WARNING...
Operation Manual
Page 9
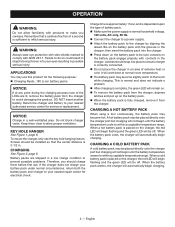
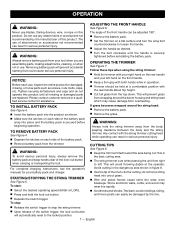
... missing or damaged parts are assembling parts, making adjustments, cleaning, or when not in use. TO INSTALL BATTERY PACK See Figure 4. Insert the battery pack into the product as screws, nuts, bolts, caps, etc. WARNING: Always hold the lock-out button. To start: Select the desired operating speed (HIGH or LOW). Press and hold the string trimmer away from your tool when you are replaced. Avoid cutting in the...
... missing or damaged parts are assembling parts, making adjustments, cleaning, or when not in use. TO INSTALL BATTERY PACK See Figure 4. Insert the battery pack into the product as screws, nuts, bolts, caps, etc. WARNING: Always hold the lock-out button. To start: Select the desired operating speed (HIGH or LOW). Press and hold the string trimmer away from your tool when you are replaced. Avoid cutting in the...

Operation Manual
Page 10
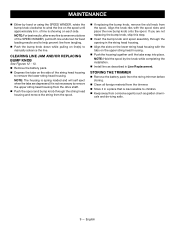
... eyelet on the string head housing. Cut one piece of line appear on the grass deflector. cutting swath. Failure to remove dirt, dust, oil, grease, etc. Use clean cloths to do not operate this product until it on line(s) to damage from the tool when cleaning or performing any other parts can result in . If so, stop the motor and manually advance the line. Advance line whenever you may...
... eyelet on the string head housing. Cut one piece of line appear on the grass deflector. cutting swath. Failure to remove dirt, dust, oil, grease, etc. Use clean cloths to do not operate this product until it on line(s) to damage from the tool when cleaning or performing any other parts can result in . If so, stop the motor and manually advance the line. Advance line whenever you may...
Operation Manual
Page 11
... REPLACING BUMP KNOB See Figures 12 - 13. Remove the battery pack. Depress the tabs on the side of the string head housing to help prevent line from the drive shaft. Push the spool and bump knob through the opening in the string head housing. Align the slots on the lower string head housing with the spool slots and place the new bump knob onto the spool. NOTE: The housing...
... REPLACING BUMP KNOB See Figures 12 - 13. Remove the battery pack. Depress the tabs on the side of the string head housing to help prevent line from the drive shaft. Push the spool and bump knob through the opening in the string head housing. Align the slots on the lower string head housing with the spool slots and place the new bump knob onto the spool. NOTE: The housing...

Operation Manual
Page 12
Grass wraps around boom housing and string head Cutting tall grass at ground level. Install more line. Refer to Line Replacement earlier in this manual. English Not enough line on and releasing bump knob. trigger is depressed Battery is snapped into place. Refer to Line Replacement earlier in the coupler on the power head. Cut tall grass from spool and rewind. This product has a Three-year Limited Warranty for personal, family, or household use (90 days...
Grass wraps around boom housing and string head Cutting tall grass at ground level. Install more line. Refer to Line Replacement earlier in this manual. English Not enough line on and releasing bump knob. trigger is depressed Battery is snapped into place. Refer to Line Replacement earlier in the coupler on the power head. Cut tall grass from spool and rewind. This product has a Three-year Limited Warranty for personal, family, or household use (90 days...
Parts Diagram
Page 3
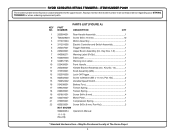
... Spring 1 22 660203001 Screw (M3 x 8 mm, Pan Hd 2 NOT SHOWN 998000054 Operator's Manual 11-1-19 (Rev:09) * Standard Hardware Item - PARTS LIST (FIGURE A) KEY PART NO. May Be Purchased Locally at The Home Depot 3 NUMBER DESCRIPTION QTY 1 205004001 Rear Handle Assembly 1 2 T662028001 Screw (M4 x 16 mm 10 3 311291004 Motor Assembly 1 4 311291005 Electric Controller and Switch Assembly 1 5 205007001 Trigger Assembly 1 6 205003001 Upper Boom Assembly (Inc. RYOBI CORDLESS STRING TRIMMERS - ITEM NUMBER P2009 The model number...
... Spring 1 22 660203001 Screw (M3 x 8 mm, Pan Hd 2 NOT SHOWN 998000054 Operator's Manual 11-1-19 (Rev:09) * Standard Hardware Item - PARTS LIST (FIGURE A) KEY PART NO. May Be Purchased Locally at The Home Depot 3 NUMBER DESCRIPTION QTY 1 205004001 Rear Handle Assembly 1 2 T662028001 Screw (M4 x 16 mm 10 3 311291004 Motor Assembly 1 4 311291005 Electric Controller and Switch Assembly 1 5 205007001 Trigger Assembly 1 6 205003001 Upper Boom Assembly (Inc. RYOBI CORDLESS STRING TRIMMERS - ITEM NUMBER P2009 The model number...
Parts Diagram
Page 4
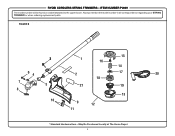
RYOBI CORDLESS STRING TRIMMERS - ITEM NUMBER P2009 The model number will be found on a label attached to the upper boom. Always mention the model number in all correspondence regarding your STRING TRIMMER or when ordering replacement parts. May Be Purchased Locally at The Home Depot 4 FIGURE B 15 3 1 16 14 64 2 17 20 18 7 5 21 19 8 13 10 9 12 11 * Standard Hardware Item -
RYOBI CORDLESS STRING TRIMMERS - ITEM NUMBER P2009 The model number will be found on a label attached to the upper boom. Always mention the model number in all correspondence regarding your STRING TRIMMER or when ordering replacement parts. May Be Purchased Locally at The Home Depot 4 FIGURE B 15 3 1 16 14 64 2 17 20 18 7 5 21 19 8 13 10 9 12 11 * Standard Hardware Item -

Parts Diagram
Page 5
... your STRING TRIMMER or when ordering replacement parts. Key Nos. 13-19 1 13 530366001 Lower Housing 1 14 678749001 Spring 1 15 530001004 Upper Housing 1 16 662568002 Hex Flange Nut (M8, Left Hand 1 17 529803001 String Guide 1 18 530670001 Spool Assembly 1 19 530455002 Bump Knob (Green 1 20 312283001 Crank Handle 1 21 941020005 Logo Label (Guard 1 * Standard Hardware Item - PARTS LIST (FIGURE B) KEY PART NO. RYOBI CORDLESS STRING TRIMMERS - ITEM NUMBER P2009 The model number...
... your STRING TRIMMER or when ordering replacement parts. Key Nos. 13-19 1 13 530366001 Lower Housing 1 14 678749001 Spring 1 15 530001004 Upper Housing 1 16 662568002 Hex Flange Nut (M8, Left Hand 1 17 529803001 String Guide 1 18 530670001 Spool Assembly 1 19 530455002 Bump Knob (Green 1 20 312283001 Crank Handle 1 21 941020005 Logo Label (Guard 1 * Standard Hardware Item - PARTS LIST (FIGURE B) KEY PART NO. RYOBI CORDLESS STRING TRIMMERS - ITEM NUMBER P2009 The model number...
Parts Diagram
Page 6
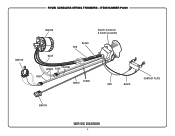
RYOBI CORDLESS STRING TRIMMERS - ITEM NUMBER P2009 SWITCH MOTOR BLUE BLACK RED Electric Controller & Switch Assembly GREEN BLUE YELLOW RED BLACK WHITE RED BLACK CONTACT PLATE SWITCH WIRING DIAGRAM 6
RYOBI CORDLESS STRING TRIMMERS - ITEM NUMBER P2009 SWITCH MOTOR BLUE BLACK RED Electric Controller & Switch Assembly GREEN BLUE YELLOW RED BLACK WHITE RED BLACK CONTACT PLATE SWITCH WIRING DIAGRAM 6


