

User Manual
Page 2
Power head (bloc moteur, cabezal motor) B - Power head shaft (arbre du bloc moteur, eje del cabezal motor) L - Hex head screws (boulons à six pans, tornillos de cabeza hexagonal) D - Tighten (serrer, ajustar) G - See this fold-out section for all the figures referenced in the operator's manual. Fig. 1 E C A Fig. 3 B A C E F G D F H I - Switch trigger (gâchette, gatillo del interruptor) E - Speed switch (interrupteur de vitesse, interruptor de velocidad) F - Telescoping boom (fl...
Power head (bloc moteur, cabezal motor) B - Power head shaft (arbre du bloc moteur, eje del cabezal motor) L - Hex head screws (boulons à six pans, tornillos de cabeza hexagonal) D - Tighten (serrer, ajustar) G - See this fold-out section for all the figures referenced in the operator's manual. Fig. 1 E C A Fig. 3 B A C E F G D F H I - Switch trigger (gâchette, gatillo del interruptor) E - Speed switch (interrupteur de vitesse, interruptor de velocidad) F - Telescoping boom (fl...
User Manual
Page 5
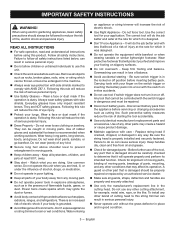
.... Remove all parts of electric shock. Use Right Appliance - Following this unit when you are NOT safety glasses. Be sure switch trigger is damaged should always be controlled with side shields. Use of moving part. Do not operate power tools in loss of rubber gloves and substantial footwear is grounded. Avoid Dangerous Environments - Check for your body away from oil and grease...
.... Remove all parts of electric shock. Use Right Appliance - Following this unit when you are NOT safety glasses. Be sure switch trigger is damaged should always be controlled with side shields. Use of moving part. Do not operate power tools in loss of rubber gloves and substantial footwear is grounded. Avoid Dangerous Environments - Check for your body away from oil and grease...

User Manual
Page 6
... area to avoid overheating the motor. If liquid gets into an electrical outlet; Remove objects (rocks, broken glass, nails, wire, string, etc.) which can explode in rain, or damp or wet location. If contact accidentally occurs, flush with water immediately. Do not crush, drop or damage battery pack. For use only. Following this power tool. Released electrolyte is designed...
... area to avoid overheating the motor. If liquid gets into an electrical outlet; Remove objects (rocks, broken glass, nails, wire, string, etc.) which can explode in rain, or damp or wet location. If contact accidentally occurs, flush with water immediately. Do not crush, drop or damage battery pack. For use only. Following this power tool. Released electrolyte is designed...

User Manual
Page 7
... use any type of injury, user must read and understand operator's manual before using this product. Read Operator's Manual Eye Protection To reduce the risk of blade on this product. no load Revolutions, strokes, surface speed, orbits etc., per minute Voltage Frequency (cycles per second) Time 5 - This product uses lithium-ion (Li-ion) and nickel-cadmium (Ni-Cd) batteries. Proper interpretation of current Rotational speed...
... use any type of injury, user must read and understand operator's manual before using this product. Read Operator's Manual Eye Protection To reduce the risk of blade on this product. no load Revolutions, strokes, surface speed, orbits etc., per minute Voltage Frequency (cycles per second) Time 5 - This product uses lithium-ion (Li-ion) and nickel-cadmium (Ni-Cd) batteries. Proper interpretation of current Rotational speed...
User Manual
Page 8
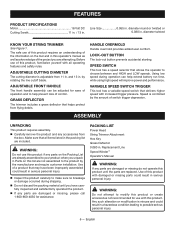
... YOUR STRING TRIMMER See Figure 1. PACKING LIST Power Head String Trimmer Attachment Hex Key Grass Deflector 0.080 in . Line Size 0.065 in . HANDLE OVERMOLD Handle overmold provides added user comfort. n If any parts are damaged or missing, please call 1-800-860-4050 for use of the project you are replaced. SPEED SWITCH This tool has a speed selector that may have carefully inspected and satisfactorily operated the product. Speed is controlled by rotating the line cutoff blade. LOCK...
... YOUR STRING TRIMMER See Figure 1. PACKING LIST Power Head String Trimmer Attachment Hex Key Grass Deflector 0.080 in . Line Size 0.065 in . HANDLE OVERMOLD Handle overmold provides added user comfort. n If any parts are damaged or missing, please call 1-800-860-4050 for use of the project you are replaced. SPEED SWITCH This tool has a speed selector that may have carefully inspected and satisfactorily operated the product. Speed is controlled by rotating the line cutoff blade. LOCK...

User Manual
Page 9
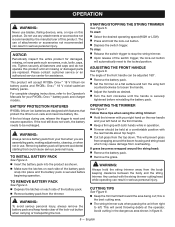
... string trimmer is sharp. Attempting to use other attachments or cutting heads. Failure to avoid possible disconnection of shafts, which could result in serious personal injury. check it periodically for tightness during use only the provided trimmer shaft and string head. WARNING: The line cut-off blade on the grass deflector. Align the screw hole in the trimmer shaft with ANSI Z87.1. CONNECTING THE POWER HEAD SHAFT AND TRIMMER SHAFT See Figure 3 Remove the battery...
... string trimmer is sharp. Attempting to use other attachments or cutting heads. Failure to avoid possible disconnection of shafts, which could result in serious personal injury. check it periodically for tightness during use only the provided trimmer shaft and string head. WARNING: The line cut-off blade on the grass deflector. Align the screw hole in the trimmer shaft with ANSI Z87.1. CONNECTING THE POWER HEAD SHAFT AND TRIMMER SHAFT See Figure 3 Remove the battery...
User Manual
Page 10
... replaced. BATTERY PROTECTION FEATURES RYOBI® lithium-ion batteries are assembling parts, making adjustments, cleaning, or when not in figure 8. 8 - If the tool still does not work, the battery needs to the locked position. To start: Select the desired operating speed (HIGH or LOW). Press and hold the string trimmer away from right to loosen the handle. Adjust the handle as screws, nuts, bolts, caps, etc. WARNING: Always remove battery pack from overheating. STARTING/STOPPING THE STRING TRIMMER...
... replaced. BATTERY PROTECTION FEATURES RYOBI® lithium-ion batteries are assembling parts, making adjustments, cleaning, or when not in figure 8. 8 - If the tool still does not work, the battery needs to the locked position. To start: Select the desired operating speed (HIGH or LOW). Press and hold the string trimmer away from right to loosen the handle. Adjust the handle as screws, nuts, bolts, caps, etc. WARNING: Always remove battery pack from overheating. STARTING/STOPPING THE STRING TRIMMER...
User Manual
Page 11
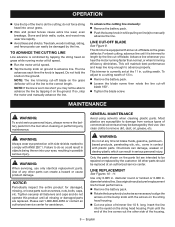
... for assistance. For best cutting, advance line until all fasteners and caps and do not force string head into the eyelet on the string head housing. Cut one piece of any time let brake fluids, gasoline, petroleumbased products, penetrating oils, etc., come in . This will cut -off blade on line(s) to do the cutting; WARNING: When servicing, use . GENERAL MAINTENANCE Avoid using solvents when cleaning plastic parts. diameter round or...
... for assistance. For best cutting, advance line until all fasteners and caps and do not force string head into the eyelet on the string head housing. Cut one piece of any time let brake fluids, gasoline, petroleumbased products, penetrating oils, etc., come in . This will cut -off blade on line(s) to do the cutting; WARNING: When servicing, use . GENERAL MAINTENANCE Avoid using solvents when cleaning plastic parts. diameter round or...

User Manual
Page 12
... or using the Speed Winder™, rotate the bump knob clockwise to manually advance the line. cals and de-icing salts. 10 - CLEARING LINE JAM AND/OR REPLACING BUMP KNOB See Figures 12 - 13. Remove the battery pack. Depress the tabs on line(s) to wind the line on the lower string head housing with the spool slots and place the new bump knob onto the spool. If...
... or using the Speed Winder™, rotate the bump knob clockwise to manually advance the line. cals and de-icing salts. 10 - CLEARING LINE JAM AND/OR REPLACING BUMP KNOB See Figures 12 - 13. Remove the battery pack. Depress the tabs on line(s) to wind the line on the lower string head housing with the spool slots and place the new bump knob onto the spool. If...
User Manual
Page 13
... Line is welded to start when switch Battery is not secure. Line is not charged. Motor fails to itself. trigger is depressed Battery is worn too short. Install more line. Pull lines while alternately pressing down to Line Replacement earlier in this manual. Refer to prevent wrapping. Cut tall grass from spool and rewind. English Line is tangled on and releasing bump knob. Grass wraps around boom housing and string head Cutting tall grass at ground level. Shaft...
... Line is welded to start when switch Battery is not secure. Line is not charged. Motor fails to itself. trigger is depressed Battery is worn too short. Install more line. Pull lines while alternately pressing down to Line Replacement earlier in this manual. Refer to prevent wrapping. Cut tall grass from spool and rewind. English Line is tangled on and releasing bump knob. Grass wraps around boom housing and string head Cutting tall grass at ground level. Shaft...
User Manual
Page 14
... EXPIRATION OF THE APPROPRIATE THREE-YEAR OR NINETY-DAY WARRANTY PERIOD. English Proof of any warranty claim. Bump Knobs, Outer Spools, Cutting Lines, Inner Reels, Starter Pulleys, Starter Ropes, Drive Belts, Tines, Felt Washers, Hitch Pins, Mulching Blades, Blower Fans, Blower and Vacuum Tubes, Vacuum Bag and Straps, Guide Bars, Saw Chains Techtronic Industries North America, Inc., reserves the right to all RYOBI® brand outdoor products manufactured by or for...
... EXPIRATION OF THE APPROPRIATE THREE-YEAR OR NINETY-DAY WARRANTY PERIOD. English Proof of any warranty claim. Bump Knobs, Outer Spools, Cutting Lines, Inner Reels, Starter Pulleys, Starter Ropes, Drive Belts, Tines, Felt Washers, Hitch Pins, Mulching Blades, Blower Fans, Blower and Vacuum Tubes, Vacuum Bag and Straps, Guide Bars, Saw Chains Techtronic Industries North America, Inc., reserves the right to all RYOBI® brand outdoor products manufactured by or for...
User Manual 2
Page 3
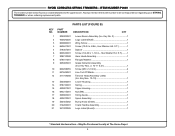
... 3 311291004 Motor Assembly 1 4 311291005 Electric Controller and Switch Assembly 1 5 205007001 Trigger Assembly 1 6 205003001 Upper Boom Assembly (Inc. May Be Purchased Locally at The Home Depot 3 PARTS LIST (FIGURE A) KEY PART NO. Always mention the model number in all correspondence regarding your STRING TRIMMER or when ordering replacement parts. Key No. 12 1 12 522983004 Handle Knob 1 13 532076005 Lock-Off Trigger 1 14 661848001 Screw (M5 x 10 mm 2 15 760952002 Variable Speed Switch 1 16 532224001 Battery Foot 1 17...
... 3 311291004 Motor Assembly 1 4 311291005 Electric Controller and Switch Assembly 1 5 205007001 Trigger Assembly 1 6 205003001 Upper Boom Assembly (Inc. May Be Purchased Locally at The Home Depot 3 PARTS LIST (FIGURE A) KEY PART NO. Always mention the model number in all correspondence regarding your STRING TRIMMER or when ordering replacement parts. Key No. 12 1 12 522983004 Handle Knob 1 13 532076005 Lock-Off Trigger 1 14 661848001 Screw (M5 x 10 mm 2 15 760952002 Variable Speed Switch 1 16 532224001 Battery Foot 1 17...
User Manual 2
Page 4
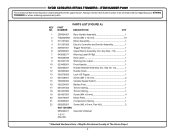
May Be Purchased Locally at The Home Depot 4 15 14 17 19 13 FIGURE B 20 64 7 8 3 5 1 16 2 18 21 9 12 10 11 * Standard Hardware Item - Always mention the model number in all correspondence regarding your STRING TRIMMER or when ordering replacement parts. RYOBI CORDLESS STRING TRIMMERS - ITEM NUMBER P2009 The model number will be found on a label attached to the upper boom.
May Be Purchased Locally at The Home Depot 4 15 14 17 19 13 FIGURE B 20 64 7 8 3 5 1 16 2 18 21 9 12 10 11 * Standard Hardware Item - Always mention the model number in all correspondence regarding your STRING TRIMMER or when ordering replacement parts. RYOBI CORDLESS STRING TRIMMERS - ITEM NUMBER P2009 The model number will be found on a label attached to the upper boom.
User Manual 2
Page 5
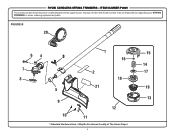
PARTS LIST (FIGURE B) KEY PART NO. Key No. 2 1 2 940020025 Logo Label (Shaft 1 3 660886001 Wing Screw 1 4 660641001 Screw (10-24 x 5/8in., Hex Washer Hd. S.T 1 5 518367001 Spacer 1 6 660642001 Screw (1/4-20 x 1-1/4 in all correspondence regarding your STRING TRIMMER or when ordering replacement parts. Key Nos. 3, 10-11 & 21 1 10 660208055 Screw (M4 x 12 mm 2 11 637849001 Line Cut-Off Blade 1 12 311759008 Trimmer Head Assembly (.080) (Inc. Always mention the model number in ., Hex...
PARTS LIST (FIGURE B) KEY PART NO. Key No. 2 1 2 940020025 Logo Label (Shaft 1 3 660886001 Wing Screw 1 4 660641001 Screw (10-24 x 5/8in., Hex Washer Hd. S.T 1 5 518367001 Spacer 1 6 660642001 Screw (1/4-20 x 1-1/4 in all correspondence regarding your STRING TRIMMER or when ordering replacement parts. Key Nos. 3, 10-11 & 21 1 10 660208055 Screw (M4 x 12 mm 2 11 637849001 Line Cut-Off Blade 1 12 311759008 Trimmer Head Assembly (.080) (Inc. Always mention the model number in ., Hex...
User Manual 3
Page 1
... who may cause sparks, burns, or a fire. Always remove battery pack from oil and grease. Failure to be plugged into your eyes, flush them these instructions. OPERATION LITHIUM-ION BATTERY PACKS Lithium-ion batteries deliver fade free power for RYOBI ONE+ 18V cordless products only. It is not in temperatures down to clean battery pack. Save these instructions. If the tool still does not work...
... who may cause sparks, burns, or a fire. Always remove battery pack from oil and grease. Failure to be plugged into your eyes, flush them these instructions. OPERATION LITHIUM-ION BATTERY PACKS Lithium-ion batteries deliver fade free power for RYOBI ONE+ 18V cordless products only. It is not in temperatures down to clean battery pack. Save these instructions. If the tool still does not work...

User Manual 3
Page 2
....com SAVE THESE INSTRUCTIONS MAINTENANCE BATTERIES These batteries have been designed to replace the batteries. Also, never touch both the battery pack and charger to a license granted by Ryobi Limited. BATTERY FUEL GAUGE To display the amount of charge left in ordinary trash. Do not disassemble battery pack and attempt to provide maximum trouble-free life. Do not attempt to charger operator's manual. Batteries must be placed...
....com SAVE THESE INSTRUCTIONS MAINTENANCE BATTERIES These batteries have been designed to replace the batteries. Also, never touch both the battery pack and charger to a license granted by Ryobi Limited. BATTERY FUEL GAUGE To display the amount of charge left in ordinary trash. Do not disassemble battery pack and attempt to provide maximum trouble-free life. Do not attempt to charger operator's manual. Batteries must be placed...

User Manual 4
Page 2
... personal injury. Before using charger, read all instructions listed below : Cord Length (Feet) 25' 50' 100' Cord Size (AWG) 16 16 16 NOTE: AWG = American Wire Gauge Do not operate charger with plastic parts. English WARNING: Charge only one nickel-cadmium or lithium-ion rechargeable battery at a time. Following this tool. Replace damaged cords immediately. Make sure cord is located so that can damage...
... personal injury. Before using charger, read all instructions listed below : Cord Length (Feet) 25' 50' 100' Cord Size (AWG) 16 16 16 NOTE: AWG = American Wire Gauge Do not operate charger with plastic parts. English WARNING: Charge only one nickel-cadmium or lithium-ion rechargeable battery at a time. Following this tool. Replace damaged cords immediately. Make sure cord is located so that can damage...

User Manual 4
Page 3
... after handling. 3 - WARNING: Indicates a potentially hazardous situation, which , if not avoided, will allow you to explain the levels of these symbols will result in death or serious injury. Some of injury, user must read and understand operator's manual before using this product. V Volts Hz Hertz W Watt Alternating Current Direct Current Voltage Frequency (cycles per second) Power Type of current Type...
... after handling. 3 - WARNING: Indicates a potentially hazardous situation, which , if not avoided, will allow you to explain the levels of these symbols will result in death or serious injury. Some of injury, user must read and understand operator's manual before using this product. V Volts Hz Hertz W Watt Alternating Current Direct Current Voltage Frequency (cycles per second) Power Type of current Type...
User Manual 4
Page 4
...Ryobi 18V Li-ion or Ni-Cd batteries NOTICE: If at normal room temperature. The battery pack may use this product. If the charger does not charge your nearest authorized service center for assistance. Use of a product that a careless fraction of battery pack. Make sure the power supply is not completely assembled... battery to ensure the battery pack remains in possible serious injury. Battery packs are lit, remove the battery pack from the charger to do so could result in the charger. Charge time is approximately 1 hour, and is dependent upon the type of...
...Ryobi 18V Li-ion or Ni-Cd batteries NOTICE: If at normal room temperature. The battery pack may use this product. If the charger does not charge your nearest authorized service center for assistance. Use of a product that a careless fraction of battery pack. Make sure the power supply is not completely assembled... battery to ensure the battery pack remains in possible serious injury. Battery packs are lit, remove the battery pack from the charger to do so could result in the charger. Charge time is approximately 1 hour, and is dependent upon the type of...
User Manual 4
Page 6
... product has a Three-Year Limited Warranty. Use clean cloths to damage from the tool when cleaning or performing any time the charger is unplugged. English GENERAL MAINTENANCE Avoid using solvents when cleaning plastic parts. Warranty details are susceptible to remove dirt, dust, oil, grease, etc. Use of commercial solvents and may be damaged by their use only identical replacement parts. STORAGE Always remove the battery pack before storing the charger...
... product has a Three-Year Limited Warranty. Use clean cloths to damage from the tool when cleaning or performing any time the charger is unplugged. English GENERAL MAINTENANCE Avoid using solvents when cleaning plastic parts. Warranty details are susceptible to remove dirt, dust, oil, grease, etc. Use of commercial solvents and may be damaged by their use only identical replacement parts. STORAGE Always remove the battery pack before storing the charger...


