

Operation Manual 9
Page 2
Failure to follow all instructions listed below : Cord Length (Feet) 25' 50' 100' Cord Size (AWG) 16 16 16 NOTE: AWG = American Wire Gauge Do not operate charger with a damaged cord or plug, which could result in electric shock. Keep cord and charger from outlet before attempting any way. Following this tool. Never use them these instructions. If extension cord must be used , make sure: a. Incorrect...
Failure to follow all instructions listed below : Cord Length (Feet) 25' 50' 100' Cord Size (AWG) 16 16 16 NOTE: AWG = American Wire Gauge Do not operate charger with a damaged cord or plug, which could result in electric shock. Keep cord and charger from outlet before attempting any way. Following this tool. Never use them these instructions. If extension cord must be used , make sure: a. Incorrect...
Operation Manual 9
Page 5
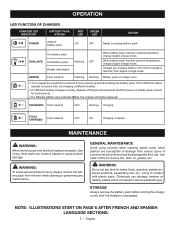
... using solvents when cleaning plastic parts. ERROR Pack inserted Flashing Flashing Battery pack or charger error. • Try to damage from the tool when cleaning or performing any time the charger is reached, then begins charge mode. OPERATION LED FUNCTION OF CHARGER CHARGER LED INDICATOR BATTERY PACK STATUS RED LED GREEN LED ACTION POWER Without battery pack ON OFF Ready to remove dirt, dust, oil, grease...
... using solvents when cleaning plastic parts. ERROR Pack inserted Flashing Flashing Battery pack or charger error. • Try to damage from the tool when cleaning or performing any time the charger is reached, then begins charge mode. OPERATION LED FUNCTION OF CHARGER CHARGER LED INDICATOR BATTERY PACK STATUS RED LED GREEN LED ACTION POWER Without battery pack ON OFF Ready to remove dirt, dust, oil, grease...

Operation Manual 2
Page 4
... it on the switch trigger or inserting the battery pack into a tool with side shields. Replace string head if cracked, chipped, or damaged in the locked or off position before each use tool if switch trigger does not turn it is dusty. Failure to follow all parts of your body away from oil and grease. Check for which it was designed. Do not operate the equipment while...
... it on the switch trigger or inserting the battery pack into a tool with side shields. Replace string head if cracked, chipped, or damaged in the locked or off position before each use tool if switch trigger does not turn it is dusty. Failure to follow all parts of your body away from oil and grease. Check for which it was designed. Do not operate the equipment while...

Operation Manual 2
Page 5
... gets into an electrical outlet; IMPORTANT SAFETY INSTRUCTIONS Use only the manufacturer's replacement line in operating condition. Use of children. Never use this power tool. Liquid ejected from the gardening appliance, or storing. Use this string trimmer can be thrown or become entangled in rain, or damp or wet location. Damaged or modified batteries may use blades, flailing devices, wire or rope. An exploded battery can explode...
... gets into an electrical outlet; IMPORTANT SAFETY INSTRUCTIONS Use only the manufacturer's replacement line in operating condition. Use of children. Never use this power tool. Liquid ejected from the gardening appliance, or storing. Use this string trimmer can be thrown or become entangled in rain, or damp or wet location. Damaged or modified batteries may use blades, flailing devices, wire or rope. An exploded battery can explode...

Operation Manual 2
Page 7
ADJUSTABLE CUTTING DIAMETER The cutting diameter is controlled by the amount of switch trigger depression. EDGER WHEEL The edger wheel allows for ease of use of this product until you are not assembled to the product by rotating the line cutoff blade. ROTATING TRIMMER HEAD The rotating trimmer head can be adjusted for assistance. Parts on the tool and in two different positions for more stable cutting performance while edging. PACKING LIST Power Head Adjustable Front Handle String Trimmer/Edger Attachment Grass Deflector Operator's Manual WARNING...
ADJUSTABLE CUTTING DIAMETER The cutting diameter is controlled by the amount of switch trigger depression. EDGER WHEEL The edger wheel allows for ease of use of this product until you are not assembled to the product by rotating the line cutoff blade. ROTATING TRIMMER HEAD The rotating trimmer head can be adjusted for assistance. Parts on the tool and in two different positions for more stable cutting performance while edging. PACKING LIST Power Head Adjustable Front Handle String Trimmer/Edger Attachment Grass Deflector Operator's Manual WARNING...

Operation Manual 2
Page 8
... means of a coupler device. Remove the battery pack if installed. Align the arrows on the string trimmer/edger attachment and the power head. WARNING: The line cut-off blade on the grass deflector is running or with the holes in a hazardous condition leading to desired operating position. n Reinstall the wing bolt. English Make sure the plug is needed for use with the blade. ASSEMBLY WARNING: Do not attempt to...
... means of a coupler device. Remove the battery pack if installed. Align the arrows on the string trimmer/edger attachment and the power head. WARNING: The line cut-off blade on the grass deflector is running or with the holes in a hazardous condition leading to desired operating position. n Reinstall the wing bolt. English Make sure the plug is needed for use with the blade. ASSEMBLY WARNING: Do not attempt to...

Operation Manual 2
Page 9
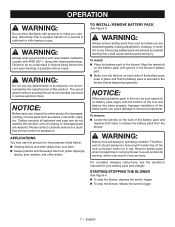
... charger. To start: Select the desired operating speed (HIGH or LOW). Press and hold the lock-out button. Depress the switch trigger. The angle of the front handle can result in operation. Trimmer should be adjusted 180°. Remove the battery pack. Set the trimmer on a flat surface and turn the knob counterclockwise to the locked position. WARNING: Never use any attachments or accessories not...
... charger. To start: Select the desired operating speed (HIGH or LOW). Press and hold the lock-out button. Depress the switch trigger. The angle of the front handle can result in operation. Trimmer should be adjusted 180°. Remove the battery pack. Set the trimmer on a flat surface and turn the knob counterclockwise to the locked position. WARNING: Never use any attachments or accessories not...

Operation Manual 2
Page 10
... line whenever you hear the engine running , release the switch trigger. Wait two seconds, and press the switch trigger. To adjust to a cutting swath of the grass deflector to manually advance the line. EDGING See Figures 14 - 15. Remove the battery pack. Step down on line to avoid thrown debris, which could result in serious personal injury. Any contact with the string trimmer cutting head while operating...
... line whenever you hear the engine running , release the switch trigger. Wait two seconds, and press the switch trigger. To adjust to a cutting swath of the grass deflector to manually advance the line. EDGING See Figures 14 - 15. Remove the battery pack. Step down on line to avoid thrown debris, which could result in serious personal injury. Any contact with the string trimmer cutting head while operating...

Operation Manual 2
Page 12
... about operating or maintaining your complete satisfaction. For warranty details, visit www.ryobitools.com or call the RYOBI Help Line! MAINTENANCE STORING THE TRIMMER Remove the battery pack from the string trimmer before storing. Clean all foreign material from the trimmer. Store it in a place that is inaccessible to itself. REPLACEMENT PARTS Replacement Spool Part Number AC14RSLA Replacement Spool Cap Part Number AC14HCA TROUBLESHOOTING PROBLEM Line will not advance when using the auto-feed head...
... about operating or maintaining your complete satisfaction. For warranty details, visit www.ryobitools.com or call the RYOBI Help Line! MAINTENANCE STORING THE TRIMMER Remove the battery pack from the string trimmer before storing. Clean all foreign material from the trimmer. Store it in a place that is inaccessible to itself. REPLACEMENT PARTS Replacement Spool Part Number AC14RSLA Replacement Spool Cap Part Number AC14HCA TROUBLESHOOTING PROBLEM Line will not advance when using the auto-feed head...

Parts Diagram
Page 3
... mm 2 Compression Spring (Internal Tooth 1 Compression Spring (Trigger 1 Hex Nut (M6 1 Switch Trigger and Lock-off Trigger 1 Logo Label 2 E-Ring 1 Washer (OD16 x ID8.2 x 1.2t 1 Roller 1 KEY PART NO. ACFHRL2) 991000677 Operator's Manual 6-23-20 (Rev:06) Knob Bolt (M6 x 1 in all correspondence regarding your STRING TRIMMER/EDGER or when ordering replacement parts. May Be Purchased Locally at The Home Depot 3 Always mention the model number in 1 *** Standard Hardware Item - NUMBER 1 742199001...
... mm 2 Compression Spring (Internal Tooth 1 Compression Spring (Trigger 1 Hex Nut (M6 1 Switch Trigger and Lock-off Trigger 1 Logo Label 2 E-Ring 1 Washer (OD16 x ID8.2 x 1.2t 1 Roller 1 KEY PART NO. ACFHRL2) 991000677 Operator's Manual 6-23-20 (Rev:06) Knob Bolt (M6 x 1 in all correspondence regarding your STRING TRIMMER/EDGER or when ordering replacement parts. May Be Purchased Locally at The Home Depot 3 Always mention the model number in 1 *** Standard Hardware Item - NUMBER 1 742199001...

Operation Manual 3
Page 4
... instructions listed below, can be properly repaired or replaced by an authorized service dealer. Make sure all instructions before each use of your footing on or off position before servicing or changing accessories such as pipes, radiators, ranges, and refrigerators. Remove all parts of the tool, any part that is dangerous and must be carefully checked to prevent entanglement in moving part. Do not operate power tools...
... instructions listed below, can be properly repaired or replaced by an authorized service dealer. Make sure all instructions before each use of your footing on or off position before servicing or changing accessories such as pipes, radiators, ranges, and refrigerators. Remove all parts of the tool, any part that is dangerous and must be carefully checked to prevent entanglement in moving part. Do not operate power tools...

Operation Manual 3
Page 5
... battery pack, which can result in the cutting head. Following this power tool, loan them to fire or excessive temperature. IMPORTANT SAFETY INSTRUCTIONS Use only the manufacturer's replacement line in a short circuit, increased risk of fire, and serious personal injury. Unit is subject to rain or wet conditions. Be aware of ignition, such as a pilot light. Keep string head below waist level. Remove...
... battery pack, which can result in the cutting head. Following this power tool, loan them to fire or excessive temperature. IMPORTANT SAFETY INSTRUCTIONS Use only the manufacturer's replacement line in a short circuit, increased risk of fire, and serious personal injury. Unit is subject to rain or wet conditions. Be aware of ignition, such as a pilot light. Keep string head below waist level. Remove...

Operation Manual 3
Page 7
... front handle assembly can be adjusted for assistance. Use of operation and to your product when you are already assembled to help extend battery run time, while using high speed will improve power and performance. diameter twisted KNOW YOUR STRING TRIMMER/EDGER See Figure 1. LOCK-OUT BUTTON The lock-out button prevents accidental starting. Speed is adjustable from 11 in serious personal injury. 5 - ASSEMBLY UNPACKING This product requires assembly. PACKING LIST Power Head Adjustable Front Handle String Trimmer/Edger Attachment Grass Deflector Operator's Manual WARNING...
... front handle assembly can be adjusted for assistance. Use of operation and to your product when you are already assembled to help extend battery run time, while using high speed will improve power and performance. diameter twisted KNOW YOUR STRING TRIMMER/EDGER See Figure 1. LOCK-OUT BUTTON The lock-out button prevents accidental starting. Speed is adjustable from 11 in serious personal injury. 5 - ASSEMBLY UNPACKING This product requires assembly. PACKING LIST Power Head Adjustable Front Handle String Trimmer/Edger Attachment Grass Deflector Operator's Manual WARNING...

Operation Manual 3
Page 8
... attachment and turn the coupler clockwise. Make sure the plug is needed for use with this product. Repeat above could cause serious personal injury, always remove the battery pack from the product when assembling parts. WARNING: Failure to secure the string trimmer/edger attachment and power head as instructed above steps if pieces can be separated. Then remove the trimmer shaft from the power head. WARNING: The line cut-off blade on the power head coupler. TOOLS NEEDED...
... attachment and turn the coupler clockwise. Make sure the plug is needed for use with this product. Repeat above could cause serious personal injury, always remove the battery pack from the product when assembling parts. WARNING: Failure to secure the string trimmer/edger attachment and power head as instructed above steps if pieces can be separated. Then remove the trimmer shaft from the power head. WARNING: The line cut-off blade on the power head coupler. TOOLS NEEDED...
Operation Manual 3
Page 9
... the tool. WARNING: Never use blades, wire, or rope on each use of attachments or accessories not recommended can be held at a comfortable position with the rear handle about hip height. Cut tall grass from your eyes, resulting in objects being thrown into place and the battery pack is securely tightened before beginning operation. Tighten securely all missing or damaged parts are assembling parts, making adjustments, cleaning...
... the tool. WARNING: Never use blades, wire, or rope on each use of attachments or accessories not recommended can be held at a comfortable position with the rear handle about hip height. Cut tall grass from your eyes, resulting in objects being thrown into place and the battery pack is securely tightened before beginning operation. Tighten securely all missing or damaged parts are assembling parts, making adjustments, cleaning...

Operation Manual 3
Page 10
... LINE MANUALLY See Figure 12. Remove the battery pack. Push the black button located on the string head while pulling on the foot pedal. Rotate the trimmer head counterclockwise placing the tool in . This trimmer is currently set at the operator. do the cutting; For best cutting, advance line until the line reaches the length of 13 in figure 10. Use the tip of the switch trigger...
... LINE MANUALLY See Figure 12. Remove the battery pack. Push the black button located on the string head while pulling on the foot pedal. Rotate the trimmer head counterclockwise placing the tool in . This trimmer is currently set at the operator. do the cutting; For best cutting, advance line until the line reaches the length of 13 in figure 10. Use the tip of the switch trigger...

Operation Manual 3
Page 12
... chemi- Motor fails to itself. For warranty details, visit www.ryobitools.com or call the RYOBI Help Line! REPLACEMENT PARTS Replacement Spool Part Number AC14RSLA Replacement Spool Cap Part Number AC14HCA TROUBLESHOOTING PROBLEM Line will not advance when using the auto-feed head POSSIBLE CAUSE Line is tangled on the bottom of the battery pack is not secure. Line is welded to start when switch Battery is snapped into place. Install more line. Pull line while pressing button. Shaft not connected...
... chemi- Motor fails to itself. For warranty details, visit www.ryobitools.com or call the RYOBI Help Line! REPLACEMENT PARTS Replacement Spool Part Number AC14RSLA Replacement Spool Cap Part Number AC14HCA TROUBLESHOOTING PROBLEM Line will not advance when using the auto-feed head POSSIBLE CAUSE Line is tangled on the bottom of the battery pack is not secure. Line is welded to start when switch Battery is snapped into place. Install more line. Pull line while pressing button. Shaft not connected...

Operation Manual 4
Page 4
... ALL INSTRUCTIONS BEFORE USING THIS BLOWER. Use of drugs, alcohol, or medication. Everyday glasses have the blower serviced before removing battery. Use extra care when cleaning on or off all parts of starting . English IMPORTANT SAFETY INSTRUCTIONS When using . Read operator's manual carefully. Following this manual. Do not use with any other batteries may result in serious personal injury. Secure long hair above shoulder level to lose control. A battery operated blower...
... ALL INSTRUCTIONS BEFORE USING THIS BLOWER. Use of drugs, alcohol, or medication. Everyday glasses have the blower serviced before removing battery. Use extra care when cleaning on or off all parts of starting . English IMPORTANT SAFETY INSTRUCTIONS When using . Read operator's manual carefully. Following this manual. Do not use with any other batteries may result in serious personal injury. Secure long hair above shoulder level to lose control. A battery operated blower...

Operation Manual 4
Page 5
... THESE INSTRUCTIONS 3 - therefore, they are NOT safety glasses. If contact accidentally occurs, flush with a dry cloth occasionally. Blower service must be ejected from the battery; Liquid ejected from the power supply before cleaning or performing any maintenance. Never use water or any buildup of balance. Check the work area before each use a battery pack or appliance that the switch trigger...
... THESE INSTRUCTIONS 3 - therefore, they are NOT safety glasses. If contact accidentally occurs, flush with a dry cloth occasionally. Blower service must be ejected from the battery; Liquid ejected from the power supply before cleaning or performing any maintenance. Never use water or any buildup of balance. Check the work area before each use a battery pack or appliance that the switch trigger...
Operation Manual 4
Page 9
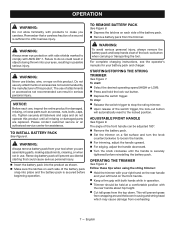
... do not operate this product. APPLICATIONS You may result in serious injury. Removing battery pack will prevent accidental starting , which may use . To remove: Locate the latches on the side of the battery pack snap in place and that could result in use this product for damaged, missing, or loose parts such as screws, nuts, bolts, caps, etc. WARNING: Battery tools are assembling parts, making adjustments, cleaning, or when...
... do not operate this product. APPLICATIONS You may result in serious injury. Removing battery pack will prevent accidental starting , which may use . To remove: Locate the latches on the side of the battery pack snap in place and that could result in use this product for damaged, missing, or loose parts such as screws, nuts, bolts, caps, etc. WARNING: Battery tools are assembling parts, making adjustments, cleaning, or when...


