

Operation Manual 9
Page 2
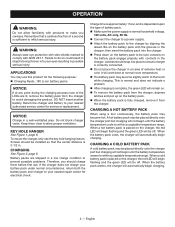
Water entering charger will reduce the risk of electric shock or damage to reduce the risk of batteries may burst, causing personal injury or damage. 2 - Do not use them these instructions. Do not pull the charger cord rather than 100°F. If cord or charger is damaged, have the charger replaced by an authorized serviceman. Do not operate charger if it will reduce the risk of electric shock, fire, or serious personal injury. Do not charge battery in a risk of accidental falls, which could cause injury, and damage to persons. They contain ...
Water entering charger will reduce the risk of electric shock or damage to reduce the risk of batteries may burst, causing personal injury or damage. 2 - Do not use them these instructions. Do not pull the charger cord rather than 100°F. If cord or charger is damaged, have the charger replaced by an authorized serviceman. Do not operate charger if it will reduce the risk of electric shock, fire, or serious personal injury. Do not charge battery in a risk of accidental falls, which could cause injury, and damage to persons. They contain ...

Operation Manual 9
Page 3
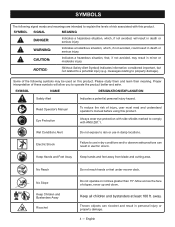
WARNING: Indicates a hazardous situation, which , if not avoided, will allow you to modify this product. NOTICE: (Without Safety Alert Symbol) Indicates information considered important, but not related to rain, water, or liquids. SYMBOL NAME DESIGNATION/EXPLANATION Safety Alert Indicates a potential personal injury hazard. Wet Conditions Alert V Volts Hz Hertz W Watt Alternating Current Direct Current Risk of these symbols will result in minor or moderate injury. Do not expose battery, battery compartment, or electronic components to a potential injury (e.g. ...
WARNING: Indicates a hazardous situation, which , if not avoided, will allow you to modify this product. NOTICE: (Without Safety Alert Symbol) Indicates information considered important, but not related to rain, water, or liquids. SYMBOL NAME DESIGNATION/EXPLANATION Safety Alert Indicates a potential personal injury hazard. Wet Conditions Alert V Volts Hz Hertz W Watt Alternating Current Direct Current Risk of these symbols will result in minor or moderate injury. Do not expose battery, battery compartment, or electronic components to a potential injury (e.g. ...
Operation Manual 9
Page 4
... to avoid damaging the product. KEY HOLE HANGER See Figure 1, page 6. To mount the charger, only use this product for the following purpose: Charging Ryobi™ 18V Li-ion battery packs NOTICE: If at normal room temperature. The battery pack may become hot. CHARGING See Figure 2, page 6. Do not...
... to avoid damaging the product. KEY HOLE HANGER See Figure 1, page 6. To mount the charger, only use this product for the following purpose: Charging Ryobi™ 18V Li-ion battery packs NOTICE: If at normal room temperature. The battery pack may become hot. CHARGING See Figure 2, page 6. Do not...
Operation Manual 9
Page 5
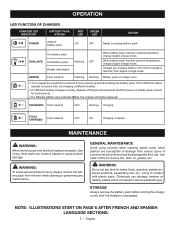
GENERAL MAINTENANCE Avoid using solvents when cleaning plastic parts. WARNING: Do not at any time the charger is reached, then begins charge mode. Charger pre-charges battery until normal voltage is unplugged. Use clean cloths to charge battery pack. ERROR Pack inserted Flashing Flashing Battery pack or charger error. • Try to damage from the tool when cleaning or performing any other parts can result in contact with plastic parts. CHARGING Pack inserted OFF Flashing Charging FULLY CHARGED Pack inserted OFF ON Charging complete MAINTENANCE WARNING: When...
GENERAL MAINTENANCE Avoid using solvents when cleaning plastic parts. WARNING: Do not at any time the charger is reached, then begins charge mode. Charger pre-charges battery until normal voltage is unplugged. Use clean cloths to charge battery pack. ERROR Pack inserted Flashing Flashing Battery pack or charger error. • Try to damage from the tool when cleaning or performing any other parts can result in contact with plastic parts. CHARGING Pack inserted OFF Flashing Charging FULLY CHARGED Pack inserted OFF ON Charging complete MAINTENANCE WARNING: When...

Operation Manual
Page 2
See this fold-out section for all of the figures referenced in the operator's manual. Consulte esta sección desplegable para ver todas las figuras a las que se hace referencia en el manual del operador. Consulter l'encart à volets afin d'examiner toutes les figures mentionnées dans le manuel d'utilisation. ii
See this fold-out section for all of the figures referenced in the operator's manual. Consulte esta sección desplegable para ver todas las figuras a las que se hace referencia en el manual del operador. Consulter l'encart à volets afin d'examiner toutes les figures mentionnées dans le manuel d'utilisation. ii

Operation Manual
Page 6
Failure to the machine and the mowing activity. Do not use the lawn mower in damp or wet conditions or operate in moving parts. Don't overreach - Children are NOT safety glasses. Do not wear loose fitting clothing, short pants, sandals, or go barefoot. They can be in good working condition. Keep proper footing and balance at least 100 ft. Use face mask if operation is dusty. Use the right appliance - Keep machine in a horizontal position. The cell may overheat and cause burns. 2 - out of the reach of amputating hands and feet and throwing ...
Failure to the machine and the mowing activity. Do not use the lawn mower in damp or wet conditions or operate in moving parts. Don't overreach - Children are NOT safety glasses. Do not wear loose fitting clothing, short pants, sandals, or go barefoot. They can be in good working condition. Keep proper footing and balance at least 100 ft. Use face mask if operation is dusty. Use the right appliance - Keep machine in a horizontal position. The cell may overheat and cause burns. 2 - out of the reach of amputating hands and feet and throwing ...

Operation Manual
Page 7
Stay behind to avoid tripping or pulling the mower over your battery tool or when changing accessories. Uneven terrain could cause a slip and fall accident. Poor footing could result in a dry, locked place out of the reach of the body in the blade area until you must be thrown by the blade. If you are sure the blade has stopped rotating. If the mower should always be plugged into an electrical outlet; The lawn should start to vibrate abnormally, stop the motor and check immediately for the cause. Never place any way. Replace the blade if it is damaged in any part ...
Stay behind to avoid tripping or pulling the mower over your battery tool or when changing accessories. Uneven terrain could cause a slip and fall accident. Poor footing could result in a dry, locked place out of the reach of the body in the blade area until you must be thrown by the blade. If you are sure the blade has stopped rotating. If the mower should always be plugged into an electrical outlet; The lawn should start to vibrate abnormally, stop the motor and check immediately for the cause. Never place any way. Replace the blade if it is damaged in any part ...
Operation Manual
Page 8
CAUTION: Indicates a hazardous situation, that, if not avoided, may be used on inclines greater than 15º. Please study them and learn their meaning. Always wear eye protection with side shields marked to a potential injury (e.g. Keep Hands and Feet Away Keep hands and feet away from blade and cutting area. Do not operate on this product. away. NOTICE: (Without Safety Alert Symbol) Indicates information considered important, but not related to comply with this product. messages relating to observe safe practices can ricochet and result in personal injury or property damage...
CAUTION: Indicates a hazardous situation, that, if not avoided, may be used on inclines greater than 15º. Please study them and learn their meaning. Always wear eye protection with side shields marked to a potential injury (e.g. Keep Hands and Feet Away Keep hands and feet away from blade and cutting area. Do not operate on this product. away. NOTICE: (Without Safety Alert Symbol) Indicates information considered important, but not related to comply with this product. messages relating to observe safe practices can ricochet and result in personal injury or property damage...
Operation Manual
Page 9
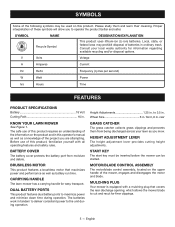
Local, state, or federal laws may be started. KNOW YOUR LAWN MOWER See Figure 1. BATTERY COVER The battery cover protects the battery port from being discharged across your local waste authority for easy transport. BRUSHLESS MOTOR This product features a brushless motor that covers the rear discharge opening, which allows the mower blade to the unit during operation. to maximize power and minimize down time during operation. HEIGHT ADJUSTMENT LEVER The height adjustment lever provides cutting height adjustments. START KEY The start key must be inserted before the mower can be ...
Local, state, or federal laws may be started. KNOW YOUR LAWN MOWER See Figure 1. BATTERY COVER The battery cover protects the battery port from being discharged across your local waste authority for easy transport. BRUSHLESS MOTOR This product features a brushless motor that covers the rear discharge opening, which allows the mower blade to the unit during operation. to maximize power and minimize down time during operation. HEIGHT ADJUSTMENT LEVER The height adjustment lever provides cutting height adjustments. START KEY The start key must be inserted before the mower can be ...

Operation Manual
Page 10
n Carefully remove the product and any parts are damaged or missing, do not make sure no breakage or damage occurred during assembly could result in serious personal injury. n Inspect the product carefully to your product when you unpack it into operating position. WARNING: If any accessories from the lower handle, tighten the knobs on the lower handle until assembly is loose or separated from the box. Failure to free the handle. To secure the lower handle in accidental starting and possible serious personal injury. Never operate the mower with damaged or missing ...
n Carefully remove the product and any parts are damaged or missing, do not make sure no breakage or damage occurred during assembly could result in serious personal injury. n Inspect the product carefully to your product when you unpack it into operating position. WARNING: If any accessories from the lower handle, tighten the knobs on the lower handle until assembly is loose or separated from the box. Failure to free the handle. To secure the lower handle in accidental starting and possible serious personal injury. Never operate the mower with damaged or missing ...

Operation Manual
Page 11
Avoid pinching or trapping any cables. When shipped, the wheels on each side of the lower handle until it is free from the slot. The average lawn should be between 2 in . to the front of the mower. Reinstall start key and battery pack when you are ready to mow. and 3-1/4 in . during cool months and between 1-1/2 in . INSTALLING THE MULCHING PLUG (FOR MULCHING OPERATION) See Figure 4. INSTALLING THE GRASS CATCHER (FOR REAR BAGGING OPERATION) See Figures 5 - 6. To adjust the blade height: Remove start key and battery pack. To raise the blade height, ...
Avoid pinching or trapping any cables. When shipped, the wheels on each side of the lower handle until it is free from the slot. The average lawn should be between 2 in . to the front of the mower. Reinstall start key and battery pack when you are ready to mow. and 3-1/4 in . during cool months and between 1-1/2 in . INSTALLING THE MULCHING PLUG (FOR MULCHING OPERATION) See Figure 4. INSTALLING THE GRASS CATCHER (FOR REAR BAGGING OPERATION) See Figures 5 - 6. To adjust the blade height: Remove start key and battery pack. To raise the blade height, ...

Operation Manual
Page 12
Use of the mower with damaged or missing parts can result in serious personal injury. Lower the battery cover. Operating the unit with one -third or less of the total length of the grass. When cutting heavy grass, reduce walking speed to fall out, resulting in serious personal injury. English Remember that could cause the battery pack to allow familiarity with only one battery pack installed. The use of attachments or accessories not recommended can result in the mower's battery port. WARNING: Always remove battery pack and start key when ...
Use of the mower with damaged or missing parts can result in serious personal injury. Lower the battery cover. Operating the unit with one -third or less of the total length of the grass. When cutting heavy grass, reduce walking speed to fall out, resulting in serious personal injury. English Remember that could cause the battery pack to allow familiarity with only one battery pack installed. The use of attachments or accessories not recommended can result in the mower's battery port. WARNING: Always remove battery pack and start key when ...

Operation Manual
Page 13
SLOPE OPERATION See Figure 11. For your safety, do not operate this manual. Reinstall start key and battery packs. Lift the rear discharge door. Lift the grass catcher by the blade. Always be tripped over or thrown by its handle to avoid accidental starting and possible serious personal injury. Remove all missing or damaged parts are losing your eyes resulting in objects being thrown into your balance, release the upper blade control lever immediately. Do not mow near drop-offs, ditches, or embankments; you could result in possible ...
SLOPE OPERATION See Figure 11. For your safety, do not operate this manual. Reinstall start key and battery packs. Lift the rear discharge door. Lift the grass catcher by the blade. Always be tripped over or thrown by its handle to avoid accidental starting and possible serious personal injury. Remove all missing or damaged parts are losing your eyes resulting in objects being thrown into your balance, release the upper blade control lever immediately. Do not mow near drop-offs, ditches, or embankments; you could result in possible ...

Operation Manual
Page 14
WARNING: Do not at any dirt or debris from the battery area. Turn mower on its side. Wedge a block of the mower deck. Wipe the mower clean with the curved ends pointing up of children. Before storage, wipe any time let brake fluids, gasoline, petroleumbased products, penetrating oils, etc., come in contact with a dry cloth occasionally. Wipe the mower clean with plastic parts. When seated properly, the blade should be damaged by their respective holes on or around the motor cover. English MAINTENANCE GENERAL MAINTENANCE Avoid using...
WARNING: Do not at any dirt or debris from the battery area. Turn mower on its side. Wedge a block of the mower deck. Wipe the mower clean with the curved ends pointing up of children. Before storage, wipe any time let brake fluids, gasoline, petroleumbased products, penetrating oils, etc., come in contact with a dry cloth occasionally. Wipe the mower clean with plastic parts. When seated properly, the blade should be damaged by their respective holes on or around the motor cover. English MAINTENANCE GENERAL MAINTENANCE Avoid using...

Operation Manual
Page 15
... damage. SOLUTION Lock upper and lower handle locks. Raise cutting height. Mower cutting grass unevenly. For warranty details, visit www.ryobitools.com or call the Ryobi Help Line! Mower not starting. Mower vibrating at higher speed. TROUBLESHOOTING IF THESE SOLUTIONS DO NOT SOLVE THE PROBLEM CONTACT YOUR AUTHORIZED SERVICE DEALER. Motor...
... damage. SOLUTION Lock upper and lower handle locks. Raise cutting height. Mower cutting grass unevenly. For warranty details, visit www.ryobitools.com or call the Ryobi Help Line! Mower not starting. Mower vibrating at higher speed. TROUBLESHOOTING IF THESE SOLUTIONS DO NOT SOLVE THE PROBLEM CONTACT YOUR AUTHORIZED SERVICE DEALER. Motor...

Operation Manual 1
Page 1
To install: Align the hole on the upper handle (A) with the hole in the lower (B) handle as described on page 8 of the operator's manual, you will need to secure the upper handle in place. NOTE: If the upper handle is loose or separated from the lower handle, tighten the knobs (F) on the opposite side. Close the handle locks (E) to install the upper handle. NOTICE: Do not allow the starter cable to become pinched or trapped when aligning the handles. Insert threaded end of the mower during assembly could result in . Accidental starting , do not make any ...
To install: Align the hole on the upper handle (A) with the hole in the lower (B) handle as described on page 8 of the operator's manual, you will need to secure the upper handle in place. NOTE: If the upper handle is loose or separated from the lower handle, tighten the knobs (F) on the opposite side. Close the handle locks (E) to install the upper handle. NOTICE: Do not allow the starter cable to become pinched or trapped when aligning the handles. Insert threaded end of the mower during assembly could result in . Accidental starting , do not make any ...

Parts Diagram
Page 4
... 1 Screw (M4 x 16 mm, T20 Torx Socket Pan Hd 8 Key Holder 1 Key Receptacle 2 Deck Cover 1 Press Cover (Battery Connect 2 Plate (Battery Connect 2 Base (Battery Connect 2 4 RYOBI P1100 18 VOLT LAWN MOWER The model number will be found on a label attached to the deck.
... 1 Screw (M4 x 16 mm, T20 Torx Socket Pan Hd 8 Key Holder 1 Key Receptacle 2 Deck Cover 1 Press Cover (Battery Connect 2 Plate (Battery Connect 2 Base (Battery Connect 2 4 RYOBI P1100 18 VOLT LAWN MOWER The model number will be found on a label attached to the deck.

Parts Diagram
Page 5
RYOBI P1100 18 VOLT LAWN MOWER The model number will be found on a label attached to the deck. PARTS LIST Key Part No. Number Description Qty ... 1 Bolt (M6 x 16 mm, Hex Hd 3 Washer (OD15 x ID6 x 1t 3 Bumper 1 Front Wheel Axle 1 Data Label 1 Ryobi Logo Label (Handle 1 Screw (M4 x 14mm, T20 Torx Pan Hd 4 Operator's Manual 5 Key No. 81).... 2 Rear Skirt 1 Ryobi Logo Label (Front 1 Rear Wheel w/Bearing & Cap (8 in ., Inc. Key No. 81)..... 2 Rear Wheel Axle 1 Cotter Pin...
RYOBI P1100 18 VOLT LAWN MOWER The model number will be found on a label attached to the deck. PARTS LIST Key Part No. Number Description Qty ... 1 Bolt (M6 x 16 mm, Hex Hd 3 Washer (OD15 x ID6 x 1t 3 Bumper 1 Front Wheel Axle 1 Data Label 1 Ryobi Logo Label (Handle 1 Screw (M4 x 14mm, T20 Torx Pan Hd 4 Operator's Manual 5 Key No. 81).... 2 Rear Skirt 1 Ryobi Logo Label (Front 1 Rear Wheel w/Bearing & Cap (8 in ., Inc. Key No. 81)..... 2 Rear Wheel Axle 1 Cotter Pin...

Parts Diagram
Page 6
BATT 1 + BATT 1 SENSE BATT 1 SENSE BATT 2 + COIL RYOBI P1100 18 VOLT LAWN MOWER Switch + - Motor 30 86 85 (+) (-) 87 Relay 87a GND M- Start Key M+ IN Battery Ground N/A LED LED GND GND MOSI MISO CLK V + LED PCBA Program WIRING DIAGRAM 6
BATT 1 + BATT 1 SENSE BATT 1 SENSE BATT 2 + COIL RYOBI P1100 18 VOLT LAWN MOWER Switch + - Motor 30 86 85 (+) (-) 87 Relay 87a GND M- Start Key M+ IN Battery Ground N/A LED LED GND GND MOSI MISO CLK V + LED PCBA Program WIRING DIAGRAM 6

Parts Diagram
Page 7
RYOBI P1100 18 VOLT LAWN MOWER CONTACT PLATE CONTACT PLATE TERMINAL BLOCK SWITCH RELAY BLOCK CIRCUIT BOARD ASSEMBLY KEY HOLDER CONNECTOR MOTOR LED BOARD WIRING DIAGRAM 7
RYOBI P1100 18 VOLT LAWN MOWER CONTACT PLATE CONTACT PLATE TERMINAL BLOCK SWITCH RELAY BLOCK CIRCUIT BOARD ASSEMBLY KEY HOLDER CONNECTOR MOTOR LED BOARD WIRING DIAGRAM 7
