
Operation Manual
Page 2
... RYOBI® power tool for a period of purchase. TABLE OF CONTENTS Introduction...2 Warranty...2 General Power Tool Safety Warnings...3-4 Jig Saw Safety Warnings...4 Symbols...5 Electrical...6 Features...7 Assembly...8 Operation...8-11 Maintenance...12 Figure Numbers (Illustrations)...13-16 Parts Ordering / Service...Back Page INTRODUCTION This product has many features for making it was purchased. To receive a replacement power tool or requested warranty service...
... RYOBI® power tool for a period of purchase. TABLE OF CONTENTS Introduction...2 Warranty...2 General Power Tool Safety Warnings...3-4 Jig Saw Safety Warnings...4 Symbols...5 Electrical...6 Features...7 Assembly...8 Operation...8-11 Maintenance...12 Figure Numbers (Illustrations)...13-16 Parts Ordering / Service...Back Page INTRODUCTION This product has many features for making it was purchased. To receive a replacement power tool or requested warranty service...

Operation Manual
Page 3
... (corded) power tool or battery-operated (cordless) power tool. Use of a GFCI reduces the risk of electric shock. Do not abuse the cord. Do not use . Carrying power tools with your hair, clothing and gloves away from moving parts, breakage of the power tool may result in personal injury. Do not overreach. A wrench or a key left attached to a rotating part of parts and any other condition that have the power tool repaired...
... (corded) power tool or battery-operated (cordless) power tool. Use of a GFCI reduces the risk of electric shock. Do not abuse the cord. Do not use . Carrying power tools with your hair, clothing and gloves away from moving parts, breakage of the power tool may result in personal injury. Do not overreach. A wrench or a key left attached to a rotating part of parts and any other condition that have the power tool repaired...
Operation Manual
Page 4
... follow Maintenance instructions may create a risk of the power tool for operations different from lumber before using this rule will reduce the risk of the power tool "live " wire may make exposed metal parts of electric shock or fire. Check damaged parts. JIG SAW SAFETY WARNINGS Hold power tool by a qualified repair person using an extension cord, be replaced only by the manufacturer or by an authorized service center. Cutting accessory...
... follow Maintenance instructions may create a risk of the power tool for operations different from lumber before using this rule will reduce the risk of the power tool "live " wire may make exposed metal parts of electric shock or fire. Check damaged parts. JIG SAW SAFETY WARNINGS Hold power tool by a qualified repair person using an extension cord, be replaced only by the manufacturer or by an authorized service center. Cutting accessory...
Operation Manual
Page 5
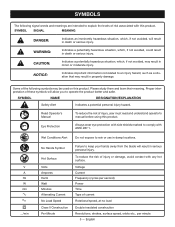
... Alert No Hands Symbol Hot Surface Volts Amperes Hertz Watt Minutes Alternating Current No Load Speed Class II Construction Per Minute Do not expose to rain or use in property damage. WARNING: Indicates a potentially hazardous situation, which, if not avoided, could result in serious personal injury. Voltage Current Frequency (cycles per second) Power Time Type of injury...
... Alert No Hands Symbol Hot Surface Volts Amperes Hertz Watt Minutes Alternating Current No Load Speed Class II Construction Per Minute Do not expose to rain or use in property damage. WARNING: Indicates a potentially hazardous situation, which, if not avoided, could result in serious personal injury. Voltage Current Frequency (cycles per second) Power Time Type of injury...

Operation Manual
Page 6
... replace immediately. Never use . All exposed metal parts are working with a product , use an extension cord that is designed for the usual three-wire grounded power cord. This type of power. ELECTRICAL CONNECTION This product has a precision-built electric motor. A substantial voltage drop will cause a loss of power and the motor will cause a drop in line voltage, resulting in overheating and loss of cord is a concept in safety...
... replace immediately. Never use . All exposed metal parts are working with a product , use an extension cord that is designed for the usual three-wire grounded power cord. This type of power. ELECTRICAL CONNECTION This product has a precision-built electric motor. A substantial voltage drop will cause a loss of power and the motor will cause a drop in line voltage, resulting in overheating and loss of cord is a concept in safety...

Operation Manual
Page 7
... hands after handling. English BEVELING BASE The base can be angled from the cut . The plate protects delicate surfaces from chemically treated lumber. Some examples of these chemicals varies, depending on button allows continuous operation. NO-MAR BASE PLATE A no-mar base plate has been included with approved safety equipment, such as a guide LED LIGHT The LED light illuminates your exposure, work area. VACUUM PORT 1-1/4 in . RAPID CHANGE BLADE CLAMP The rapid change blade clamp...
... hands after handling. English BEVELING BASE The base can be angled from the cut . The plate protects delicate surfaces from chemically treated lumber. Some examples of these chemicals varies, depending on button allows continuous operation. NO-MAR BASE PLATE A no-mar base plate has been included with approved safety equipment, such as a guide LED LIGHT The LED light illuminates your exposure, work area. VACUUM PORT 1-1/4 in . RAPID CHANGE BLADE CLAMP The rapid change blade clamp...
Operation Manual
Page 8
... a hazardous condition leading to power supply until the parts are not assembled to modify this list are replaced. WARNING: Do not connect to possible serious personal injury. English OPERATION WARNING: Do not allow familiarity with damaged or missing parts could result in serious personal injury. The use any accessories from the area between the gear housing and saw blade clamp. 8 - Any such alteration...
... a hazardous condition leading to power supply until the parts are not assembled to modify this list are replaced. WARNING: Do not connect to possible serious personal injury. English OPERATION WARNING: Do not allow familiarity with damaged or missing parts could result in serious personal injury. The use any accessories from the area between the gear housing and saw blade clamp. 8 - Any such alteration...
Operation Manual
Page 9
...; Cutting thin sheet metal Cutting plastics and laminates INSTALLING / REMOVING BLADE See Figure 2, page 13. If you have the lock-on feature engaged during use the tool if the blade is required. Next, adjust the variable speed control selector until the desired speed is securely in and hold the lock-on position (depress and release switch trigger). To install blade: Unplug the saw. Rotate the rapid change blade clamp...
...; Cutting thin sheet metal Cutting plastics and laminates INSTALLING / REMOVING BLADE See Figure 2, page 13. If you have the lock-on feature engaged during use the tool if the blade is required. Next, adjust the variable speed control selector until the desired speed is securely in and hold the lock-on position (depress and release switch trigger). To install blade: Unplug the saw. Rotate the rapid change blade clamp...
Operation Manual
Page 10
LED LIGHT See Figure 6, page 14. Start the saw and move or remove the edge guide knob when making bevel cuts. Tighten base pivot screw. ORBITAL MOTION See Figures 7 - 8, pages 14 - 15. To adjust the orbital motion, rotate the orbital adjustment knob to find the right setting for cuts from between the gear housing and saw cuts in the line of the edge guide through your work in the upstroke but does not...
LED LIGHT See Figure 6, page 14. Start the saw and move or remove the edge guide knob when making bevel cuts. Tighten base pivot screw. ORBITAL MOTION See Figures 7 - 8, pages 14 - 15. To adjust the orbital motion, rotate the orbital adjustment knob to find the right setting for cuts from between the gear housing and saw cuts in the line of the edge guide through your work in the upstroke but does not...

Operation Manual
Page 11
... the material being cut . Fully squeeze the switch trigger to start the saw. Do not move the jig saw has to drill a pilot hole before making plunge cuts. If blade heats excessively, use a coarsertooth blade or lower speed. Lay out your pattern or line of the work firmly and saw close to complete the opening . Use only the 7 teeth per inch blade for more details...
... the material being cut . Fully squeeze the switch trigger to start the saw. Do not move the jig saw has to drill a pilot hole before making plunge cuts. If blade heats excessively, use a coarsertooth blade or lower speed. Lay out your pattern or line of the work firmly and saw close to complete the opening . Use only the 7 teeth per inch blade for more details...

Operation Manual
Page 12
... grindings are susceptible to clean the product using solvents when cleaning plastic parts. Therefore, no further lubrication is extremely important to damage from various types of materials. GENERAL MAINTENANCE Avoid using compressed air. Electric tools used on these materials, it is required. MAINTENANCE WARNING: When servicing, use . Use of any of these types of commercial solvents and may be done by their use only identical replacement parts.
... grindings are susceptible to clean the product using solvents when cleaning plastic parts. Therefore, no further lubrication is extremely important to damage from various types of materials. GENERAL MAINTENANCE Avoid using compressed air. Electric tools used on these materials, it is required. MAINTENANCE WARNING: When servicing, use . Use of any of these types of commercial solvents and may be done by their use only identical replacement parts.
Repair Sheet
Page 2
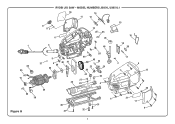
MODEL NUMBERS JS651L/JS651L1 10 14 11 13 9 87 6 12 35 45 15 16 1 3 18 46 38 36 35 5 37 4 39 40 41 33 20 44 43 22 23 24 26 17 2 4 12 19 34 42 25 27 29 28 4 4 20 35 36 Figure A 30 31 4 31 32 21 11 4 2 RYOBI JIG SAW -
MODEL NUMBERS JS651L/JS651L1 10 14 11 13 9 87 6 12 35 45 15 16 1 3 18 46 38 36 35 5 37 4 39 40 41 33 20 44 43 22 23 24 26 17 2 4 12 19 34 42 25 27 29 28 4 4 20 35 36 Figure A 30 31 4 31 32 21 11 4 2 RYOBI JIG SAW -
Repair Sheet
Page 3
...Data Label (JS651L 1 941121062 Data Label (JS651L1 1 673058001 Pin 1 693114003 Torsion Spring 1 305061001 Blade Guide Assembly 1 305287001 Edge Guide Knob 1 692668001 Base Angle Nut 1 692670001 Compression Spring 1 692667001 Spherical Pin 1 29 641933001 Saw Base 1 30 521927001 Base Plate 1 31 660211006 Screw (M3 x 6 mm 4 32 661276001 Screw (M5 x 20 mm 1 33 305493001 Bearing Plate 1 34 305467001 Motor Assembly (Incl. Key No. 19) (JS651L)..........1 202338001 Motor Assembly (Incl. Always mention the model number in damage...
...Data Label (JS651L 1 941121062 Data Label (JS651L1 1 673058001 Pin 1 693114003 Torsion Spring 1 305061001 Blade Guide Assembly 1 305287001 Edge Guide Knob 1 692668001 Base Angle Nut 1 692670001 Compression Spring 1 692667001 Spherical Pin 1 29 641933001 Saw Base 1 30 521927001 Base Plate 1 31 660211006 Screw (M3 x 6 mm 4 32 661276001 Screw (M5 x 20 mm 1 33 305493001 Bearing Plate 1 34 305467001 Motor Assembly (Incl. Key No. 19) (JS651L)..........1 202338001 Motor Assembly (Incl. Always mention the model number in damage...

Repair Sheet
Page 4
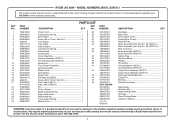
POWER CORD BLUE RYOBI JIG SAW - MODEL NUMBERS JS651L/JS651L1 SWITCH BLACK BLACK WHITE CIRCUIT BOARD RED BLUE BRUSH HOLDER RED LED LIGHT RED BLACK BRUSH HOLDER RED WIRING DIAGRAM 4 MOTOR
POWER CORD BLUE RYOBI JIG SAW - MODEL NUMBERS JS651L/JS651L1 SWITCH BLACK BLACK WHITE CIRCUIT BOARD RED BLUE BRUSH HOLDER RED LED LIGHT RED BLACK BRUSH HOLDER RED WIRING DIAGRAM 4 MOTOR


