Repair Sheet
Page 2
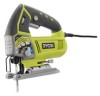
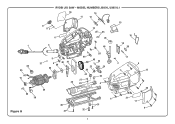
MODEL NUMBERS JS651L/JS651L1 10 14 11 13 9 87 6 12 35 45 15 16 1 3 18 46 38 36 35 5 37 4 39 40 41 33 20 44 43 22 23 24 26 17 2 4 12 19 34 42 25 27 29 28 4 4 20 35 36 Figure A 30 31 4 31 32 21 11 4 2 RYOBI JIG SAW -
MODEL NUMBERS JS651L/JS651L1 10 14 11 13 9 87 6 12 35 45 15 16 1 3 18 46 38 36 35 5 37 4 39 40 41 33 20 44 43 22 23 24 26 17 2 4 12 19 34 42 25 27 29 28 4 4 20 35 36 Figure A 30 31 4 31 32 21 11 4 2 RYOBI JIG SAW -
Repair Sheet
Page 3
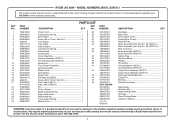
... Output Gear Assembly (JS651L1 1 43 305104002 Bushing w/Needle Bearing 1 44 673054001 Orbital Pin 1 45 611841001 Bushing 1 46 304944001 Saw Bar Assembly 1 NOT SHOWN 631097001 Edge Guide 1 681215001 Hex Key (M4 1 690227053 Metal Cutting Blade 1 902651002 Tool Bag 1 690227051 Wood Cutting Blade 2 988000799 Operator's Manual 1 6-7-13 (REV:04) WARNING: Improper repair of your JIG SAW or when ordering repair parts. MODEL NUMBERS JS651L/JS651L1 The model number will be performed by a Ryobi Authorized Service Center...
... Output Gear Assembly (JS651L1 1 43 305104002 Bushing w/Needle Bearing 1 44 673054001 Orbital Pin 1 45 611841001 Bushing 1 46 304944001 Saw Bar Assembly 1 NOT SHOWN 631097001 Edge Guide 1 681215001 Hex Key (M4 1 690227053 Metal Cutting Blade 1 902651002 Tool Bag 1 690227051 Wood Cutting Blade 2 988000799 Operator's Manual 1 6-7-13 (REV:04) WARNING: Improper repair of your JIG SAW or when ordering repair parts. MODEL NUMBERS JS651L/JS651L1 The model number will be performed by a Ryobi Authorized Service Center...

Repair Sheet
Page 4
MODEL NUMBERS JS651L/JS651L1 SWITCH BLACK BLACK WHITE CIRCUIT BOARD RED BLUE BRUSH HOLDER RED LED LIGHT RED BLACK BRUSH HOLDER RED WIRING DIAGRAM 4 MOTOR POWER CORD BLUE RYOBI JIG SAW -
MODEL NUMBERS JS651L/JS651L1 SWITCH BLACK BLACK WHITE CIRCUIT BOARD RED BLUE BRUSH HOLDER RED LED LIGHT RED BLACK BRUSH HOLDER RED WIRING DIAGRAM 4 MOTOR POWER CORD BLUE RYOBI JIG SAW -

User Manual
Page 2
... battery pack, picking up or carrying the tool. Use of electric shock. If operating a power tool in any adjusting key or wrench before turning the power tool on and off -position before making any adapter plugs with the power tool or these are tired or under the influence of drugs, alcohol or medication. English Do not use . If damaged, have the switch on invites accidents. Remove...
... battery pack, picking up or carrying the tool. Use of electric shock. If operating a power tool in any adjusting key or wrench before turning the power tool on and off -position before making any adapter plugs with the power tool or these are tired or under the influence of drugs, alcohol or medication. English Do not use . If damaged, have the switch on invites accidents. Remove...

User Manual
Page 3
... parts, mounting, and any other part that is damaged should be carefully checked to control. Use the power tool, accessories and tool bits etc. A guard or other conditions that may contact hidden wiring or its operation. A wire gauge size (A.W.G.) of serious personal injury. If the power supply cord is not recommended. The smaller the gauge number, the heavier the cord. SERVICE Have your extension cord is maintained. When servicing a power tool, use...
... parts, mounting, and any other part that is damaged should be carefully checked to control. Use the power tool, accessories and tool bits etc. A guard or other conditions that may contact hidden wiring or its operation. A wire gauge size (A.W.G.) of serious personal injury. If the power supply cord is not recommended. The smaller the gauge number, the heavier the cord. SERVICE Have your extension cord is maintained. When servicing a power tool, use...
User Manual
Page 4
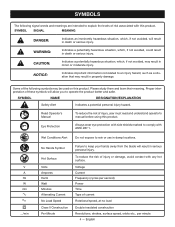
... No Hands Symbol Hot Surface Volts Amperes Hertz Watt Minutes Alternating Current No Load Speed Class II Construction Per Minute Do not expose to rain or use in property damage. Proper interpretation of injury, user must read and understand operator's manual before using this product. V A Hz W min no load Double-insulated construction Revolutions, strokes, surface speed, orbits etc., per second) Power Time Type...
... No Hands Symbol Hot Surface Volts Amperes Hertz Watt Minutes Alternating Current No Load Speed Class II Construction Per Minute Do not expose to rain or use in property damage. Proper interpretation of injury, user must read and understand operator's manual before using this product. V A Hz W min no load Double-insulated construction Revolutions, strokes, surface speed, orbits etc., per second) Power Time Type...
User Manual
Page 5
... wire size required in an extension cord. English Always use . This type of power and the motor will not get caught on direct current (DC). If damaged replace immediately. NOTE: Servicing of a product with a power tool. Failure to protect the user from shock resulting from the internal metal motor components with a damaged cord since touching the damaged area could cause electrical shock resulting in serious injury. 5 - ELECTRICAL...
... wire size required in an extension cord. English Always use . This type of power and the motor will not get caught on direct current (DC). If damaged replace immediately. NOTE: Servicing of a product with a power tool. Failure to protect the user from shock resulting from the internal metal motor components with a damaged cord since touching the damaged area could cause electrical shock resulting in serious injury. 5 - ELECTRICAL...
User Manual
Page 6
... Settings...4 ASSEMBLY WARNING: Do not use with the slot in the blade support roller. Holding the blade clamp in place, insert the saw . Rotate orbital adjustment knob to position 3. Rotate the rapid change blade clamp so that the slot in the blade clamp body and blade support roller. Check to make sure the back of the blade support roller and blade clamp. Release the blade clamp...
... Settings...4 ASSEMBLY WARNING: Do not use with the slot in the blade support roller. Holding the blade clamp in place, insert the saw . Rotate orbital adjustment knob to position 3. Rotate the rapid change blade clamp so that the slot in the blade clamp body and blade support roller. Check to make sure the back of the blade support roller and blade clamp. Release the blade clamp...
User Manual
Page 7
.... INSTALLING VACUUM HOSE (NOT PROVIDED) See Figure 3, page 11. Unplug the saw in possible serious injury. They could result in accidental starting cuts. OPERATION NOTE: Check that the slot in the blade support roller. Remove the blade. Do not use and the saw OFF. To turn the saw becomes disconnected from power supply, disengage the lock-on position (depress and release switch trigger). Release the switch trigger to allow operator...
.... INSTALLING VACUUM HOSE (NOT PROVIDED) See Figure 3, page 11. Unplug the saw in possible serious injury. They could result in accidental starting cuts. OPERATION NOTE: Check that the slot in the blade support roller. Remove the blade. Do not use and the saw OFF. To turn the saw becomes disconnected from power supply, disengage the lock-on position (depress and release switch trigger). Release the switch trigger to allow operator...
User Manual
Page 8
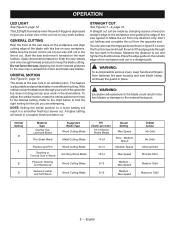
... direction only. To adjust the orbital motion, rotate the orbital adjustment knob to keep the guard in the line of the saw blade clamp, and keep the blade cutting. A higher setting will result in Wood Plywood, Decking and Hardwood General Lumber and Soft Wood Suggested Blade Type Wood Cutting Blade Metal Cutting Blade Wood Cutting Blade TPI (Teeth per inch) 10-12 (Down Stroke Blade) 14-24 10-12 Speed Setting Max Speed Slow - Start...
... direction only. To adjust the orbital motion, rotate the orbital adjustment knob to keep the guard in the line of the saw blade clamp, and keep the blade cutting. A higher setting will result in Wood Plywood, Decking and Hardwood General Lumber and Soft Wood Suggested Blade Type Wood Cutting Blade Metal Cutting Blade Wood Cutting Blade TPI (Teeth per inch) 10-12 (Down Stroke Blade) 14-24 10-12 Speed Setting Max Speed Slow - Start...
User Manual
Page 9
... edge guide knob when making bevel cuts. Tighten base pivot screw. If the blade chatters or vibrates excessively, use lower speed. Bevel cutting angles may be adjusted from contacting the thumb screw, it rests on the front edge of the base and blade will not come in 15° increments are required. Unplug the saw. Using the 1/8 in this manual for this , the material will be large enough to slide...
... edge guide knob when making bevel cuts. Tighten base pivot screw. If the blade chatters or vibrates excessively, use lower speed. Bevel cutting angles may be adjusted from contacting the thumb screw, it rests on the front edge of the base and blade will not come in 15° increments are required. Unplug the saw. Using the 1/8 in this manual for this , the material will be large enough to slide...

User Manual
Page 10
... may be done by their use only identical replacement parts. MAINTENANCE WARNING: Before inspecting, cleaning, or performing any maintenance, make sure the switch is in the off (O) position, wait for all moving parts to remove dirt, dust, oil, grease, etc. Your risk from the power supply. CALIFORNIA PROPOSITION 65 WARNING: This product and some dust created by power sanding, sawing, grinding, drilling, and other reproductive harm.
... may be done by their use only identical replacement parts. MAINTENANCE WARNING: Before inspecting, cleaning, or performing any maintenance, make sure the switch is in the off (O) position, wait for all moving parts to remove dirt, dust, oil, grease, etc. Your risk from the power supply. CALIFORNIA PROPOSITION 65 WARNING: This product and some dust created by power sanding, sawing, grinding, drilling, and other reproductive harm.


