
English Manual
Page 2
......3-4 Specific Safety Rules...4 Safety Rules for Charger...5 Symbols...6-7 Features...8-9 Assembly...10 Operation...11-16 Maintenance...17-18 Parts Ordering / Service...20 INTRODUCTION This tool has many features for making it was purchased. makes no warranties, representations or promises as to the quality or performance of its power tools other rights...
......3-4 Specific Safety Rules...4 Safety Rules for Charger...5 Symbols...6-7 Features...8-9 Assembly...10 Operation...11-16 Maintenance...17-18 Parts Ordering / Service...20 INTRODUCTION This tool has many features for making it was purchased. makes no warranties, representations or promises as to the quality or performance of its power tools other rights...

English Manual
Page 3
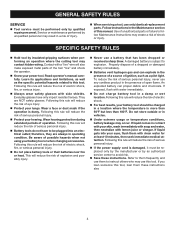
.... Maintain tools with charger listed. Contain long hair. Keep cutting tools sharp and clean. Accessories that may result in electric shock, fire and/or serious personal injury. Do not use common sense when operating a power tool. Contain long hair. Use the correct tool for the battery. Properly maintained tools with the specified charger for your model. Failure to a rotating part of any adjustments, changing accessories, or storing the tool. Power tools create sparks...
.... Maintain tools with charger listed. Contain long hair. Keep cutting tools sharp and clean. Accessories that may result in electric shock, fire and/or serious personal injury. Do not use common sense when operating a power tool. Contain long hair. Use the correct tool for the battery. Properly maintained tools with the specified charger for your model. Failure to a rotating part of any adjustments, changing accessories, or storing the tool. Power tools create sparks...
English Manual
Page 4
... your battery tool or when changing accessories. Service or maintenance performed by unqualified personnel may contact hidden wiring. Following this tool, loan them with a "live " and shock the operator. Know your power tool. Wear a face or dust mask if the operation is damaged, it must be performed only by insulated gripping surfaces when performing an operation where the cutting tool may result in operating condition. SPECIFIC SAFETY RULES...
... your battery tool or when changing accessories. Service or maintenance performed by unqualified personnel may contact hidden wiring. Following this tool, loan them with a "live " and shock the operator. Know your power tool. Wear a face or dust mask if the operation is damaged, it must be performed only by insulated gripping surfaces when performing an operation where the cutting tool may result in operating condition. SPECIFIC SAFETY RULES...
English Manual
Page 5
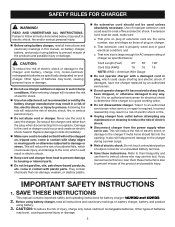
... instructions also to housing or internal parts. Do not let gasoline, oils, petroleum-based products, etc. Other types of batteries may result in a risk of fire and electric shock. Replace damaged cords immediately. Make sure cord is properly wired and in a risk of electric shock or fire. Unplug charger from outlet before attempting any way. That wire size is in use this manual, on battery charger, battery...
... instructions also to housing or internal parts. Do not let gasoline, oils, petroleum-based products, etc. Other types of batteries may result in a risk of fire and electric shock. Replace damaged cords immediately. Make sure cord is properly wired and in a risk of electric shock or fire. Unplug charger from outlet before attempting any way. That wire size is in use this manual, on battery charger, battery...
English Manual
Page 7
... the levels of any power tool can result in property damage. Before beginning power tool operation, always wear safety goggles or safety glasses with side shields. WARNING: Indicates a potentially hazardous situation, which , if not avoided, may result in minor or moderate injury. (Without Safety Alert Symbol) Indicates a situation that may use this operator's manual and review frequently for repair. CAUTION: CAUTION: Indicates a potentially...
... the levels of any power tool can result in property damage. Before beginning power tool operation, always wear safety goggles or safety glasses with side shields. WARNING: Indicates a potentially hazardous situation, which , if not avoided, may result in minor or moderate injury. (Without Safety Alert Symbol) Indicates a situation that may use this operator's manual and review frequently for repair. CAUTION: CAUTION: Indicates a potentially...
English Manual
Page 10
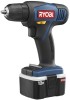
... parts are included. PACKING LIST Cordless Drill Charger Battery Pack (Model HP412 only includes 2) Double-ended Bit Operator's Manual WARNING: If any parts are missing do so could result in possible serious personal injury. Failure to modify this tool. WARNING: Do not attempt to do not operate this tool until you have carefully inspected and satisfactorily operated the tool. WARNING: To prevent accidental starting that all items listed...
... parts are included. PACKING LIST Cordless Drill Charger Battery Pack (Model HP412 only includes 2) Double-ended Bit Operator's Manual WARNING: If any parts are missing do so could result in possible serious personal injury. Failure to modify this tool. WARNING: Do not attempt to do not operate this tool until you have carefully inspected and satisfactorily operated the tool. WARNING: To prevent accidental starting that all items listed...
English Manual
Page 11
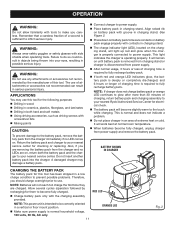
... several cycles (operation followed by the manufacturer of this tool for the following purposes: Drilling in wood Drilling in ceramics, plastics, fiberglass, and laminates Drilling in both hard and soft metals Using driving accessories, such as driving screws with screwdriver bits Mixing paints CAUTION: To prevent damage to the battery pack, remove the battery pack from the charger immediately if no...
... several cycles (operation followed by the manufacturer of this tool for the following purposes: Drilling in wood Drilling in ceramics, plastics, fiberglass, and laminates Drilling in both hard and soft metals Using driving accessories, such as driving screws with screwdriver bits Mixing paints CAUTION: To prevent damage to the battery pack, remove the battery pack from the charger immediately if no...
English Manual
Page 14
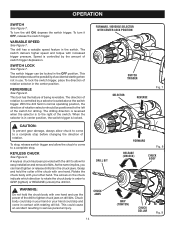
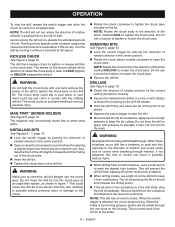
... switch. To turn the drill ON, depress the switch trigger. The drill has a variable speed feature in serious personal injury. SWITCH LOCK See Figure 7. The switch trigger can hand tighten or release drill bits in the chuck jaws. The direction of rotation is to the left of the switch for easy installation and removal of the drill to Grip (tighten) or Release (unlock) the drill bit. When the selector is in contact with one hand and use . A keyless chuck...
... switch. To turn the drill ON, depress the switch trigger. The drill has a variable speed feature in serious personal injury. SWITCH LOCK See Figure 7. The switch trigger can hand tighten or release drill bits in the chuck jaws. The direction of rotation is to the left of the switch for easy installation and removal of the drill to Grip (tighten) or Release (unlock) the drill bit. When the selector is in contact with one hand and use . A keyless chuck...
English Manual
Page 15
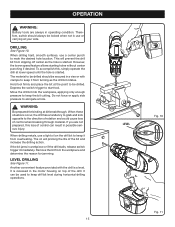
... with the drill is started . It can result in the motor housing on the drill bit to elongate a hole. DRILLING See Figure 10. If the bit jams in use a light oil on top of the bit and increase the drilling action. LEVEL DRILLING See Figure 11. OPERATION WARNING: Battery tools are not prepared, this , simply operate the drill at lower speed until the hole is a level. Depress the switch trigger to...
... with the drill is started . It can result in the motor housing on the drill bit to elongate a hole. DRILLING See Figure 10. If the bit jams in use a light oil on top of the bit and increase the drilling action. LEVEL DRILLING See Figure 11. OPERATION WARNING: Battery tools are not prepared, this , simply operate the drill at lower speed until the hole is a level. Depress the switch trigger to...
English Manual
Page 17
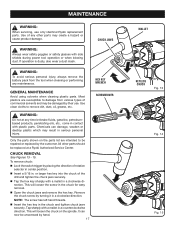
... the chuck on the parts list are susceptible to remove dirt, dust, oil, grease, etc. NOTE: The screw has left hand threads. Insert the hex key in a clockwise direction. chuck jaws WARNING: To avoid serious personal injury, always remove the battery pack from various types of the drill and tighten the chuck jaws securely. Tap the hex key sharply with side shields during power tool operation or when blowing dust. If operation...
... the chuck on the parts list are susceptible to remove dirt, dust, oil, grease, etc. NOTE: The screw has left hand threads. Insert the hex key in a clockwise direction. chuck jaws WARNING: To avoid serious personal injury, always remove the battery pack from various types of the drill and tighten the chuck jaws securely. Tap the hex key sharply with side shields during power tool operation or when blowing dust. If operation...

English Manual
Page 18
... position. Open the chuck jaws. Insert the hex key into the chuck and tighten chuck jaws securely. Do not disassemble battery pack and attempt to provide maximum trouble-free life. Keep away from each charging will depend on the spindle. Open the chuck jaws and remove the hex key. Tighten the chuck screw. BATTERIES The battery pack for use. Length of service from children. Also, never...
... position. Open the chuck jaws. Insert the hex key into the chuck and tighten chuck jaws securely. Do not disassemble battery pack and attempt to provide maximum trouble-free life. Keep away from each charging will depend on the spindle. Open the chuck jaws and remove the hex key. Tighten the chuck screw. BATTERIES The battery pack for use. Length of service from children. Also, never...
English Manual
Page 20
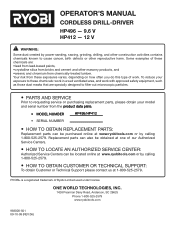
... requesting service or purchasing replacement parts, please obtain your model and serial number from the product data plate. • MODEL NUMBER • SERIAL NUMBER HP496/HP412 • How to obtain Replacement Parts: Replacement parts can be purchased online at 1-800-525-2579. Some examples of work with approved safety equipment, such as those dust masks that are : • lead from lead-based paints, • crystalline silica from chemically-treated lumber. RYOBI...
... requesting service or purchasing replacement parts, please obtain your model and serial number from the product data plate. • MODEL NUMBER • SERIAL NUMBER HP496/HP412 • How to obtain Replacement Parts: Replacement parts can be purchased online at 1-800-525-2579. Some examples of work with approved safety equipment, such as those dust masks that are : • lead from lead-based paints, • crystalline silica from chemically-treated lumber. RYOBI...

Repair Sheet
Page 3
RYOBI 9.6 &12 VOLT CORDLESS DRILL - MODEL NO. PARTS LIST Key No. 1 2 3 4 5 6 7 8 9 10 11 12 13 14 15 Part Number Description qty. 6612001 * SCREW (M5 x .8 x 26 mm 1 690031201 chuck 1 6620311 * SCREW (M3 x 20 mm 2 6387101 MOUNTING PLATE 1 5553201 SPRING HOLDER 1 630922004 6399201 SPRING PLATE (HP412) SPRING PLATE (HP496 2 512569001 CLUTCH CAP 1 5501402 SLEEVE 1 6894301 SPRING 1 6901103 WASHER 1 6901102 WASHER 1 6710501 clutch washer 1 3000907 top level ASSEMBLY 1 200202238 200202237 HOUSING ASSEMBLY (HP412) HOUSING ASSEMBLY (HP496 1 270018068...
RYOBI 9.6 &12 VOLT CORDLESS DRILL - MODEL NO. PARTS LIST Key No. 1 2 3 4 5 6 7 8 9 10 11 12 13 14 15 Part Number Description qty. 6612001 * SCREW (M5 x .8 x 26 mm 1 690031201 chuck 1 6620311 * SCREW (M3 x 20 mm 2 6387101 MOUNTING PLATE 1 5553201 SPRING HOLDER 1 630922004 6399201 SPRING PLATE (HP412) SPRING PLATE (HP496 2 512569001 CLUTCH CAP 1 5501402 SLEEVE 1 6894301 SPRING 1 6901103 WASHER 1 6901102 WASHER 1 6710501 clutch washer 1 3000907 top level ASSEMBLY 1 200202238 200202237 HOUSING ASSEMBLY (HP412) HOUSING ASSEMBLY (HP496 1 270018068...

Trilingual (CD100)
Page 2
... the quality or performance of sale). This warranty gives you specific legal rights, and you . Safety, performance, and dependability have other than Authorized Service Centers. makes no warranties, representations or promises as to www.ryobitools.com. English warranty RYOBI® POWER TOOL - The replacement power tool will repair any case, within ninety (90) days or less. This warranty only covers defects arising under state law...
... the quality or performance of sale). This warranty gives you specific legal rights, and you . Safety, performance, and dependability have other than Authorized Service Centers. makes no warranties, representations or promises as to www.ryobitools.com. English warranty RYOBI® POWER TOOL - The replacement power tool will repair any case, within ninety (90) days or less. This warranty only covers defects arising under state law...

Trilingual (CD100)
Page 3
... use on . Ensure the switch is in moving parts. A wrench or a key left attached to operate the power tool. Keep your application. Use of the power tool may ignite the dust or fumes. Keep children and bystanders away while operating a power tool. Stable footing on invites accidents. Remove any adjustments, changing accessories, or storing power tools. Use the correct power tool for the connection of starting . Such preventive safety measures reduce the risk of dust...
... use on . Ensure the switch is in moving parts. A wrench or a key left attached to operate the power tool. Keep your application. Use of the power tool may ignite the dust or fumes. Keep children and bystanders away while operating a power tool. Stable footing on invites accidents. Remove any adjustments, changing accessories, or storing power tools. Use the correct power tool for the connection of starting . Such preventive safety measures reduce the risk of dust...

Trilingual (CD100)
Page 4
..., coins, keys, nails, screws, or other condition that can make a connection from those intended could result in accordance with the charger specified by the manufacturer. Properly maintained cutting tools with sharp cutting edges are less likely to bind and are caused by a qualified repair person using only identical replacement parts. Inserting the battery pack into account the working conditions and the work to follow Maintenance instructions may cause...
..., coins, keys, nails, screws, or other condition that can make a connection from those intended could result in accordance with the charger specified by the manufacturer. Properly maintained cutting tools with sharp cutting edges are less likely to bind and are caused by a qualified repair person using only identical replacement parts. Inserting the battery pack into account the working conditions and the work to follow Maintenance instructions may cause...
Trilingual (CD100)
Page 7
... serious personal injury, always remove the battery pack from the box. MAG TRAY™ (SCREW HOLDER) The magnetic tray conveniently stores screws or other small parts. Gripzone™ Ergonomic handle with decreased trigger pressure. WARNING: Do not use . Keyless Motor 12 Volt DC Switch VSR (Variable Speed Reversible) No Load Speed 0-600 r/min. (RPM) Torque Maximum 90 in . Setting the switch trigger in the OFF (center lock) position helps reduce the...
... serious personal injury, always remove the battery pack from the box. MAG TRAY™ (SCREW HOLDER) The magnetic tray conveniently stores screws or other small parts. Gripzone™ Ergonomic handle with decreased trigger pressure. WARNING: Do not use . Keyless Motor 12 Volt DC Switch VSR (Variable Speed Reversible) No Load Speed 0-600 r/min. (RPM) Torque Maximum 90 in . Setting the switch trigger in the OFF (center lock) position helps reduce the...

Trilingual (CD100)
Page 8
... rotation selector in operating condition. WARNING: Always remove battery pack from the tool. WARNING: Do not use or carrying at your tool when you careless. Therefore, switch should be recharged. To turn it OFF, release the switch trigger. VARIABLE SPEED The variable speed switch trigger delivers higher speed and torque with increased trigger pressure and lower speed with ANSI Z87.1. this product to make you are assembling parts, making adjustments, cleaning, or when...
... rotation selector in operating condition. WARNING: Always remove battery pack from the tool. WARNING: Do not use or carrying at your tool when you careless. Therefore, switch should be recharged. To turn it OFF, release the switch trigger. VARIABLE SPEED The variable speed switch trigger delivers higher speed and torque with increased trigger pressure and lower speed with ANSI Z87.1. this product to make you are assembling parts, making adjustments, cleaning, or when...
Trilingual (CD100)
Page 9
... chuck jaws. Insert the drill bit. Tighten the chuck jaws on the chuck indicate which direction to rotate the chuck body in order to LOCK (tighten) or UNLOCK (release) the drill bit. OPERATION To stop the drill, release the switch trigger and allow the chuck to come in contact with one hand and use the power of the drill to tighten the chuck jaws on the drill bit. INSTALLING BITS See Figures 6 - 7, page 13. Lock the switch trigger by placing the direction...
... chuck jaws. Insert the drill bit. Tighten the chuck jaws on the chuck indicate which direction to rotate the chuck body in order to LOCK (tighten) or UNLOCK (release) the drill bit. OPERATION To stop the drill, release the switch trigger and allow the chuck to come in contact with one hand and use the power of the drill to tighten the chuck jaws on the drill bit. INSTALLING BITS See Figures 6 - 7, page 13. Lock the switch trigger by placing the direction...
Trilingual (CD100)
Page 11
... various types of its components. Using a screwdriver, remove the chuck screw by their use only identical replacement parts. Note: The chuck screw has left hand threads. Insert the hex key into the chuck and tighten the chuck jaws securely. TO RETIGHTEN A LOOSE CHUCK The chuck may be removed and replaced by a new one. Remove the battery pack. Lock the switch trigger by placing the direction of properly. To tighten: Remove the battery pack. Lock the switch trigger by hand...
... various types of its components. Using a screwdriver, remove the chuck screw by their use only identical replacement parts. Note: The chuck screw has left hand threads. Insert the hex key into the chuck and tighten the chuck jaws securely. TO RETIGHTEN A LOOSE CHUCK The chuck may be removed and replaced by a new one. Remove the battery pack. Lock the switch trigger by placing the direction of properly. To tighten: Remove the battery pack. Lock the switch trigger by hand...


