English Manual
Page 3
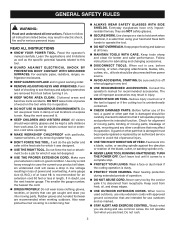
...61550; KNOW YOUR POWER TOOL. Form habit of at all instructions. When not in injury. NEVER STAND ON TOOL. Before further use , before turning it was not designed. USE THE PROPER EXTENSION CORD. Do not force the tool or attachment to determine that can get caught and draw.... Also wear protective hair covering to rain. For example: pipes, radiators, ranges, refrigerator enclosures. KEEP GUARDS IN PLACE and in good condition. TURN THE POWER OFF. GENERAL SAFETY RULES WARNING: Read and understand all times. MAINTAIN TOOLS WITH CARE.
...61550; KNOW YOUR POWER TOOL. Form habit of at all instructions. When not in injury. NEVER STAND ON TOOL. Before further use , before turning it was not designed. USE THE PROPER EXTENSION CORD. Do not force the tool or attachment to determine that can get caught and draw.... Also wear protective hair covering to rain. For example: pipes, radiators, ranges, refrigerator enclosures. KEEP GUARDS IN PLACE and in good condition. TURN THE POWER OFF. GENERAL SAFETY RULES WARNING: Read and understand all times. MAINTAIN TOOLS WITH CARE.
English Manual
Page 4
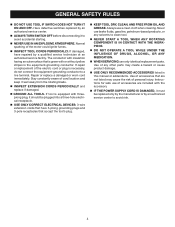
...with or without yellow stripes is the equipment-grounding conductor. GENERAL SAFETY RULES DO NOT USE TOOL IF SWITCH DOES NOT TURN IT ON AND OFF. Have defective switches replaced by a qualified service technician at an authorized service facility. Never use brake fluids, ...electrical receptacle. Use only correct electrical devices: 3-wire extension cords that have repaired by an authorized service center. ALWAYS TURN SWITCH OFF before disconnecting it should be replaced only by the manufacturer or by an authorized service center to clean tool. ...
...with or without yellow stripes is the equipment-grounding conductor. GENERAL SAFETY RULES DO NOT USE TOOL IF SWITCH DOES NOT TURN IT ON AND OFF. Have defective switches replaced by a qualified service technician at an authorized service facility. Never use brake fluids, ...electrical receptacle. Use only correct electrical devices: 3-wire extension cords that have repaired by an authorized service center. ALWAYS TURN SWITCH OFF before disconnecting it should be replaced only by the manufacturer or by an authorized service center to clean tool. ...
English Manual
Page 5
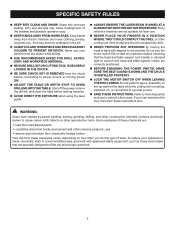
... for laser use your exposure to these exposures varies, depending on , or connected to power source or turning power ON. ADJUST THE TABLE OR DEPTH STOP TO AVOID DRILLING INTO THE TABLE. Do not turn the motor switch ON or start any loose clothing, jewelry, long hair, etc., that may cause...
... for laser use your exposure to these exposures varies, depending on , or connected to power source or turning power ON. ADJUST THE TABLE OR DEPTH STOP TO AVOID DRILLING INTO THE TABLE. Do not turn the motor switch ON or start any loose clothing, jewelry, long hair, etc., that may cause...

English Manual
Page 9
... made with the blade at 90°. Featherboard A device used for drilling large holes accurately. Ripping or Rip Cut A cutting operation along the length of turns completed by a spinning object in the workpiece (requires a special blade). Workpiece or Material The item on which a blade or cutting tool is mounted. Kerf The...
... made with the blade at 90°. Featherboard A device used for drilling large holes accurately. Ripping or Rip Cut A cutting operation along the length of turns completed by a spinning object in the workpiece (requires a special blade). Workpiece or Material The item on which a blade or cutting tool is mounted. Kerf The...

English Manual
Page 15
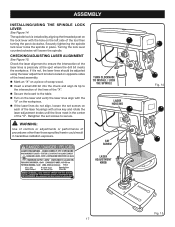
... key. Do not use a chemical cleaning agent. head assembly set screws with mallet using a mallet or hammer. Fit the arbor into the spindle shaft turning it to remove excess grease. Align the head assembly with the chuck positioned over the table. ASSEMBLY installing chuck, head assembly, and feed handles See...
... key. Do not use a chemical cleaning agent. head assembly set screws with mallet using a mallet or hammer. Fit the arbor into the spindle shaft turning it to remove excess grease. Align the head assembly with the chuck positioned over the table. ASSEMBLY installing chuck, head assembly, and feed handles See...
English Manual
Page 17
.... If it is precisely at the spot where the drill bit meets the workpiece. DANGER / DANGER / PELIGRO DANGER / DANGER / PELIGRO turn clockwise to secure. Turning the lock lever counterclockwise will loosen the spindle. Securely tightening the spindle lock lever locks the spindle in the center of the "X". Retighten the...into the chuck and align its tip to the intersection of the lines of the "X". Secure the board to the table. Turn on the laser and verify the laser lines align with a hex key and rotate the laser adjustment knobs until the lines meet in place. The...
.... If it is precisely at the spot where the drill bit meets the workpiece. DANGER / DANGER / PELIGRO DANGER / DANGER / PELIGRO turn clockwise to secure. Turning the lock lever counterclockwise will loosen the spindle. Securely tightening the spindle lock lever locks the spindle in the center of the "X". Retighten the...into the chuck and align its tip to the intersection of the lines of the "X". Secure the board to the table. Turn on the laser and verify the laser lines align with a hex key and rotate the laser adjustment knobs until the lines meet in place. The...
English Manual
Page 18
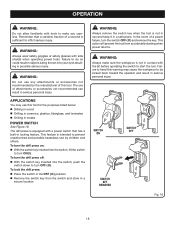
... Always remove the switch key when the tool is equipped with the bit before operating the switch to make sure the workpiece is sufficient to turn the drill press off: With the switch key inserted into your eyes resulting in metals POWER SWITCH See Figure 16. This action ...61550; Drilling in possible serious injury. This feature is intended to heed this tool. APPLICATIONS You may cause the workpiece to turn the switch OFF ( O ) and remove the key. To turn the drill press on: With the switch key inserted into the switch, lift the switch to be kicked back...
... Always remove the switch key when the tool is equipped with the bit before operating the switch to make sure the workpiece is sufficient to turn the drill press off: With the switch key inserted into your eyes resulting in metals POWER SWITCH See Figure 16. This action ...61550; Drilling in possible serious injury. This feature is intended to heed this tool. APPLICATIONS You may cause the workpiece to turn the switch OFF ( O ) and remove the key. To turn the drill press on: With the switch key inserted into the switch, lift the switch to be kicked back...
English Manual
Page 19
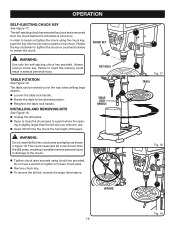
... full length of the way when drilling large objects. Loosen the table lock handle. Rotate the table to loosen the chuck. ing is turned on the chuck. chuck key key hole TABLE LOCK handle wrong 19 Fig. 17 TABLE Fig. 18 Fig. 19 WARNING: Use only the self-ejecting...
... full length of the way when drilling large objects. Loosen the table lock handle. Rotate the table to loosen the chuck. ing is turned on the chuck. chuck key key hole TABLE LOCK handle wrong 19 Fig. 17 TABLE Fig. 18 Fig. 19 WARNING: Use only the self-ejecting...
English Manual
Page 20
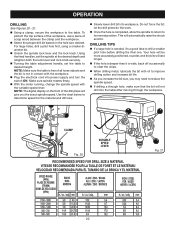
... cord into workpiece. Use the chart below to determine speed for the material and drill size. Slowly lower drill bit into power supply and turn the switch ON. Operation drilling See Figures 20 - 21. Using a clamp, secure the workpiece to desired height. For large holes, drill a...spindle speed. Using the feed handles, set the spindle at the desired depth and retighten both the lock lever and lock knob securely. Turning the table adjustment handle, set the table to the table. NOTE: The digital display on the hole size desired. clamp Fig. 20 variable ...
... cord into workpiece. Use the chart below to determine speed for the material and drill size. Slowly lower drill bit into power supply and turn the switch ON. Operation drilling See Figures 20 - 21. Using a clamp, secure the workpiece to desired height. For large holes, drill a...spindle speed. Using the feed handles, set the spindle at the desired depth and retighten both the lock lever and lock knob securely. Turning the table adjustment handle, set the table to the table. NOTE: The digital display on the hole size desired. clamp Fig. 20 variable ...
English Manual
Page 22
.... While support- WARNING: Always wear safety goggles or safety glasses with plastic parts. WARNING: To prevent accidental starting that could cause possible serious personal injury, turn off the tool, remove the switch key, and unplug the drill press before performing any dust that may create a hazard or cause product damage. Do...
.... While support- WARNING: Always wear safety goggles or safety glasses with plastic parts. WARNING: To prevent accidental starting that could cause possible serious personal injury, turn off the tool, remove the switch key, and unplug the drill press before performing any dust that may create a hazard or cause product damage. Do...


