
User Manual (English)
Page 3
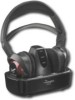
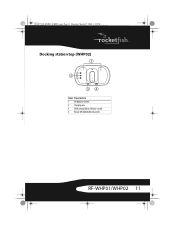
... system represents the state of the art in 2.4 GHz wireless headphone design that gives you complete freedom while enjoying your purchase of headphone cables. 08-1077 RF-WHP01-WHP02.book Page 3 Thursday, March 27, 2008 1:29 PM Rocketfish RF-WHP01/RF-WHP02 Digital Wireless Stereo Headphones Contents Introduction 3 Safety information 4 Features 6 Setting up your system 12 Using your system...year Limited Warranty 27 Français 29 Español 59 Introduction Congratulations on your music or movie without any limitations of a high quality Rocketfish digital wireless stereo headphones.
... system represents the state of the art in 2.4 GHz wireless headphone design that gives you complete freedom while enjoying your purchase of headphone cables. 08-1077 RF-WHP01-WHP02.book Page 3 Thursday, March 27, 2008 1:29 PM Rocketfish RF-WHP01/RF-WHP02 Digital Wireless Stereo Headphones Contents Introduction 3 Safety information 4 Features 6 Setting up your system 12 Using your system...year Limited Warranty 27 Français 29 Español 59 Introduction Congratulations on your music or movie without any limitations of a high quality Rocketfish digital wireless stereo headphones.

User Manual (English)
Page 4
...or computer. Warning: To reduce the risk of fire or electric shock, do not remove screws, covers, or the cabinet. 08-1077 RF-WHP01-WHP02.book Page 4 Thursday, March 27, 2008 1:29 PM The system has a line of sight transmission range of up to 98 feet...charged and always ready whenever you need them. This allows your digital wireless stereo headphones. Refer servicing to persons. Read this apparatus to correctly install, operate, and get the best performance from your headphones to external interference and static. The exclamation point within an equilateral triangle is ...
...or computer. Warning: To reduce the risk of fire or electric shock, do not remove screws, covers, or the cabinet. 08-1077 RF-WHP01-WHP02.book Page 4 Thursday, March 27, 2008 1:29 PM The system has a line of sight transmission range of up to 98 feet...charged and always ready whenever you need them. This allows your digital wireless stereo headphones. Refer servicing to persons. Read this apparatus to correctly install, operate, and get the best performance from your headphones to external interference and static. The exclamation point within an equilateral triangle is ...
User Manual (English)
Page 5
...and objects filled with liquids should not be placed on or pinched particularly at plugs, convenience receptacles, and the point where they exit from headphones can cause hearing loss. A polarized plug has two blades with the apparatus. A grounding type plug has two blades and a third grounding ... apparatus (including amplifiers) that produce heat. • Do not defeat the safety purpose of the polarized or grounding-type plug. 08-1077 RF-WHP01-WHP02.book Page 5 Thursday, March 27, 2008 1:29 PM • Follow all servicing to qualified service personnel. Servicing is required when the ...
...and objects filled with liquids should not be placed on or pinched particularly at plugs, convenience receptacles, and the point where they exit from headphones can cause hearing loss. A polarized plug has two blades with the apparatus. A grounding type plug has two blades and a third grounding ... apparatus (including amplifiers) that produce heat. • Do not defeat the safety purpose of the polarized or grounding-type plug. 08-1077 RF-WHP01-WHP02.book Page 5 Thursday, March 27, 2008 1:29 PM • Follow all servicing to qualified service personnel. Servicing is required when the ...

User Manual (English)
Page 6
... communication link • Hidden antennas • Strong immunity to avoid short circuits involving the charging pins. 08-1077 RF-WHP01-WHP02.book Page 6 Thursday, March 27, 2008 1:29 PM • Batteries (battery pack and batteries installed) should contain: Headphones Docking station AC Adapter Rechargeable batteries (2) Microphone holder (WHP02) Microphone (WHP02) (WHP01 & WHP02) (WHP02) Audio cable(s) User guide 6
... communication link • Hidden antennas • Strong immunity to avoid short circuits involving the charging pins. 08-1077 RF-WHP01-WHP02.book Page 6 Thursday, March 27, 2008 1:29 PM • Batteries (battery pack and batteries installed) should contain: Headphones Docking station AC Adapter Rechargeable batteries (2) Microphone holder (WHP02) Microphone (WHP02) (WHP01 & WHP02) (WHP02) Audio cable(s) User guide 6

User Manual (English)
Page 7
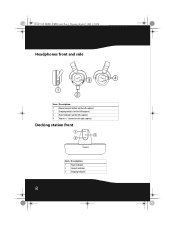
08-1077 RF-WHP01-WHP02.book Page 7 Thursday, March 27, 2008 1:29 PM Headphones back 1 2 2 3 Item Description 1 Self-adjustable headband 2 Swiveling hinge for angle adjustment (on the left and right ear pieces) 3 Power On/Off switch (on left earpiece) RF-WHP01/WHP02 7
08-1077 RF-WHP01-WHP02.book Page 7 Thursday, March 27, 2008 1:29 PM Headphones back 1 2 2 3 Item Description 1 Self-adjustable headband 2 Swiveling hinge for angle adjustment (on the left and right ear pieces) 3 Power On/Off switch (on left earpiece) RF-WHP01/WHP02 7
User Manual (English)
Page 8
button (on the left earpiece) 3 Power indicator (on the right earpiece) Docking station front 1 3 2 Item Description 1 Power indicator 2 Connect indicator 3 Charging indicator 8 08-1077 RF-WHP01-WHP02.book Page 8 Thursday, March 27, 2008 1:29 PM Headphones front and side 3 4 1 2 Item Description 1 Manual connect button (on the left earpiece) 2 Charging contacts (on the left earpiece) 4 Volume +/-
button (on the left earpiece) 3 Power indicator (on the right earpiece) Docking station front 1 3 2 Item Description 1 Power indicator 2 Connect indicator 3 Charging indicator 8 08-1077 RF-WHP01-WHP02.book Page 8 Thursday, March 27, 2008 1:29 PM Headphones front and side 3 4 1 2 Item Description 1 Manual connect button (on the left earpiece) 2 Charging contacts (on the left earpiece) 4 Volume +/-
User Manual (English)
Page 10
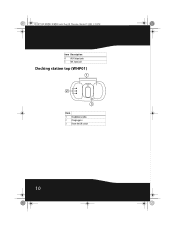
08-1077 RF-WHP01-WHP02.book Page 10 Thursday, March 27, 2008 1:29 PM Item Description 4 AUX Output jacks 5 MIC Input jack Docking station top (WHP01) 1 2 3 Item 1 Headphone cradles 2 Charging pins 3 Power On/Off switch 10
08-1077 RF-WHP01-WHP02.book Page 10 Thursday, March 27, 2008 1:29 PM Item Description 4 AUX Output jacks 5 MIC Input jack Docking station top (WHP01) 1 2 3 Item 1 Headphone cradles 2 Charging pins 3 Power On/Off switch 10
User Manual (English)
Page 11
08-1077 RF-WHP01-WHP02.book Page 11 Thursday, March 27, 2008 1:29 PM Docking station top (WHP02) 1 2 34 Item Description 1 Headphone cradles 2 Charging pins 3 Off/Surround/Voice Enhance switch 4 Power Off/AUX IN/MIC IN switch RF-WHP01/WHP02 11
08-1077 RF-WHP01-WHP02.book Page 11 Thursday, March 27, 2008 1:29 PM Docking station top (WHP02) 1 2 34 Item Description 1 Headphone cradles 2 Charging pins 3 Off/Surround/Voice Enhance switch 4 Power Off/AUX IN/MIC IN switch RF-WHP01/WHP02 11

User Manual (English)
Page 12
Amplifier A/V Receiver Docking station Headphones 12 Connecting the system to an A/V receiver with an external amplifier Note: Before you listen to the system after all components are set up your system Caution: To prevent damage to stop sound from coming out of the amplifier speakers. 08-1077 RF-WHP01-WHP02.book Page 12 Thursday, March 27, 2008 1:29 PM Setting up , turn off the amplifier to your system, make sure all connections are turned off before making the connections.
Amplifier A/V Receiver Docking station Headphones 12 Connecting the system to an A/V receiver with an external amplifier Note: Before you listen to the system after all components are set up your system Caution: To prevent damage to stop sound from coming out of the amplifier speakers. 08-1077 RF-WHP01-WHP02.book Page 12 Thursday, March 27, 2008 1:29 PM Setting up , turn off the amplifier to your system, make sure all connections are turned off before making the connections.

User Manual (English)
Page 15
TV Microphone Docking station Headphones RF-WHP01/WHP02 15 Connecting the microphone (WHP02 only) This microphone is designed for those who suffer from poor hearing and would enjoy watching TV with an external amplifier" on page 12. 08-1077 RF-WHP01-WHP02.book Page 15 Thursday, March 27, 2008 1:29 PM... Connecting the system to an A/V receiver with an internal amplifier A/V Receiver Docking station Headphones To connect the docking station to your A/V receiver (such as...
TV Microphone Docking station Headphones RF-WHP01/WHP02 15 Connecting the microphone (WHP02 only) This microphone is designed for those who suffer from poor hearing and would enjoy watching TV with an external amplifier" on page 12. 08-1077 RF-WHP01-WHP02.book Page 15 Thursday, March 27, 2008 1:29 PM... Connecting the system to an A/V receiver with an internal amplifier A/V Receiver Docking station Headphones To connect the docking station to your A/V receiver (such as...

User Manual (English)
Page 16
... station back panel Microphone Attach to the docking station MIC INPUT jack. 08-1077 RF-WHP01-WHP02.book Page 16 Thursday, March 27, 2008 1:29 PM Caution: Before making the connections, adjust the volume of your television and headphones to the minimum level to avoid damage to your television: 1 Bend and fix the...
... station back panel Microphone Attach to the docking station MIC INPUT jack. 08-1077 RF-WHP01-WHP02.book Page 16 Thursday, March 27, 2008 1:29 PM Caution: Before making the connections, adjust the volume of your television and headphones to the minimum level to avoid damage to your television: 1 Bend and fix the...
User Manual (English)
Page 17
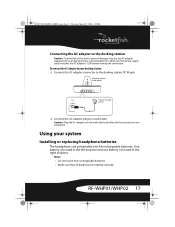
08-1077 RF-WHP01-WHP02.book Page 17 Thursday, March 27, 2008 1:29 PM Connecting the AC adapter to the ... L R AUX OUTPUT L R DC IN Connect to wall 5V outlet 2 Connect the AC adapter plug to your digital wireless stereo headphones. Notes: • Do not install non-rechargeable batteries. • Make sure that power supply outlet matches the AC adapter's 120V ... correctly. Make sure that all other connections are powered by two AA rechargeable batteries. RF-WHP01/WHP02 17 Using your system Installing or replacing headphone batteries The headphones are completed.
08-1077 RF-WHP01-WHP02.book Page 17 Thursday, March 27, 2008 1:29 PM Connecting the AC adapter to the ... L R AUX OUTPUT L R DC IN Connect to wall 5V outlet 2 Connect the AC adapter plug to your digital wireless stereo headphones. Notes: • Do not install non-rechargeable batteries. • Make sure that power supply outlet matches the AC adapter's 120V ... correctly. Make sure that all other connections are powered by two AA rechargeable batteries. RF-WHP01/WHP02 17 Using your system Installing or replacing headphone batteries The headphones are completed.

User Manual (English)
Page 18
...: Before using the wireless headphones for the first time, make sure the batteries are fully charged for at least 16 hours. This will guarantee a longer operating lifetime of the batteries. 18 Make sure to align the + and - 08-1077 RF-WHP01-WHP02.book Page 18 Thursday, March 27, 2008 1:29 ...PM To install batteries in the headphones: 1 Unlock and remove the cushions from the left and right ear pieces. 2 Insert one AA rechargeable battery...
...: Before using the wireless headphones for the first time, make sure the batteries are fully charged for at least 16 hours. This will guarantee a longer operating lifetime of the batteries. 18 Make sure to align the + and - 08-1077 RF-WHP01-WHP02.book Page 18 Thursday, March 27, 2008 1:29 ...PM To install batteries in the headphones: 1 Unlock and remove the cushions from the left and right ear pieces. 2 Insert one AA rechargeable battery...

User Manual (English)
Page 19
... batteries. Establishing a link between the headphones and the docking station To establish a link between the headphones and the docking station: 1 Set the POWER ON/OFF switch located on page 18. RF-WHP01/WHP02 19 Charge the headphones. 08-1077 RF-WHP01-WHP02.book Page 19 Thursday, March 27..., 2008 1:29 PM To charge the headphones: • Place the headphones onto the docking station cradles, and make sure the headphone charging contacts and the docking...
... batteries. Establishing a link between the headphones and the docking station To establish a link between the headphones and the docking station: 1 Set the POWER ON/OFF switch located on page 18. RF-WHP01/WHP02 19 Charge the headphones. 08-1077 RF-WHP01-WHP02.book Page 19 Thursday, March 27..., 2008 1:29 PM To charge the headphones: • Place the headphones onto the docking station cradles, and make sure the headphone charging contacts and the docking...

User Manual (English)
Page 20
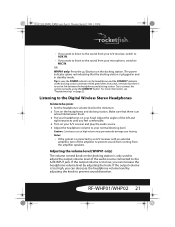
Power indicator 20 The power indicator glows red indicating that the docking station is established between them, the POWER indicator on the headphones and the CONNECT indicator on the docking station to AUX IN or MIC IN for your listening needs. When an active link is plugged in and in standby mode. 08-1077 RF-WHP01-WHP02.book Page 20 Thursday, March 27, 2008 1:29 PM • The headphones and docking station were pre-paired at the factory. L Power indicator Connect indicator 2 WHP02 only: Set the POWER OFF/AUX IN/MIC IN switch on the docking station glow green solidly.
Power indicator 20 The power indicator glows red indicating that the docking station is established between them, the POWER indicator on the headphones and the CONNECT indicator on the docking station to AUX IN or MIC IN for your listening needs. When an active link is plugged in and in standby mode. 08-1077 RF-WHP01-WHP02.book Page 20 Thursday, March 27, 2008 1:29 PM • The headphones and docking station were pre-paired at the factory. L Power indicator Connect indicator 2 WHP02 only: Set the POWER OFF/AUX IN/MIC IN switch on the docking station glow green solidly.
User Manual (English)
Page 21
... station. Make sure that there is too low, you can increase the headphone volume level by adjusting the knob to prevent sound distortion. Adjust the angles of the audio source connected to the AUX INPUT jack. RF-WHP01/WHP02 21 For more information, see "Troubleshooting" on the docking station. Caution:... minimum. 2 Turn on the docking station is too high, you can decrease the headphone volume level by adjusting the knob. Notes: • If the system is plugged in and in standby mode. 08-1077 RF-WHP01-WHP02.book Page 21 Thursday, March 27, 2008 1:29 PM • If you want...
... station. Make sure that there is too low, you can increase the headphone volume level by adjusting the knob to prevent sound distortion. Adjust the angles of the audio source connected to the AUX INPUT jack. RF-WHP01/WHP02 21 For more information, see "Troubleshooting" on the docking station. Caution:... minimum. 2 Turn on the docking station is too high, you can decrease the headphone volume level by adjusting the knob. Notes: • If the system is plugged in and in standby mode. 08-1077 RF-WHP01-WHP02.book Page 21 Thursday, March 27, 2008 1:29 PM • If you want...

User Manual (English)
Page 22
... any background noise. The power indicator on the docking station goes off the system: 1 Set the POWER ON/OFF switch located on the headphones' left earpiece to OFF. 2 WHP02: Set the POWER OFF/AUX IN/MIC IN switch to POWER OFF on the docking station. Off OFF Turning off the system To... turn off . 22 WHP01: Press and hold the /| button on the docking station for more echoey and reverberant. 08-1077 RF-WHP01-WHP02.book Page 22 Thursday, March 27, 2008 1:29 PM Note: After the system is set up , always adjust the volume using the volume control...
... any background noise. The power indicator on the docking station goes off the system: 1 Set the POWER ON/OFF switch located on the headphones' left earpiece to OFF. 2 WHP02: Set the POWER OFF/AUX IN/MIC IN switch to POWER OFF on the docking station. Off OFF Turning off the system To... turn off . 22 WHP01: Press and hold the /| button on the docking station for more echoey and reverberant. 08-1077 RF-WHP01-WHP02.book Page 22 Thursday, March 27, 2008 1:29 PM Note: After the system is set up , always adjust the volume using the volume control...

User Manual (English)
Page 23
...newspapers, table clothes, and curtains. • If the power cord is set to "No Communication between the headphones and docking station" below. If the indicators are connected correctly. RF-WHP01/WHP02 23 Cautions: • Do not cover the ventilation openings with a weak solution of mild detergent and water... green, or blinking alternatively between red and green, refer to minimum. • Make sure that all of the headphones and docking station are lit solidly. 08-1077 RF-WHP01-WHP02.book Page 23 Thursday, March 27, 2008 1:29 PM Maintaining your digital wireless stereo...
...newspapers, table clothes, and curtains. • If the power cord is set to "No Communication between the headphones and docking station" below. If the indicators are connected correctly. RF-WHP01/WHP02 23 Cautions: • Do not cover the ventilation openings with a weak solution of mild detergent and water... green, or blinking alternatively between red and green, refer to minimum. • Make sure that all of the headphones and docking station are lit solidly. 08-1077 RF-WHP01-WHP02.book Page 23 Thursday, March 27, 2008 1:29 PM Maintaining your digital wireless stereo...

User Manual (English)
Page 24
... Headband Auto Adjusting Headband Wireless type 2.4 Ghz ISM band Distance 98 feet (30 m) line-of-sight (WHP02) 65 feet (20 m) line-of headphones and docking station blink between the headphones and docking station. 08-1077 RF-WHP01-WHP02.book Page 24 Thursday, March 27, 2008 1:29 PM Problem Solution Sound interference • Move the docking...
... Headband Auto Adjusting Headband Wireless type 2.4 Ghz ISM band Distance 98 feet (30 m) line-of-sight (WHP02) 65 feet (20 m) line-of headphones and docking station blink between the headphones and docking station. 08-1077 RF-WHP01-WHP02.book Page 24 Thursday, March 27, 2008 1:29 PM Problem Solution Sound interference • Move the docking...


