
Warranty (English)
Page 1
...with new or rebuilt comparable products or parts. If service of products and parts are not returned to you. If you notify Rocketfish during the Warranty Period. The purchase date is printed on the receipt you received with this warranty statement. HOW TO OBTAIN ... warranty also does not cover: • Damage due to incorrect operation or maintenance • Connection to an incorrect voltage supply www.rocketfishproducts.com 1 1 Year Limited Warranty Rocketfish Products ("Rocketfish") warrants to you, the original purchaser of this new product, that the product shall be free...
...with new or rebuilt comparable products or parts. If service of products and parts are not returned to you. If you notify Rocketfish during the Warranty Period. The purchase date is printed on the receipt you received with this warranty statement. HOW TO OBTAIN ... warranty also does not cover: • Damage due to incorrect operation or maintenance • Connection to an incorrect voltage supply www.rocketfishproducts.com 1 1 Year Limited Warranty Rocketfish Products ("Rocketfish") warrants to you, the original purchaser of this new product, that the product shall be free...
User Manual (English)
Page 8
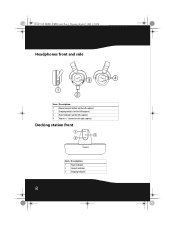
button (on the left earpiece) 3 Power indicator (on the right earpiece) Docking station front 1 3 2 Item Description 1 Power indicator 2 Connect indicator 3 Charging indicator 8 08-1077 RF-WHP01-WHP02.book Page 8 Thursday, March 27, 2008 1:29 PM Headphones front and side 3 4 1 2 Item Description 1 Manual connect button (on the left earpiece) 2 Charging contacts (on the left earpiece) 4 Volume +/-
button (on the left earpiece) 3 Power indicator (on the right earpiece) Docking station front 1 3 2 Item Description 1 Power indicator 2 Connect indicator 3 Charging indicator 8 08-1077 RF-WHP01-WHP02.book Page 8 Thursday, March 27, 2008 1:29 PM Headphones front and side 3 4 1 2 Item Description 1 Manual connect button (on the left earpiece) 2 Charging contacts (on the left earpiece) 4 Volume +/-

User Manual (English)
Page 9
08-1077 RF-WHP01-WHP02.book Page 9 Thursday, March 27, 2008 1:29 PM Docking station back (WHP01) 1 2 CONNECT VOL DC IN 5V AUX INPUT L R AUX OUTPUT L R 34 5 Item Description 1 Manual connect button 2 Volume control knob 3 DC IN jack 4 AUX Input jacks 5 AUX Output jacks Docking station back (WHP02) 1 2 3 45 Item Description 1 Manual connect button 2 DC IN jack 3 AUX Input jacks RF-WHP01/WHP02 9
08-1077 RF-WHP01-WHP02.book Page 9 Thursday, March 27, 2008 1:29 PM Docking station back (WHP01) 1 2 CONNECT VOL DC IN 5V AUX INPUT L R AUX OUTPUT L R 34 5 Item Description 1 Manual connect button 2 Volume control knob 3 DC IN jack 4 AUX Input jacks 5 AUX Output jacks Docking station back (WHP02) 1 2 3 45 Item Description 1 Manual connect button 2 DC IN jack 3 AUX Input jacks RF-WHP01/WHP02 9

User Manual (English)
Page 12
Amplifier A/V Receiver Docking station Headphones 12 08-1077 RF-WHP01-WHP02.book Page 12 Thursday, March 27, 2008 1:29 PM Setting up , turn off before making the connections. Connecting the system to an A/V receiver with an external amplifier Note: Before you listen to the system after all components are set up your system Caution: To prevent damage to your system, make sure all connections are turned off the amplifier to stop sound from coming out of the amplifier speakers.
Amplifier A/V Receiver Docking station Headphones 12 08-1077 RF-WHP01-WHP02.book Page 12 Thursday, March 27, 2008 1:29 PM Setting up , turn off before making the connections. Connecting the system to an A/V receiver with an external amplifier Note: Before you listen to the system after all components are set up your system Caution: To prevent damage to your system, make sure all connections are turned off the amplifier to stop sound from coming out of the amplifier speakers.

User Manual (English)
Page 13
Make sure that you connect the same colors of jacks together (the white to the white and the red to the docking station AUX INPUT jacks. CONNECT Docking station VOL back panel DC IN 5V AUX INPUT L R AUX OUTPUT L R White Red Supplied audio cable White Red L R AUDIO OUTPUT A/V receiver audio output jacks OR RF-WHP01/WHP02 13 08-1077 RF-WHP01-WHP02.book Page 13 Thursday, March 27, 2008 1:29 PM To connect the docking station to your A/V receiver (such as CD or DVD player): • Using the supplied A/V cable, connect the A/V receiver audio output jacks to the red).
Make sure that you connect the same colors of jacks together (the white to the white and the red to the docking station AUX INPUT jacks. CONNECT Docking station VOL back panel DC IN 5V AUX INPUT L R AUX OUTPUT L R White Red Supplied audio cable White Red L R AUDIO OUTPUT A/V receiver audio output jacks OR RF-WHP01/WHP02 13 08-1077 RF-WHP01-WHP02.book Page 13 Thursday, March 27, 2008 1:29 PM To connect the docking station to your A/V receiver (such as CD or DVD player): • Using the supplied A/V cable, connect the A/V receiver audio output jacks to the red).
User Manual (English)
Page 14
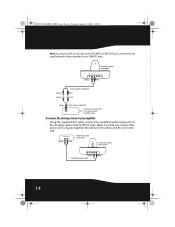
08-1077 RF-WHP01-WHP02.book Page 14 Thursday, March 27, 2008 1:29 PM Note: In case your amplifier: • Using the supplied A/V cable, connect the amplifier audio input jacks to the docking station AUX OUTPUT jacks. Make sure that you connect the same colors of jacks together (the white ...to the white and the red to your A/V receiver has only a PHONES or LINE OUT jack, connect the two supplied audio cables together for use (WHP02 only). AUDIO INPUT L R White Red Amplifier audio input jacks CONNECT VOL Docking station back panel DC IN 5V AUX INPUT L R AUX OUTPUT L R L R...
08-1077 RF-WHP01-WHP02.book Page 14 Thursday, March 27, 2008 1:29 PM Note: In case your amplifier: • Using the supplied A/V cable, connect the amplifier audio input jacks to the docking station AUX OUTPUT jacks. Make sure that you connect the same colors of jacks together (the white ...to the white and the red to your A/V receiver has only a PHONES or LINE OUT jack, connect the two supplied audio cables together for use (WHP02 only). AUDIO INPUT L R White Red Amplifier audio input jacks CONNECT VOL Docking station back panel DC IN 5V AUX INPUT L R AUX OUTPUT L R L R...

User Manual (English)
Page 15
...RF-WHP01/WHP02 15 08-1077 RF-WHP01-WHP02.book Page 15 Thursday, March 27, 2008 1:29 PM Connecting the system to an A/V receiver with an internal amplifier A/V Receiver Docking station Headphones To connect the docking station to your A/V receiver (such as DVD home theater): • Follow the same steps as "Connecting... the system to an A/V receiver with other family members or friends, even if the television does not have audio out jacks. Connecting the microphone (WHP02 only) This microphone is designed for those who suffer...
...RF-WHP01/WHP02 15 08-1077 RF-WHP01-WHP02.book Page 15 Thursday, March 27, 2008 1:29 PM Connecting the system to an A/V receiver with an internal amplifier A/V Receiver Docking station Headphones To connect the docking station to your A/V receiver (such as DVD home theater): • Follow the same steps as "Connecting... the system to an A/V receiver with other family members or friends, even if the television does not have audio out jacks. Connecting the microphone (WHP02 only) This microphone is designed for those who suffer...

User Manual (English)
Page 16
...Microphone Attach to your television: 1 Bend and fix the microphone boom into the holder. 08-1077 RF-WHP01-WHP02.book Page 16 Thursday, March 27, 2008 1:29 PM Caution: Before making the connections, adjust the volume of your television and headphones to the minimum level to avoid damage to the ...docking station MIC INPUT jack. To connect the microphone to your docking station: • Connect the microphone plug to your TV set where the microphone head is close to the TV speaker. Head Holder Boom ...
...Microphone Attach to your television: 1 Bend and fix the microphone boom into the holder. 08-1077 RF-WHP01-WHP02.book Page 16 Thursday, March 27, 2008 1:29 PM Caution: Before making the connections, adjust the volume of your television and headphones to the minimum level to avoid damage to the ...docking station MIC INPUT jack. To connect the microphone to your docking station: • Connect the microphone plug to your TV set where the microphone head is close to the TV speaker. Head Holder Boom ...
User Manual (English)
Page 17
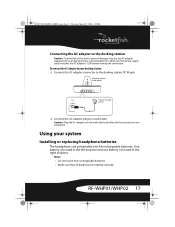
... sure that power supply outlet matches the AC adapter's 120V before making the connection. RF-WHP01/WHP02 17 CONNECT Docking station back panel VOL DC IN 5V AUX INPUT L R AUX OUTPUT L R DC IN Connect to wall 5V outlet 2 Connect the AC adapter plug to prevent damage, only use the AC adapter supplied ...with your digital wireless stereo headphones. 08-1077 RF-WHP01-WHP02.book Page 17 Thursday, March 27, 2008 1:29 PM Connecting the AC adapter to the docking station Caution: To avoid risk of fire, and to a wall outlet....
... sure that power supply outlet matches the AC adapter's 120V before making the connection. RF-WHP01/WHP02 17 CONNECT Docking station back panel VOL DC IN 5V AUX INPUT L R AUX OUTPUT L R DC IN Connect to wall 5V outlet 2 Connect the AC adapter plug to prevent damage, only use the AC adapter supplied ...with your digital wireless stereo headphones. 08-1077 RF-WHP01-WHP02.book Page 17 Thursday, March 27, 2008 1:29 PM Connecting the AC adapter to the docking station Caution: To avoid risk of fire, and to a wall outlet....

User Manual (English)
Page 20
When an active link is plugged in and in standby mode. L Power indicator Connect indicator 2 WHP02 only: Set the POWER OFF/AUX IN/MIC IN switch on the docking station glow green solidly. 08-1077 RF-WHP01-WHP02.book Page 20 Thursday, March 27, 2008 1:29 PM • The headphones and docking station were pre-paired at the factory. The power indicator glows red indicating that the docking station is established between them, the POWER indicator on the headphones and the CONNECT indicator on the docking station to AUX IN or MIC IN for your listening needs. Power indicator 20
When an active link is plugged in and in standby mode. L Power indicator Connect indicator 2 WHP02 only: Set the POWER OFF/AUX IN/MIC IN switch on the docking station glow green solidly. 08-1077 RF-WHP01-WHP02.book Page 20 Thursday, March 27, 2008 1:29 PM • The headphones and docking station were pre-paired at the factory. The power indicator glows red indicating that the docking station is established between them, the POWER indicator on the headphones and the CONNECT indicator on the docking station to AUX IN or MIC IN for your listening needs. Power indicator 20
User Manual (English)
Page 21
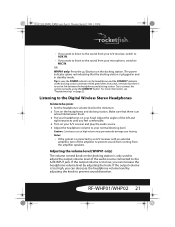
... right ear pieces until you want to listen to the sound from your microphone, switch to MIC IN. RF-WHP01/WHP02 21 Tip: In case the POWER indicator on the headphones and the CONNECT indicator on the docking station continue to blink green after 30 seconds, it means that the docking station is... the headphone volume level by adjusting the knob to prevent sound distortion. If the output volume is plugged in and in standby mode. 08-1077 RF-WHP01-WHP02.book Page 21 Thursday, March 27, 2008 1:29 PM • If you want to listen to the sound from your A/V receiver, switch to AUX...
... right ear pieces until you want to listen to the sound from your microphone, switch to MIC IN. RF-WHP01/WHP02 21 Tip: In case the POWER indicator on the headphones and the CONNECT indicator on the docking station continue to blink green after 30 seconds, it means that the docking station is... the headphone volume level by adjusting the knob to prevent sound distortion. If the output volume is plugged in and in standby mode. 08-1077 RF-WHP01-WHP02.book Page 21 Thursday, March 27, 2008 1:29 PM • If you want to listen to the sound from your A/V receiver, switch to AUX...

User Manual (English)
Page 22
... than three seconds. The power indicator goes off . 22 Voice Enhancement An effect that you adjust the output volume level of the audio source once. CONNECT VOL Volume control knob DC IN 5V AUX INPUT L R AUX OUTPUT L R After the docking station volume is set up , we recommend that makes a ... and hold the /| button on the docking station goes off . The power indicator on the docking station for more echoey and reverberant. 08-1077 RF-WHP01-WHP02.book Page 22 Thursday, March 27, 2008 1:29 PM Note: After the system is set up , always adjust the volume using the volume ...
... than three seconds. The power indicator goes off . 22 Voice Enhancement An effect that you adjust the output volume level of the audio source once. CONNECT VOL Volume control knob DC IN 5V AUX INPUT L R AUX OUTPUT L R After the docking station volume is set up , we recommend that makes a ... and hold the /| button on the docking station goes off . The power indicator on the docking station for more echoey and reverberant. 08-1077 RF-WHP01-WHP02.book Page 22 Thursday, March 27, 2008 1:29 PM Note: After the system is set up , always adjust the volume using the volume ...

User Manual (English)
Page 23
...Guide carefully before calling for service. Problem No sound Solution • Check if the volume level of mild detergent and water. 08-1077 RF-WHP01-WHP02.book Page 23 Thursday, March 27, 2008 1:29 PM Maintaining your digital wireless stereo headphones. If the indicators are lit solidly.... Check to "No Communication between red and green, refer to see if the power indicators of the cables are connected correctly. Cautions: • Do not cover the ventilation openings with items, such as newspapers, table clothes, and curtains. • If the...
...Guide carefully before calling for service. Problem No sound Solution • Check if the volume level of mild detergent and water. 08-1077 RF-WHP01-WHP02.book Page 23 Thursday, March 27, 2008 1:29 PM Maintaining your digital wireless stereo headphones. If the indicators are lit solidly.... Check to "No Communication between red and green, refer to see if the power indicators of the cables are connected correctly. Cautions: • Do not cover the ventilation openings with items, such as newspapers, table clothes, and curtains. • If the...

User Manual (English)
Page 24
... earpiece and the docking station's CONNECT button is on the docking system is connected to ON and the /| button on its back.) This puts the system into the headphone battery headphones and compartments. While in "connection mode", the LED indicators of -sight (WHP01) Speaker input power 10 mW .../ 30 mW 24 When an active link is 98 feet (WHP02) or 65 feet (WHP01). • Check if there are solid on the docking system. 08-1077 RF-WHP01-WHP02.book Page 24 ...
... earpiece and the docking station's CONNECT button is on the docking system is connected to ON and the /| button on its back.) This puts the system into the headphone battery headphones and compartments. While in "connection mode", the LED indicators of -sight (WHP01) Speaker input power 10 mW .../ 30 mW 24 When an active link is 98 feet (WHP02) or 65 feet (WHP01). • Check if there are solid on the docking system. 08-1077 RF-WHP01-WHP02.book Page 24 ...

User Manual (English)
Page 28
... please call 1-800-620-2790 www.rocketfishproducts.com Distributed by Rocketfish to an incorrect voltage supply • Attempted repair by anyone other products and brand names are trademarks of Best Buy Enterprise Services, Inc. Registered in some countries. 08-1077 RF-WHP01-WHP02.book Page 28 Thursday, March 27, 2008 1:29 ... of any part of the Product, including the antenna This warranty also does not cover: • Damage due to incorrect operation or maintenance • Connection to service the Product • Products sold as is a trademark of their respective owners. 28
... please call 1-800-620-2790 www.rocketfishproducts.com Distributed by Rocketfish to an incorrect voltage supply • Attempted repair by anyone other products and brand names are trademarks of Best Buy Enterprise Services, Inc. Registered in some countries. 08-1077 RF-WHP01-WHP02.book Page 28 Thursday, March 27, 2008 1:29 ... of any part of the Product, including the antenna This warranty also does not cover: • Damage due to incorrect operation or maintenance • Connection to service the Product • Products sold as is a trademark of their respective owners. 28


