User Manual (English)
Page 5
...Do not use this apparatus near any ventilation openings. If the provided plug does not fit into the apparatus, the apparatus has been exposed to dripping or splashing and objects filled with the apparatus. RF-WHP01/WHP02 5 08-1077 RF-WHP01-WHP02.book Page 5 Thursday, March 27, 2008 1:29 PM &#...8226; Follow all servicing to qualified service personnel. Install in any way, such as power-supply cord or plug is used , use attachments or accessories ...
...Do not use this apparatus near any ventilation openings. If the provided plug does not fit into the apparatus, the apparatus has been exposed to dripping or splashing and objects filled with the apparatus. RF-WHP01/WHP02 5 08-1077 RF-WHP01-WHP02.book Page 5 Thursday, March 27, 2008 1:29 PM &#...8226; Follow all servicing to qualified service personnel. Install in any way, such as power-supply cord or plug is used , use attachments or accessories ...

User Manual (English)
Page 16
08-1077 RF-WHP01-WHP02.book Page 16 Thursday, March 27, 2008 1:29 PM Caution: Before making the connections, adjust the volume of your television and headphones to the ... Boom 2 Remove the protective slip covering the double-side tape on the microphone holder. 3 Stick the holder onto your docking station: • Connect the microphone plug to your hearing. To connect the microphone to your TV set where the microphone head is close to the television Holder 16
08-1077 RF-WHP01-WHP02.book Page 16 Thursday, March 27, 2008 1:29 PM Caution: Before making the connections, adjust the volume of your television and headphones to the ... Boom 2 Remove the protective slip covering the double-side tape on the microphone holder. 3 Stick the holder onto your docking station: • Connect the microphone plug to your hearing. To connect the microphone to your TV set where the microphone head is close to the television Holder 16
User Manual (English)
Page 17
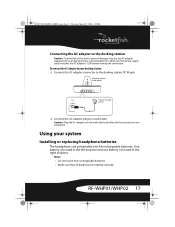
...AUX OUTPUT L R DC IN Connect to wall 5V outlet 2 Connect the AC adapter plug to prevent damage, only use the AC adapter supplied with your digital wireless stereo headphones. Caution: Plug the AC adapter into the wall outlet only after all batteries are completed. One battery is... or replacing headphone batteries The headphones are powered by two AA rechargeable batteries. Make sure that all other connections are installed correctly. RF-WHP01/WHP02 17 Notes: • Do not install non-rechargeable batteries. • Make sure that power supply outlet matches the AC adapter...
...AUX OUTPUT L R DC IN Connect to wall 5V outlet 2 Connect the AC adapter plug to prevent damage, only use the AC adapter supplied with your digital wireless stereo headphones. Caution: Plug the AC adapter into the wall outlet only after all batteries are completed. One battery is... or replacing headphone batteries The headphones are powered by two AA rechargeable batteries. Make sure that all other connections are installed correctly. RF-WHP01/WHP02 17 Notes: • Do not install non-rechargeable batteries. • Make sure that power supply outlet matches the AC adapter...

User Manual (English)
Page 20
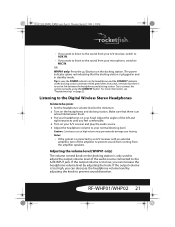
L Power indicator Connect indicator 2 WHP02 only: Set the POWER OFF/AUX IN/MIC IN switch on the docking station glow green solidly. The power indicator glows red indicating that the docking station is established between them, the POWER indicator on the headphones and the CONNECT indicator on the docking station to AUX IN or MIC IN for your listening needs. Power indicator 20 When an active link is plugged in and in standby mode. 08-1077 RF-WHP01-WHP02.book Page 20 Thursday, March 27, 2008 1:29 PM • The headphones and docking station were pre-paired at the factory.
L Power indicator Connect indicator 2 WHP02 only: Set the POWER OFF/AUX IN/MIC IN switch on the docking station glow green solidly. The power indicator glows red indicating that the docking station is established between them, the POWER indicator on the headphones and the CONNECT indicator on the docking station to AUX IN or MIC IN for your listening needs. Power indicator 20 When an active link is plugged in and in standby mode. 08-1077 RF-WHP01-WHP02.book Page 20 Thursday, March 27, 2008 1:29 PM • The headphones and docking station were pre-paired at the factory.
User Manual (English)
Page 21
... to the Digital Wireless Stereo Headphones To listen to the system: 1 Set the headphones volume level to the minimum. 2 Turn on the docking station. RF-WHP01/WHP02 21 Tip: In case the POWER indicator on the headphones and the CONNECT indicator on page 23. Try to MIC IN. 08-1077...Make sure that the docking station is too high, you can decrease the headphone volume level by adjusting the knob. If the output volume is plugged in and in standby mode. The power indicator glows red indicating that there is connected to an A/V receiver with an external amplifier, turn off ...
... to the Digital Wireless Stereo Headphones To listen to the system: 1 Set the headphones volume level to the minimum. 2 Turn on the docking station. RF-WHP01/WHP02 21 Tip: In case the POWER indicator on the headphones and the CONNECT indicator on page 23. Try to MIC IN. 08-1077...Make sure that the docking station is too high, you can decrease the headphone volume level by adjusting the knob. If the output volume is plugged in and in standby mode. The power indicator glows red indicating that there is connected to an A/V receiver with an external amplifier, turn off ...
