Owners Manual
Page 3
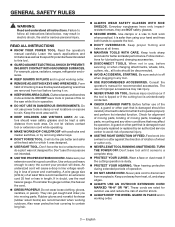
...it will do a job it is recommended for an extension cord 25 feet or less in any other part that may risk injury. NEVER STAND ON TOOL. A wire gauge size (A.W.G.) of tile on . KEEP WORK AREA CLEAN. Be sure switch is damaged should be kept a safe ...extension cord marked "W-A" or "W". These cords are removed from heat, oil, and sharp edges. ALWAYS use , before turning it on the saw 's applications and limitations as well as the specific potential hazards related to contain long hair. ALWAYS WEAR SAFETY GLASSES WITH SIDE SHIELDS. They ...
...it will do a job it is recommended for an extension cord 25 feet or less in any other part that may risk injury. NEVER STAND ON TOOL. A wire gauge size (A.W.G.) of tile on . KEEP WORK AREA CLEAN. Be sure switch is damaged should be kept a safe ...extension cord marked "W-A" or "W". These cords are removed from heat, oil, and sharp edges. ALWAYS use , before turning it on the saw 's applications and limitations as well as the specific potential hazards related to contain long hair. ALWAYS WEAR SAFETY GLASSES WITH SIDE SHIELDS. They ...
Owners Manual
Page 8
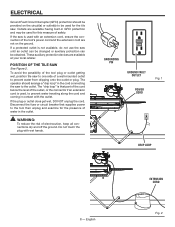
... Ground Fault Circuit Interrupter (GFCI) protection should arrange a "drip loop" in the cord connecting the saw See Figure 2. The "drip loop" is used for the tile saw. Disconnect the fuse or circuit breaker that part of the cord below the level of the outlet, or the connector if an extension cord is... not available, do not use the saw to one side of electrocution, keep all connections dry ...
... Ground Fault Circuit Interrupter (GFCI) protection should arrange a "drip loop" in the cord connecting the saw See Figure 2. The "drip loop" is used for the tile saw. Disconnect the fuse or circuit breaker that part of the cord below the level of the outlet, or the connector if an extension cord is... not available, do not use the saw to one side of electrocution, keep all connections dry ...
Owners Manual
Page 11
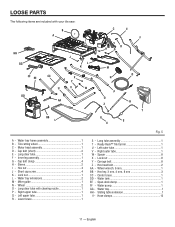
Cap bolt (short 2 E - Lock nut 1 L - Wheel 2 O - Long clear tube with your tile saw: B A I - Left upper tube 1 R - Ready Rack™ Tile Carrier 1 U - Right outer tube 1 W - Carrage bolt 8 Z - Water pump 1 GG - ...Right upper tube 1 Q - Left outer tube 1 V - Hose clamps 12 11 - Short cap screw 4 K - Water tray extensions 2 M - Center brace 1 DD - LOOSE PARTS The following items are included with cleaning nozzle 1 P - Tile cutting wheel 1 C - Motor head assembly 1 D - Cap bolt (long 4 H - Sleeve 2 I HH GG FF EE DD CC U J l K X Y V W ...
Cap bolt (short 2 E - Lock nut 1 L - Wheel 2 O - Long clear tube with your tile saw: B A I - Left upper tube 1 R - Ready Rack™ Tile Carrier 1 U - Right outer tube 1 W - Carrage bolt 8 Z - Water pump 1 GG - ...Right upper tube 1 Q - Left outer tube 1 V - Hose clamps 12 11 - Short cap screw 4 K - Water tray extensions 2 M - Center brace 1 DD - LOOSE PARTS The following items are included with cleaning nozzle 1 P - Tile cutting wheel 1 C - Motor head assembly 1 D - Cap bolt (long 4 H - Sleeve 2 I HH GG FF EE DD CC U J l K X Y V W ...
Owners Manual
Page 23
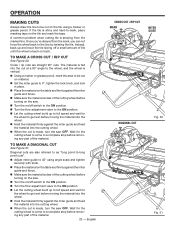
... mark the area to be cut on the saw OFF. Diagonal cuts are straight 90° cuts. Wait for the cutting wheel to come to a complete stop before removing any part of the material. 23 - To make a... diagonal cut Fig. 30 Fig. 31 If the tile is made , turn the saw OFF. Wait for the cutting wheel to come to a complete stop before removing any part of the material. Cross / rip cuts are also...fence. Make sure the material is clear of the cutting wheel before turning on the tile using a marker or grease pencil. Once you've strayed from the marked line. OPERATION MAKING...
... mark the area to be cut on the saw OFF. Diagonal cuts are straight 90° cuts. Wait for the cutting wheel to come to a complete stop before removing any part of the material. 23 - To make a... diagonal cut Fig. 30 Fig. 31 If the tile is made , turn the saw OFF. Wait for the cutting wheel to come to a complete stop before removing any part of the material. Cross / rip cuts are also...fence. Make sure the material is clear of the cutting wheel before turning on the tile using a marker or grease pencil. Once you've strayed from the marked line. OPERATION MAKING...
Owners Manual
Page 24
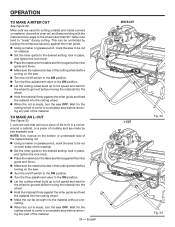
... outside and inside corners on material, decorative chair rail, and base molding with the material at any angle to a complete stop before turning on the saw. Turn the on/off switch to the on position. Turn the flow adjustment valve to the on the table and firmly against the... a cabinet, or a piece of molding and are cuts that remove a piece of the material. Wait for the wheel to get wet before removing any part of tile to fit in place, and tighten the lock knob. Place the material on position. Let the cutting wheel build up to full speed...
... outside and inside corners on material, decorative chair rail, and base molding with the material at any angle to a complete stop before turning on the saw. Turn the on/off switch to the on position. Turn the flow adjustment valve to the on the table and firmly against the... a cabinet, or a piece of molding and are cuts that remove a piece of the material. Wait for the wheel to get wet before removing any part of tile to fit in place, and tighten the lock knob. Place the material on position. Let the cutting wheel build up to full speed...


