User Guide
Page 5
..., do not dispose of replaced parts in a confined space, make removing the stain impossible. Consult a doctor if necessary. • Avoid getting toner on your clothing, wash it topples over, an injury might make sure there is not damaged under the machine. • When disconnecting the power...paper clips, staples, or other small metallic objects to fall inside of this machine gets very hot. Hot water will set the toner into contact with toner, wash the affected area thoroughly with a label indicating the "hot surface". Otherwise, an injury might occur. • Do not...
..., do not dispose of replaced parts in a confined space, make removing the stain impossible. Consult a doctor if necessary. • Avoid getting toner on your clothing, wash it topples over, an injury might make sure there is not damaged under the machine. • When disconnecting the power...paper clips, staples, or other small metallic objects to fall inside of this machine gets very hot. Hot water will set the toner into contact with toner, wash the affected area thoroughly with a label indicating the "hot surface". Otherwise, an injury might occur. • Do not...
User Guide
Page 7
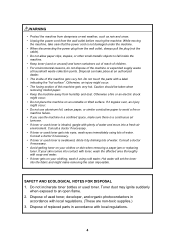
1. Needed to change without prior notice. The black screws in the kit that is not available, contact your work surface and prevent toner spillage from components removed from the machine. Important: The accessory hex driver and drum setting powder pad are included in the machine are subject to ...
1. Needed to change without prior notice. The black screws in the kit that is not available, contact your work surface and prevent toner spillage from components removed from the machine. Important: The accessory hex driver and drum setting powder pad are included in the machine are subject to ...

User Guide
Page 8
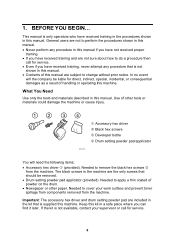
Left front cover 5. NAMES OF COMPONENTS 6 1 2 3 5 2 4 1. Inner cover 4. Never remove screws of any other color. 7 Front top cover 3. Control panel Parts, Screw Color Codes • Handles and levers colored purple indicate where you should pull or lift a component or part to move or remove it. • Black screws are the screws you must remove in order to remove the unit or component. Right front cover 6. Toner hopper cover RPG062S 2.
Left front cover 5. NAMES OF COMPONENTS 6 1 2 3 5 2 4 1. Inner cover 4. Never remove screws of any other color. 7 Front top cover 3. Control panel Parts, Screw Color Codes • Handles and levers colored purple indicate where you should pull or lift a component or part to move or remove it. • Black screws are the screws you must remove in order to remove the unit or component. Right front cover 6. Toner hopper cover RPG062S 2.
User Guide
Page 16
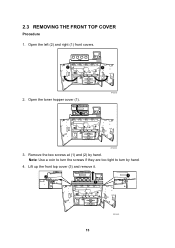
Remove the two screws at (1) and (2) by hand. 4. Open the toner hopper cover (1). 1 RPG020S RPG003S 3. Note: Use a coin to turn the screws if they are too tight to turn by hand. Lift up the front top cover (3) and remove it. 2 1 3 15 RPG056S Open the left (2) and right (1) front covers. 2 1 2. 2.3 REMOVING THE FRONT TOP COVER Procedure 1.
Remove the two screws at (1) and (2) by hand. 4. Open the toner hopper cover (1). 1 RPG020S RPG003S 3. Note: Use a coin to turn the screws if they are too tight to turn by hand. Lift up the front top cover (3) and remove it. 2 1 3 15 RPG056S Open the left (2) and right (1) front covers. 2 1 2. 2.3 REMOVING THE FRONT TOP COVER Procedure 1.

User Guide
Page 17
Fasten the two screws at (1) and (2) by hand. 5. Close the toner hopper cover (3). 3 2 1 RPG057S 6. 2.4 REATTACHING THE FRONT TOP COVER Procedure 1. Close the left and right front covers. 16 Hold the front top cover. 2. Align the two tabs (1) on the bottom of the front top cover with the three cutouts (4) on the frame of the machine, and then attach the front top cover. 3 4 12 4 3 4 3 1 2 RPG014S 4. Align the three tabs (3) on the front top cover with the two cutouts (2) on the frame of the machine, and then hook the front top cover. 3.
Fasten the two screws at (1) and (2) by hand. 5. Close the toner hopper cover (3). 3 2 1 RPG057S 6. 2.4 REATTACHING THE FRONT TOP COVER Procedure 1. Close the left and right front covers. 16 Hold the front top cover. 2. Align the two tabs (1) on the bottom of the front top cover with the three cutouts (4) on the frame of the machine, and then attach the front top cover. 3 4 12 4 3 4 3 1 2 RPG014S 4. Align the three tabs (3) on the front top cover with the two cutouts (2) on the frame of the machine, and then hook the front top cover. 3.

User Guide
Page 21
... and right front cover, and then wait for the machine and fixing heater. 4. Press the main power switch to turn the machine on, close the toner hopper cover. (See "REATTACHING THE FRONT TOP COVER".) 3. Procedure 1. While holding the charge corona unit with both hands and with the wire mesh facing down...
... and right front cover, and then wait for the machine and fixing heater. 4. Press the main power switch to turn the machine on, close the toner hopper cover. (See "REATTACHING THE FRONT TOP COVER".) 3. Procedure 1. While holding the charge corona unit with both hands and with the wire mesh facing down...
User Guide
Page 23
Open the left and right front cover, open the toner hopper cover, and then remove the front top cover. (See "REMOVING THE FRONT TOP COVER".) 2. Replacement Message Replacement of the development unit drawer. 22 Preparation: ...
Open the left and right front cover, open the toner hopper cover, and then remove the front top cover. (See "REMOVING THE FRONT TOP COVER".) 2. Replacement Message Replacement of the development unit drawer. 22 Preparation: ...

User Guide
Page 25
7. Turn the drum cleaning unit lock lever (1) counterclockwise. 1 RPG029 8. Grasping both sides (1) of the drum cleaning unit as shown, lift the drum cleaning unit (2) straight up (not down). 1 RPG030 24 To avoid spilling toner, always carry the drum cleaning unit level with the exposed roller (1) facing up . 2 1 1 RPG007S 9.
7. Turn the drum cleaning unit lock lever (1) counterclockwise. 1 RPG029 8. Grasping both sides (1) of the drum cleaning unit as shown, lift the drum cleaning unit (2) straight up (not down). 1 RPG030 24 To avoid spilling toner, always carry the drum cleaning unit level with the exposed roller (1) facing up . 2 1 1 RPG007S 9.

User Guide
Page 26
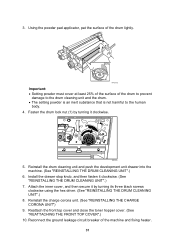
Align the purple pin covers (1) at rear side. 1 RPG018S 2. Check the drum cleaning unit direction for reinstalling. • The waste toner collection pipe (1) should be at the front and rear edge of the drum. 2 2 1 1 RPG004S 3. Turn the drum cleaning unit lock lever (1) clockwise until it clicks. ...
Align the purple pin covers (1) at rear side. 1 RPG018S 2. Check the drum cleaning unit direction for reinstalling. • The waste toner collection pipe (1) should be at the front and rear edge of the drum. 2 2 1 1 RPG004S 3. Turn the drum cleaning unit lock lever (1) clockwise until it clicks. ...
User Guide
Page 28
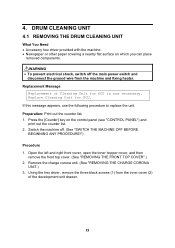
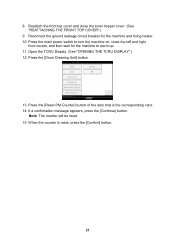
.... 15. When the counter is the corresponding color. 14. Reconnect the ground leakage circuit breaker for the machine to turn the machine on, close the toner hopper cover. (See "REATTACHING THE FRONT TOP COVER".) 9. Press the [Drum Cleaning Unit] button. 13. Reattach the front top cover and close the left and...
.... 15. When the counter is the corresponding color. 14. Reconnect the ground leakage circuit breaker for the machine to turn the machine on, close the toner hopper cover. (See "REATTACHING THE FRONT TOP COVER".) 9. Press the [Drum Cleaning Unit] button. 13. Reattach the front top cover and close the left and...
User Guide
Page 32
... (1) by turning its three black screws clockwise using the hex driver. (See "REINSTALLING THE DRUM CLEANING UNIT".) 8. Reattach the front top cover and close the toner hopper cover. (See "REATTACHING THE FRONT TOP COVER".) 10. 3.
... (1) by turning its three black screws clockwise using the hex driver. (See "REINSTALLING THE DRUM CLEANING UNIT".) 8. Reattach the front top cover and close the toner hopper cover. (See "REATTACHING THE FRONT TOP COVER".) 10. 3.

User Guide
Page 35
Note: If you are preparing is empty. 4. Open the left and right front cover, open the toner hopper cover, and then remove the front top cover. (See "REMOVING THE FRONT TOP COVER".) 2. Connect the developer bottle (3). Procedure 1. Align the hole (1) of those ...
Note: If you are preparing is empty. 4. Open the left and right front cover, open the toner hopper cover, and then remove the front top cover. (See "REMOVING THE FRONT TOP COVER".) 2. Connect the developer bottle (3). Procedure 1. Align the hole (1) of those ...

User Guide
Page 41
Turn the developer bottle upside down. 14. Reattach the front top cover and close the toner hopper cover. (See "REATTACHING THE FRONT TOP COVER".) 15. Close the left and right front cover. 40 When the confirmation message appears, press the [Confirm] button, and then, while pressing the lock levers on the developer inlet, and then remove it. 13. 11. Disconnect the developer bottle from the contact on either side of the developer bottle, carefully pull the bottle toward you. 1 RPG052 12.
Turn the developer bottle upside down. 14. Reattach the front top cover and close the toner hopper cover. (See "REATTACHING THE FRONT TOP COVER".) 15. Close the left and right front cover. 40 When the confirmation message appears, press the [Confirm] button, and then, while pressing the lock levers on the developer inlet, and then remove it. 13. 11. Disconnect the developer bottle from the contact on either side of the developer bottle, carefully pull the bottle toward you. 1 RPG052 12.

User Guide
Page 44
Using the handle (1), carefully pull the image transfer belt cleaning unit toward you until it can go no further. 1 RPG039 7. While pressing down the lock tab (1), carefully pull out the image transfer belt cleaning unit. 1 RPG058 Important: To avoid toner spillage while handling the image transfer belt cleaning unit, always keep the image transfer belt cleaning unit level. 43 6.
Using the handle (1), carefully pull the image transfer belt cleaning unit toward you until it can go no further. 1 RPG039 7. While pressing down the lock tab (1), carefully pull out the image transfer belt cleaning unit. 1 RPG058 Important: To avoid toner spillage while handling the image transfer belt cleaning unit, always keep the image transfer belt cleaning unit level. 43 6.
User Guide
Page 48
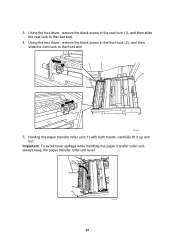
Using the hex driver, remove the black screw in the rear lock (1), and then slide the rear lock to the front end. 1 2 RPG065S 5. Holding the paper transfer roller unit (1) with both hands, carefully lift it up and out. Important: To avoid toner spillage while handling the paper transfer roller unit, always keep the paper transfer roller unit level. 1 RPG046 47 3. Using the hex driver, remove the black screw in the front lock (2), and then slide the front lock to the rear end. 4.
Using the hex driver, remove the black screw in the rear lock (1), and then slide the rear lock to the front end. 1 2 RPG065S 5. Holding the paper transfer roller unit (1) with both hands, carefully lift it up and out. Important: To avoid toner spillage while handling the paper transfer roller unit, always keep the paper transfer roller unit level. 1 RPG046 47 3. Using the hex driver, remove the black screw in the front lock (2), and then slide the front lock to the rear end. 4.
User Guide
Page 51
... 3.1.6 PROBLEM 6: DIRTY BACKGROUND 17 3.1.7 PROBLEM 7: PATCHY 19 3.1.8 PROBLEM 8: STREAKS (1 21 3.1.9 PROBLEM 9: STREAKS (2 23 3.1.10 PROBLEM 10: WHITE LINES OR DRAG MARKS 24 3.1.11 PROBLEM 11: TONER STAINS 27 3.1.12 PROBLEM 12: DIFFERENCE IN GLOSSINESS 28 4.
... 3.1.6 PROBLEM 6: DIRTY BACKGROUND 17 3.1.7 PROBLEM 7: PATCHY 19 3.1.8 PROBLEM 8: STREAKS (1 21 3.1.9 PROBLEM 9: STREAKS (2 23 3.1.10 PROBLEM 10: WHITE LINES OR DRAG MARKS 24 3.1.11 PROBLEM 11: TONER STAINS 27 3.1.12 PROBLEM 12: DIFFERENCE IN GLOSSINESS 28 4.
User Guide
Page 60
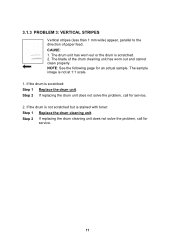
.... 2. The blade of paper feed. CAUSE: 1. The drum unit has worn out or the drum is not at 1:1 scale. 1. If the drum is stained with toner: Step 1 Replace the drum cleaning unit. Step 2 If replacing the drum cleaning unit does not solve the problem, call for an actual sample. If the...
.... 2. The blade of paper feed. CAUSE: 1. The drum unit has worn out or the drum is not at 1:1 scale. 1. If the drum is stained with toner: Step 1 Replace the drum cleaning unit. Step 2 If replacing the drum cleaning unit does not solve the problem, call for an actual sample. If the...
User Guide
Page 72
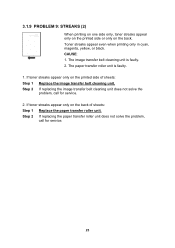
...call for service. 2. Step 2 If replacing the paper transfer roller unit does not solve the problem, call for service. 23 CAUSE: 1. If toner streaks appear only on the back of sheets: Step 1 Replace the image transfer belt cleaning unit. The paper transfer roller unit is faulty. 2. If... Step 1 Replace the paper transfer roller unit. 3.1.9 PROBLEM 9: STREAKS (2) When printing on one side only, toner streaks appear only on the printed side or only on the back. Toner streaks appear even when printing only in cyan, magenta, yellow, or black. The image transfer belt cleaning unit is...
...call for service. 2. Step 2 If replacing the paper transfer roller unit does not solve the problem, call for service. 23 CAUSE: 1. If toner streaks appear only on the back of sheets: Step 1 Replace the image transfer belt cleaning unit. The paper transfer roller unit is faulty. 2. If... Step 1 Replace the paper transfer roller unit. 3.1.9 PROBLEM 9: STREAKS (2) When printing on one side only, toner streaks appear only on the printed side or only on the back. Toner streaks appear even when printing only in cyan, magenta, yellow, or black. The image transfer belt cleaning unit is...
User Guide
Page 76
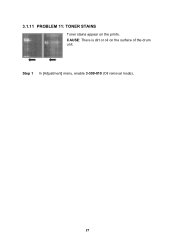
Step 1 In [Adjustment] menu, enable 3-309-010 (Oil removal mode). 27 CAUSE: There is dirt or oil on the prints. 3.1.11 PROBLEM 11: TONER STAINS Toner stains appear on the surface of the drum unit.
Step 1 In [Adjustment] menu, enable 3-309-010 (Oil removal mode). 27 CAUSE: There is dirt or oil on the prints. 3.1.11 PROBLEM 11: TONER STAINS Toner stains appear on the surface of the drum unit.
User Guide
Page 77
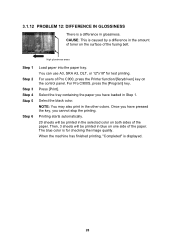
Select the black color. Once you have pressed the key, you have loaded in blue on both sides of toner on the control panel. For Pro C900S, press the [Program] key. The blue color is for test printing. High glossiness areas Step 1 Step 2 Step 3 Step 4 Step 5 Step 6 Load paper into the...be printed in Step 1. CAUSE: This is caused by a difference in the selected color on one side of the fusing belt. For users of Pro C900, press the Printer function/[fierydriven] key on the surface of the paper. Printing starts automatically. 20 sheets will be printed in the amount of ...
Select the black color. Once you have pressed the key, you have loaded in blue on both sides of toner on the control panel. For Pro C900S, press the [Program] key. The blue color is for test printing. High glossiness areas Step 1 Step 2 Step 3 Step 4 Step 5 Step 6 Load paper into the...be printed in Step 1. CAUSE: This is caused by a difference in the selected color on one side of the fusing belt. For users of Pro C900, press the Printer function/[fierydriven] key on the surface of the paper. Printing starts automatically. 20 sheets will be printed in the amount of ...


