
Operating Instructions
Page 4
... Adjusting the Focus...44 Adjusting for Using a Wireless LAN...68 Connecting the Projector to a Network...70 2 Turning On the Projector...37 Projecting an Image...38 Turning Off the Projector...40 Adjusting the Projected Image...42 Adjusting the Angle of the Projection...42 Changing the Size of the Speaker...47 Enlarging the Image...47 Temporarily Blanking the Image and Muting the Audio 48 Freezing the Image...49 Specifying the Lamp Settings...49 Using the Presentation Timer...50 3. Projecting Images from a USB Memory Device or Digital...
... Adjusting the Focus...44 Adjusting for Using a Wireless LAN...68 Connecting the Projector to a Network...70 2 Turning On the Projector...37 Projecting an Image...38 Turning Off the Projector...40 Adjusting the Projected Image...42 Adjusting the Angle of the Projection...42 Changing the Size of the Speaker...47 Enlarging the Image...47 Temporarily Blanking the Image and Muting the Audio 48 Freezing the Image...49 Specifying the Lamp Settings...49 Using the Presentation Timer...50 3. Projecting Images from a USB Memory Device or Digital...
Operating Instructions
Page 5
... Wireless LAN Settings for Infrastructure Mode 73 Configuring the Wireless LAN Settings for Ad Hoc Mode 76 Projecting a Computer's Screen via a Network 77 How to Their Defaults...92 Image Adjustment Menu...93 Display Settings Menu...97 Energy Saving Settings Menu...102 Default Settings 1 Menu...105 Default Settings 2 Menu...107 USB Settings Menu...110 Settings...110 Display Status...111 Network Settings Menu...112 Wired LAN...112 Wireless LAN (RICOH PJ X3351N/WX3351N/WX4241N only 113 LAN Common...118 Projector ID...119 Setup Wizard...120 Display Status...120 Network Application Settings...
... Wireless LAN Settings for Infrastructure Mode 73 Configuring the Wireless LAN Settings for Ad Hoc Mode 76 Projecting a Computer's Screen via a Network 77 How to Their Defaults...92 Image Adjustment Menu...93 Display Settings Menu...97 Energy Saving Settings Menu...102 Default Settings 1 Menu...105 Default Settings 2 Menu...107 USB Settings Menu...110 Settings...110 Display Status...111 Network Settings Menu...112 Wired LAN...112 Wireless LAN (RICOH PJ X3351N/WX3351N/WX4241N only 113 LAN Common...118 Projector ID...119 Setup Wizard...120 Display Status...120 Network Application Settings...
Operating Instructions
Page 15
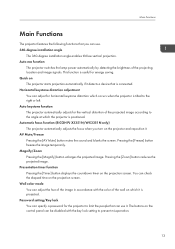
... installation angle The 360-degree installation angle enables tilt-free vertical projection. This function is useful for the vertical distortion of the projected image according to prevent misoperation. 13 Automatic focus function (RICOH PJ X3351N/WX3351N only) The projector automatically adjusts the focus when you can use it is positioned. Magnify/Zoom Pressing the [Magnify] button enlarges the projected image. The buttons on the control panel can check the elapsed time on the projection screen...
... installation angle The 360-degree installation angle enables tilt-free vertical projection. This function is useful for the vertical distortion of the projected image according to prevent misoperation. 13 Automatic focus function (RICOH PJ X3351N/WX3351N only) The projector automatically adjusts the focus when you can use it is positioned. Magnify/Zoom Pressing the [Magnify] button enlarges the projected image. The buttons on the control panel can check the elapsed time on the projection screen...
Operating Instructions
Page 21
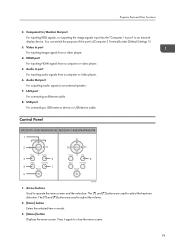
...] and [ ] buttons are used to adjust the keystone distortion. Video In port For inputting image signals from a computer or video player. 6. Audio In port For inputting audio signals from a video player. 4. Control Panel RICOH PJ X3351N/WX3351N RICOH PJ X4241N/WX4241N 1 2 3 6 6 4 7 5 DHY100 1. USB port For connecting a USB memory device or USB device cable. LAN port For connecting an Ethernet cable. 8. The [ ] and [ ] buttons are used to adjust the volume. 2. [Enter] button Enters the selected item or mode. 3. [Menu] button Displays the menu screen. Audio Out port For...
...] and [ ] buttons are used to adjust the keystone distortion. Video In port For inputting image signals from a computer or video player. 6. Audio In port For inputting audio signals from a video player. 4. Control Panel RICOH PJ X3351N/WX3351N RICOH PJ X4241N/WX4241N 1 2 3 6 6 4 7 5 DHY100 1. USB port For connecting a USB memory device or USB device cable. LAN port For connecting an Ethernet cable. 8. The [ ] and [ ] buttons are used to adjust the volume. 2. [Enter] button Enters the selected item or mode. 3. [Menu] button Displays the menu screen. Audio Out port For...

Operating Instructions
Page 40
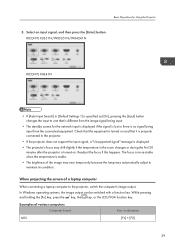
... "Connecting the Projector to use Network Setting Wizard, see page 107 "Default Settings 2 Menu". • You can also be displayed when [Reset All] in [Start-up screen closes shortly after it is projected. 2. To project the image of a laptop computer". Projecting an Image The projector beeps and the indicator flashes blue. Projecting an Image 1. For details, see page 38 "When the start -up Screen] under [Default Settings 2]. Enter a password. • The start menu is displayed". • Do not place anything near the power...
... "Connecting the Projector to use Network Setting Wizard, see page 107 "Default Settings 2 Menu". • You can also be displayed when [Reset All] in [Start-up screen closes shortly after it is projected. 2. To project the image of a laptop computer". Projecting an Image The projector beeps and the indicator flashes blue. Projecting an Image 1. For details, see page 38 "When the start -up Screen] under [Default Settings 2]. Enter a password. • The start menu is displayed". • Do not place anything near the power...
Operating Instructions
Page 41
... the [Input] button changes the input to one that it is properly connected to the projector. • If the projector does not support the input signal, a "Unsupported signal" message is displayed. • The projector's focus may automatically adjust to the projector, switch the computer's image output. Examples of a laptop computer When connecting a laptop computer to maintain its condition. Select an input signal, and then press the [Enter] button. RICOH PJ X3351N/WX3351N/WX4241N RICOH PJ X4241N • If [Auto Input Search] in...
... the [Input] button changes the input to one that it is properly connected to the projector. • If the projector does not support the input signal, a "Unsupported signal" message is displayed. • The projector's focus may automatically adjust to the projector, switch the computer's image output. Examples of a laptop computer When connecting a laptop computer to maintain its condition. Select an input signal, and then press the [Enter] button. RICOH PJ X3351N/WX3351N/WX4241N RICOH PJ X4241N • If [Auto Input Search] in...

Operating Instructions
Page 70
... cause an accident due to check the functions built into the Ethernet interface. 4. Connect the other equipment. Precautions for Using a Wireless LAN • Do not use a wireless LAN if there is active (orange LED lights up ) 1. Wireless uses radio waves to exchange information instead of the Ethernet cable to a network device such as the projector and wireless LAN access points, and to the Network • Data and systems may be...
... cause an accident due to check the functions built into the Ethernet interface. 4. Connect the other equipment. Precautions for Using a Wireless LAN • Do not use a wireless LAN if there is active (orange LED lights up ) 1. Wireless uses radio waves to exchange information instead of the Ethernet cable to a network device such as the projector and wireless LAN access points, and to the Network • Data and systems may be...
Operating Instructions
Page 73
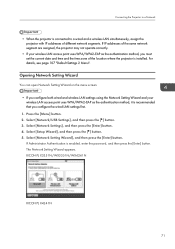
... connected to a Network • When the projector is recommended that you configure the wired LAN settings first. 1. RICOH PJ X3351N/WX3351N/WX4241N RICOH PJ X4241N 71 Select [Network Settings], and then press the [Enter] button. 4. Connecting the Projector to a wired and a wireless LAN simultaneously, assign the projector with IP addresses of the location where the projector is enabled, enter the password, and then press the [Enter] button. For details, see page 107 "Default Settings 2 Menu". Select [Network Setting...
... connected to a Network • When the projector is recommended that you configure the wired LAN settings first. 1. RICOH PJ X3351N/WX3351N/WX4241N RICOH PJ X4241N 71 Select [Network Settings], and then press the [Enter] button. 4. Connecting the Projector to a wired and a wireless LAN simultaneously, assign the projector with IP addresses of the location where the projector is enabled, enter the password, and then press the [Enter] button. For details, see page 107 "Default Settings 2 Menu". Select [Network Setting...
Operating Instructions
Page 75
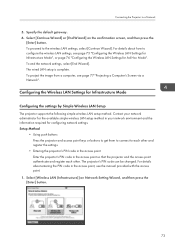
... PIN code in the access point, see the manual provided with the access point. 1. Select [Wireless LAN (Infrastructure)] on the confirmation screen, and then press the [Enter] button. To proceed to configure the wireless LAN settings, see page 77 "Projecting a Computer's Screen via a Network". Specify the default gateway. 6. The wired LAN setup is complete. To project the image from a computer, see page 73 "Configuring the Wireless LAN Settings for Infrastructure Mode...
... PIN code in the access point, see the manual provided with the access point. 1. Select [Wireless LAN (Infrastructure)] on the confirmation screen, and then press the [Enter] button. To proceed to configure the wireless LAN settings, see page 77 "Projecting a Computer's Screen via a Network". Specify the default gateway. 6. The wired LAN setup is complete. To project the image from a computer, see page 73 "Configuring the Wireless LAN Settings for Infrastructure Mode...

Operating Instructions
Page 80
... [Network PC] input appears. 4. Enter an administrator's password. Before projecting images using QuickProjection, connect the projector to [Network PC]. For basic operations, such as the input signal, press the [Input] button. 3. If [Network PC] is displayed when you start QuickProjection. Check the 4-digit number (identification code) on the projector or adjust the focus, see page page 38 "Projecting an Image". Turn the projector on the computer. 78 Double-click the "QuickProjection" icon on . 2. 4. The standby screen for Mac OS, one supports audio and...
... [Network PC] input appears. 4. Enter an administrator's password. Before projecting images using QuickProjection, connect the projector to [Network PC]. For basic operations, such as the input signal, press the [Input] button. 3. If [Network PC] is displayed when you start QuickProjection. Check the 4-digit number (identification code) on the projector or adjust the focus, see page page 38 "Projecting an Image". Turn the projector on the computer. 78 Double-click the "QuickProjection" icon on . 2. 4. The standby screen for Mac OS, one supports audio and...

Operating Instructions
Page 92
... used for operations, but numbers for settings cannot be inputted. • The Network/USB Settings menu tab includes the USB Settings menu, Network Settings menu, and Network Application Settings menu. If a confirmation screen appears, select [Reflect], and then press the [Enter] button. • The control panel on the remote control to input numbers. 7. Changes to the settings are automatically applied when you want to change, and then go to Step 2 to the settings you close the menu screen. Open the menu according to change the settings...
... used for operations, but numbers for settings cannot be inputted. • The Network/USB Settings menu tab includes the USB Settings menu, Network Settings menu, and Network Application Settings menu. If a confirmation screen appears, select [Reflect], and then press the [Enter] button. • The control panel on the remote control to input numbers. 7. Changes to the settings are automatically applied when you want to change, and then go to Step 2 to the settings you close the menu screen. Open the menu according to change the settings...

Operating Instructions
Page 104
Changing the Projector Settings Energy Saving Settings Menu Item Default Eco Mode On (Auto) Specify the lamp settings to save energy or to make images brighter. In this mode, the following settings are automatically specified: • Lamp Power: [Auto] • Lamp Pwr on No Signal: [Eco] • Image Eco: [On] • On (Detailed) You can specify [Lamp Power], [Lamp Pwr on No Signal: [Std.] • Image Eco: [Off] 102 5. In this mode to make images brighter. •...
Changing the Projector Settings Energy Saving Settings Menu Item Default Eco Mode On (Auto) Specify the lamp settings to save energy or to make images brighter. In this mode, the following settings are automatically specified: • Lamp Power: [Auto] • Lamp Pwr on No Signal: [Eco] • Image Eco: [On] • On (Detailed) You can specify [Lamp Power], [Lamp Pwr on No Signal: [Std.] • Image Eco: [Off] 102 5. In this mode to make images brighter. •...

Operating Instructions
Page 122
...Communication Mode, Transmission Speed, Channel, SSID, Authentication Method, Encryption Method, IP Address, Subnet Mask, Default Gateway Default Firmware Version Item Network/USB Func. Changing the Projector Settings Setup Wizard Item Network Setting Wizard Open Network Setting Wizard. You can confirm the following items: Connection Status, MAC Address, Transmission Speed, IP Address, Subnet Mask, Default Gateway Wireless LAN (RICOH PJ X3351N/WX3351N/WX4241N only) Item Current wireless LAN settings are displayed. Display Status Wired LAN Item Default Current wired LAN settings...
...Communication Mode, Transmission Speed, Channel, SSID, Authentication Method, Encryption Method, IP Address, Subnet Mask, Default Gateway Default Firmware Version Item Network/USB Func. Changing the Projector Settings Setup Wizard Item Network Setting Wizard Open Network Setting Wizard. You can confirm the following items: Connection Status, MAC Address, Transmission Speed, IP Address, Subnet Mask, Default Gateway Wireless LAN (RICOH PJ X3351N/WX3351N/WX4241N only) Item Current wireless LAN settings are displayed. Display Status Wired LAN Item Default Current wired LAN settings...

Operating Instructions
Page 130
...] or [HDMI] (Y/Pb/Pr signals) as the input signal. Lamp Reset Count Displays the number of lamp replacements. Total CO2 Reduction Displays the total reduction in CO2 caused by setting the lamp to the eco mode. 128 Frequency Displays the synchronous frequency. Signal Format Displays the Y/Pb/Pr signal format. This item appears when you select [Computer 1], [Computer 2], or [HDMI] (RGB signals) as the input signal. Video Mode Displays the video signal color format. Lamp Time Displays the lamp usage time. This item...
...] or [HDMI] (Y/Pb/Pr signals) as the input signal. Lamp Reset Count Displays the number of lamp replacements. Total CO2 Reduction Displays the total reduction in CO2 caused by setting the lamp to the eco mode. 128 Frequency Displays the synchronous frequency. Signal Format Displays the Y/Pb/Pr signal format. This item appears when you select [Computer 1], [Computer 2], or [HDMI] (RGB signals) as the input signal. Video Mode Displays the video signal color format. Lamp Time Displays the lamp usage time. This item...

Operating Instructions
Page 134
... a new lamp. The lamp turned off during operation. If the problem cannot be resolved, contact your service representative. displayed, and the projector turned off during operation. 6. Flashing interval : 0.2 seconds Disconnect the power cord, wait a while, and then turn on the remote control or the control panel for two seconds. • If the lamp burns out, replace it with a new lamp. The lamp does not turn on. • The lamp has overheated and cannot turn on. • The lamp's service life has...
... a new lamp. The lamp turned off during operation. If the problem cannot be resolved, contact your service representative. displayed, and the projector turned off during operation. 6. Flashing interval : 0.2 seconds Disconnect the power cord, wait a while, and then turn on the remote control or the control panel for two seconds. • If the lamp burns out, replace it with a new lamp. The lamp does not turn on. • The lamp has overheated and cannot turn on. • The lamp's service life has...

Operating Instructions
Page 135
... projector again. The lamp turned off during The lamp cover is being used in a high-temperature environment. Disconnect the power cord, wait a while, and then turn on the projector again. If the problem cannot be resolved, contact your service representative. You can also press and hold the [Power] button on the remote control or the control panel for two seconds. "Fan Error" was displayed, and the projector turned off during operation. Disconnect the power cord, and contact your service...
... projector again. The lamp turned off during The lamp cover is being used in a high-temperature environment. Disconnect the power cord, wait a while, and then turn on the projector again. If the problem cannot be resolved, contact your service representative. You can also press and hold the [Power] button on the remote control or the control panel for two seconds. "Fan Error" was displayed, and the projector turned off during operation. Disconnect the power cord, and contact your service...

Operating Instructions
Page 138
... power cord. Troubleshooting Common Problems If you disconnect the power cord without pressing the [Power] button or the projector's power is installed on . Solutions • Make sure the power plug or connector is connected correctly. • Make sure the lamp cover is within the acceptable temperature range. • Make sure the vents are not blocked. 136 For details, see page 146 "Replacing the Lamp". • When the projector is turned...
... power cord. Troubleshooting Common Problems If you disconnect the power cord without pressing the [Power] button or the projector's power is installed on . Solutions • Make sure the power plug or connector is connected correctly. • Make sure the lamp cover is within the acceptable temperature range. • Make sure the vents are not blocked. 136 For details, see page 146 "Replacing the Lamp". • When the projector is turned...

Operating Instructions
Page 157
... 110 "USB Settings Menu", page 112 "Network Settings Menu", or page 121 "Network Application Settings Menu". Login/Logout To enter edit mode, click [Login], and then enter the administrator password. Crestron Displays Crestron WebUI. Available languages are two modes available with Web Image Monitor: browse mode and edit mode. 155 On the settings screen, you can check the projector name, IP address, lamp time, and firmware version. 5. Language Select the display language for Web Image Monitor.
... 110 "USB Settings Menu", page 112 "Network Settings Menu", or page 121 "Network Application Settings Menu". Login/Logout To enter edit mode, click [Login], and then enter the administrator password. Crestron Displays Crestron WebUI. Available languages are two modes available with Web Image Monitor: browse mode and edit mode. 155 On the settings screen, you can check the projector name, IP address, lamp time, and firmware version. 5. Language Select the display language for Web Image Monitor.

Operating Instructions
Page 180
... 35 F Fan Error 131 Firmware 174 Focus 44 Focus button 20, 22 Focus lever 17, 44 Freeze button 21, 49 Freezing the image 49 Frequency 128 G G-level 94 H Hardware Error 131 HDMI cable 32, 34 HDMI port 19 High Altitude Mode 108 How to read this manual 9 I ID button 22, 26 Illuminance sensor 17 Image Adjustment menu 93 Image Eco 103 Important 6 Indicator display list 131 Indicators 18 Infrastructure mode 73, 74 Input 128 Input button 20, 21 Inputting text...
... 35 F Fan Error 131 Firmware 174 Focus 44 Focus button 20, 22 Focus lever 17, 44 Freeze button 21, 49 Freezing the image 49 Frequency 128 G G-level 94 H Hardware Error 131 HDMI cable 32, 34 HDMI port 19 High Altitude Mode 108 How to read this manual 9 I ID button 22, 26 Illuminance sensor 17 Image Adjustment menu 93 Image Eco 103 Important 6 Indicator display list 131 Indicators 18 Infrastructure mode 73, 74 Input 128 Input button 20, 21 Inputting text...

Operating Instructions
Page 181
... the projector 151 Manuals 8 Menu button 19, 21 Menu screen 87, 89, 92 Miracast 85 Model-specific information 10 Monitor Out port 19, 171 Muting the audio 48 N Network 67, 70 Network Application Settings menu 121 Network Setting Wizard 70, 72, 73, 74, 76 Network settings 70 Network Settings menu 112 Network/USB Settings menu........... 110, 112, 121 Noise Reduction 94 Notes 9 Number buttons 21 NW Settings on Standby 104 O Operating Instructions 8 Operating precautions 143 Operations while projecting images 47 Optical zoom function 43 P Page buttons 22 Picture Mode...
... the projector 151 Manuals 8 Menu button 19, 21 Menu screen 87, 89, 92 Miracast 85 Model-specific information 10 Monitor Out port 19, 171 Muting the audio 48 N Network 67, 70 Network Application Settings menu 121 Network Setting Wizard 70, 72, 73, 74, 76 Network settings 70 Network Settings menu 112 Network/USB Settings menu........... 110, 112, 121 Noise Reduction 94 Notes 9 Number buttons 21 NW Settings on Standby 104 O Operating Instructions 8 Operating precautions 143 Operations while projecting images 47 Optical zoom function 43 P Page buttons 22 Picture Mode...
