
Operating Instructions
Page 212
...to be inserted. The machine is full. There is a hex dump mode. Monitoring and Configuring the Printer Messages Full: Hole Punch Receptacle Full: Standard Tray Full: Waste Toner Full: Waste Toner Bottle Hex Dump Mode Immed. Trans. not connected Immediate Transmission Failed In Use: Copier In Use: Fax... In Use: Finisher In Use: Input Tray In Use: Staple Unit Independent-supplier Toner Key Card not inserted Key Card/...
...to be inserted. The machine is full. There is a hex dump mode. Monitoring and Configuring the Printer Messages Full: Hole Punch Receptacle Full: Standard Tray Full: Waste Toner Full: Waste Toner Bottle Hex Dump Mode Immed. Trans. not connected Immediate Transmission Failed In Use: Copier In Use: Fax... In Use: Finisher In Use: Input Tray In Use: Staple Unit Independent-supplier Toner Key Card not inserted Key Card/...

Operating Instructions
Page 213
...shortage has occurred while transmitting the fax. Indicated paper tray does not contain paper of selected type. Prepare the new fusing unit. Waste toner bottle is no paper in tray 2. 213 There is a problem with tray 1. There is no paper in tray 1. Other ... Indicated paper tray does not contain paper of selected size and type. Prepare the new color photoconductor unit. There is a problem with tray 4. There is nearly full. Monitoring and Configuring the Printer Messages Malfunction: Staple Unit Malfunction: Tray 1 Malfunction: Tray 2 Malfunction: Tray 3 Malfunction:...
...shortage has occurred while transmitting the fax. Indicated paper tray does not contain paper of selected type. Prepare the new fusing unit. Waste toner bottle is no paper in tray 2. 213 There is a problem with tray 1. There is no paper in tray 1. Other ... Indicated paper tray does not contain paper of selected size and type. Prepare the new color photoconductor unit. There is a problem with tray 4. There is nearly full. Monitoring and Configuring the Printer Messages Malfunction: Staple Unit Malfunction: Tray 1 Malfunction: Tray 2 Malfunction: Tray 3 Malfunction:...

Operating Instructions
Page 214
...set . The paper feed tray is not correctly set . The transfer unit is not correctly set . Waste toner bottle is not correctly set . 214 Unit (M) Not Detected: Develop. Black toner is not correctly set . The development unit (magenta) is not correctly set . The fusing unit is... . The photoconductor unit (yellow) is not correctly set . Monitoring and Configuring the Printer Messages No Paper: Tray 3 No Paper: Tray 4 Not Detected: B2 Lever Not Detected: Black Toner Not Detected: Cyan Toner Not Detected: Develop. Interposer unit is not correctly set . The photoconductor unit (cyan...
...set . The paper feed tray is not correctly set . The transfer unit is not correctly set . Waste toner bottle is not correctly set . 214 Unit (M) Not Detected: Develop. Black toner is not correctly set . The development unit (magenta) is not correctly set . The fusing unit is... . The photoconductor unit (yellow) is not correctly set . Monitoring and Configuring the Printer Messages No Paper: Tray 3 No Paper: Tray 4 Not Detected: B2 Lever Not Detected: Black Toner Not Detected: Cyan Toner Not Detected: Develop. Interposer unit is not correctly set . The photoconductor unit (cyan...
Setup Guide
Page 1
...How to Read This Manual 10 Guide to the Printer Exterior: Front View 11 Exterior: Rear View 12 Inside...14 Control Panel...15 Setting Up Where to Put the Printer 17 Checking the Contents of the Box 20 Unpacking...22 Installing the Waste Toner Bottle and Photo Conductor Unit 23 Installing the... Toner Cartridge 29 Loading Paper ...33 Turning the Power On 36 Selecting the Display ...
...How to Read This Manual 10 Guide to the Printer Exterior: Front View 11 Exterior: Rear View 12 Inside...14 Control Panel...15 Setting Up Where to Put the Printer 17 Checking the Contents of the Box 20 Unpacking...22 Installing the Waste Toner Bottle and Photo Conductor Unit 23 Installing the... Toner Cartridge 29 Loading Paper ...33 Turning the Power On 36 Selecting the Display ...

Setup Guide
Page 7
...the controller board compartment. Read This First • When removing misfed paper, do not take out any of the Toners, Photo Conductor Units, nor the Waste Toner Cartridge to prevent toner spill inside the machine. • When lifting the machine, use the inset grips on both sides, and lift ...slowly. The standard tray (behind the control panel) may cause an injury. • When you move the printer, remember to unplug ...
...the controller board compartment. Read This First • When removing misfed paper, do not take out any of the Toners, Photo Conductor Units, nor the Waste Toner Cartridge to prevent toner spill inside the machine. • When lifting the machine, use the inset grips on both sides, and lift ...slowly. The standard tray (behind the control panel) may cause an injury. • When you move the printer, remember to unplug ...

Setup Guide
Page 12
Plug cables such as the memory unit, user account enhance unit, or printer hard disk. Up to the Printer Exterior: Rear View 1. There are two slots. Right Cover Open this slot. Expansion Card Slots Install expansion cards in malfunction. Optional Interface Board Slots Insert ... to turn the power on paper that is not blocked by objects or in this to replace photo conductor units, the transfer belt , or the waste toner bottle. 3. Standard Tray Extension Pull this out when printing on and off. 4.
Plug cables such as the memory unit, user account enhance unit, or printer hard disk. Up to the Printer Exterior: Rear View 1. There are two slots. Right Cover Open this slot. Expansion Card Slots Install expansion cards in malfunction. Optional Interface Board Slots Insert ... to turn the power on paper that is not blocked by objects or in this to replace photo conductor units, the transfer belt , or the waste toner bottle. 3. Standard Tray Extension Pull this out when printing on and off. 4.
Setup Guide
Page 14
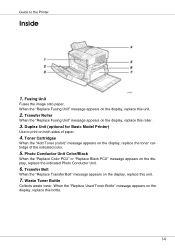
... this bottle. 14 Duplex Unit (optional for Basic Model Printer) Use to the Printer Inside 1. Toner Cartridges When the "Add Toner (color)" message appears on the display, replace this unit. 2. When the "Replace Used Toner Bottle" message appears on the display, replace the toner cartridge of paper. 4. Waste Toner Bottle Collects waste toner. Fusing Unit Fuses the image onto paper. When...
... this bottle. 14 Duplex Unit (optional for Basic Model Printer) Use to the Printer Inside 1. Toner Cartridges When the "Add Toner (color)" message appears on the display, replace this unit. 2. When the "Replace Used Toner Bottle" message appears on the display, replace the toner cartridge of paper. 4. Waste Toner Bottle Collects waste toner. Fusing Unit Fuses the image onto paper. When...

Setup Guide
Page 21
See "Appendix", Maintenance Guide. 21 Setting Up Waste Toner Bottle Ferrite Core × 2 Color Calibration Sample Sheet Image density adjusting card User registration card Additional Documentation ❒ This package does not include an interface cable. Please purchase one to use with your host computer.
See "Appendix", Maintenance Guide. 21 Setting Up Waste Toner Bottle Ferrite Core × 2 Color Calibration Sample Sheet Image density adjusting card User registration card Additional Documentation ❒ This package does not include an interface cable. Please purchase one to use with your host computer.

Setup Guide
Page 23
C Lock the waste toner bottle by sliding the green arrow into the position shown. 23 B Place the waste toner bottle in the position shown in the illustration. A Open the printer's right cover. Setting Up Installing the Waste Toner Bottle and Photo Conductor Unit The following procedure describes installing the waste toner bottle and photo conductor unit.
C Lock the waste toner bottle by sliding the green arrow into the position shown. 23 B Place the waste toner bottle in the position shown in the illustration. A Open the printer's right cover. Setting Up Installing the Waste Toner Bottle and Photo Conductor Unit The following procedure describes installing the waste toner bottle and photo conductor unit.

Maintenance Manual
Page 1
... Read This Manual 4 Paper and Other Media Paper and Other Media Supported by This Printer 5 Paper Recommendations 9 Loading Paper...9 Storing Paper ...9 Types of Paper and Other Media 9 Paper not supported by this printer 12 Print Area ...13 Loading Paper ...15 Loading Paper in Tray 1 and the ...optional paper feed unit 15 Loading Paper in the Bypass Tray 20 Switching between Paper Trays 26 Replacing Consumables and Maintenance Kit Replacing the Toner Cartridge 28 Replacing the Waste Toner Bottle 32...
... Read This Manual 4 Paper and Other Media Paper and Other Media Supported by This Printer 5 Paper Recommendations 9 Loading Paper...9 Storing Paper ...9 Types of Paper and Other Media 9 Paper not supported by this printer 12 Print Area ...13 Loading Paper ...15 Loading Paper in Tray 1 and the ...optional paper feed unit 15 Loading Paper in the Bypass Tray 20 Switching between Paper Trays 26 Replacing Consumables and Maintenance Kit Replacing the Toner Cartridge 28 Replacing the Waste Toner Bottle 32...

Maintenance Manual
Page 2
... the Display 58 Cleaning and Adjusting the Printer Cautions to Take When Cleaning 59 Adjusting the Color Registration 60 Correcting the Color Gradation 62 Set the Gradation Correction Value 62 Viewing the Color Calibration Sample Sheet and Gradation Correction Sheet... 102 When "Remove Misfeed Z: Duplex Unit" Appears 104 Appendix Moving and Transporting the Printer 106 Moving the Printer 106 Transporting the Printer 107 Consumables ...108 Toner Cartridge ...108 Waste Toner Bottle 109 Photo Conductor Unit 109 Intermediate Transfer Unit (Transfer Unit 109 Specifications...111 Mainframe...
... the Display 58 Cleaning and Adjusting the Printer Cautions to Take When Cleaning 59 Adjusting the Color Registration 60 Correcting the Color Gradation 62 Set the Gradation Correction Value 62 Viewing the Color Calibration Sample Sheet and Gradation Correction Sheet... 102 When "Remove Misfeed Z: Duplex Unit" Appears 104 Appendix Moving and Transporting the Printer 106 Moving the Printer 106 Transporting the Printer 107 Consumables ...108 Toner Cartridge ...108 Waste Toner Bottle 109 Photo Conductor Unit 109 Intermediate Transfer Unit (Transfer Unit 109 Specifications...111 Mainframe...

Maintenance Manual
Page 32
...or an appropriate collection site. B Open the right cover. Replacing Consumables and Maintenance Kit Replacing the Waste Toner Bottle • Do not incinerate spilled toner or used or unused) and the toner cartridge out of reach of children. • Do not put an object on the display: ..., and then unplug the power cable. Replace the waste toner bottle when the following message appears on the right cover when it is flammable and might ignite when exposed to local regulations. • Keep toner (used toner. C Take a new waste toner bottle out of them according to an open ....
...or an appropriate collection site. B Open the right cover. Replacing Consumables and Maintenance Kit Replacing the Waste Toner Bottle • Do not incinerate spilled toner or used or unused) and the toner cartridge out of reach of children. • Do not put an object on the display: ..., and then unplug the power cable. Replace the waste toner bottle when the following message appears on the right cover when it is flammable and might ignite when exposed to local regulations. • Keep toner (used toner. C Take a new waste toner bottle out of them according to an open ....

Maintenance Manual
Page 33
Toner may leak. E Remove the used waste toner bottle carefully. 33 Replacing Consumables and Maintenance Kit D Unlock the waste toner bottle by sliding the green arrow to the position shown. ❒ Do not lock the removed waste toner bottle.
Toner may leak. E Remove the used waste toner bottle carefully. 33 Replacing Consumables and Maintenance Kit D Unlock the waste toner bottle by sliding the green arrow to the position shown. ❒ Do not lock the removed waste toner bottle.

Maintenance Manual
Page 34
Replacing Consumables and Maintenance Kit F Place the new waste toner bottle in the position shown in the illustration. H Close the right cover carefully. I Turn on the power. 34 G Lock the waste toner bottle by sliding the green arrow to the position shown. ❒ Be sure to lock the waste toner bottle to prevent toner from leaking inside the printer.
Replacing Consumables and Maintenance Kit F Place the new waste toner bottle in the position shown in the illustration. H Close the right cover carefully. I Turn on the power. 34 G Lock the waste toner bottle by sliding the green arrow to the position shown. ❒ Be sure to lock the waste toner bottle to prevent toner from leaking inside the printer.

Maintenance Manual
Page 52
E Lift the inner cover until it stays up. 52 See p.32 "Replacing the Waste Toner Bottle". Replacing Consumables and Maintenance Kit B Open printer's right cover. D Pull out the green levers on the left and right that are securing the inner cover. C Remove the waste toner bottle.
E Lift the inner cover until it stays up. 52 See p.32 "Replacing the Waste Toner Bottle". Replacing Consumables and Maintenance Kit B Open printer's right cover. D Pull out the green levers on the left and right that are securing the inner cover. C Remove the waste toner bottle.

Maintenance Manual
Page 53
G Remove the waste toner bottle carefully. 53 Toner may leak. Replacing Consumables and Maintenance Kit F Unlock the waste toner bottle by sliding the green arrow to the position shown. ❒ Do not lock the removed waste toner bottle.
G Remove the waste toner bottle carefully. 53 Toner may leak. Replacing Consumables and Maintenance Kit F Unlock the waste toner bottle by sliding the green arrow to the position shown. ❒ Do not lock the removed waste toner bottle.

Maintenance Manual
Page 56
Q Lower the inner cover slowly. 56 P Lock the waste toner bottle by sliding the green arrow to the position shown. ❒ Be sure to lock the waste toner bottle to prevent toner from leaking inside the printer. Replacing Consumables and Maintenance Kit O Place the waste toner bottle in the position shown in the illustration.
Q Lower the inner cover slowly. 56 P Lock the waste toner bottle by sliding the green arrow to the position shown. ❒ Be sure to lock the waste toner bottle to prevent toner from leaking inside the printer. Replacing Consumables and Maintenance Kit O Place the waste toner bottle in the position shown in the illustration.

Maintenance Manual
Page 80
...belt. Prepare to replace the fusing unit. Replace the waste toner bottle. There is time to replace the fusing unit when the message [Replace Fusing Unit] appears on the display. See p.35 "Replacing the Photo Conductor Unit". The printer is waiting for Data Description Recommended Action The time to... It is not set . Remove paper from the bypass tray, and then reset the paper. The indicated toner cartridge is time to replace the color PCU when the message [Replace Color PCU] appears on the display. The indicated paper input tray Set the indicated paper input is no fusing...
...belt. Prepare to replace the fusing unit. Replace the waste toner bottle. There is time to replace the fusing unit when the message [Replace Fusing Unit] appears on the display. See p.35 "Replacing the Photo Conductor Unit". The printer is waiting for Data Description Recommended Action The time to... It is not set . Remove paper from the bypass tray, and then reset the paper. The indicated toner cartridge is time to replace the color PCU when the message [Replace Color PCU] appears on the display. The indicated paper input tray Set the indicated paper input is no fusing...

Maintenance Manual
Page 81
cartridge (Cyan) when the message [Add Toner Cyan] ap- cartridge (Magenta) when the message [Add Toner Magenta] appears on . Prepare to start Turn the printer OFF and then updating data. The printer has failed to replace the toner er (Yellow). See p.32 "Replacing the Waste Toner Bottle". 81 it is almost full. Turn the power off and then...
cartridge (Cyan) when the message [Add Toner Cyan] ap- cartridge (Magenta) when the message [Add Toner Magenta] appears on . Prepare to start Turn the printer OFF and then updating data. The printer has failed to replace the toner er (Yellow). See p.32 "Replacing the Waste Toner Bottle". 81 it is almost full. Turn the power off and then...

Maintenance Manual
Page 106
... unplugged from the wall outlet. • The interface cable is a precision piece of the Toners, Photo Conductor Units, nor the waste toner bottle to prevent toner spill inside the machine. B If the external options are located on both sides. Moving the Printer • When lifting the machine, use , do not take out any of machinery...
... unplugged from the wall outlet. • The interface cable is a precision piece of the Toners, Photo Conductor Units, nor the waste toner bottle to prevent toner spill inside the machine. B If the external options are located on both sides. Moving the Printer • When lifting the machine, use , do not take out any of machinery...


