
Hardware Guide
Page 1
For safe and correct use, be sure to the Printer 2 Installing Options 3 Connecting the Printer Cables 4 Configuration 5 Paper and Other Media 6 Replacing Consumables 7 Cleaning the Printer 8 Adjusting the Printer 9 Troubleshooting 10 Removing Misfed Paper 11 Appendix Read this machine and keep it handy for future reference. Operating Instructions Hardware Guide 1 Guide to read the Safety Information before you use this manual carefully before using the machine.
For safe and correct use, be sure to the Printer 2 Installing Options 3 Connecting the Printer Cables 4 Configuration 5 Paper and Other Media 6 Replacing Consumables 7 Cleaning the Printer 8 Adjusting the Printer 9 Troubleshooting 10 Removing Misfed Paper 11 Appendix Read this machine and keep it handy for future reference. Operating Instructions Hardware Guide 1 Guide to read the Safety Information before you use this manual carefully before using the machine.
Hardware Guide
Page 2
... Microsoft® Windows NT® Workstation 4.0 Some illustrations in the U.S. The Bluetooth® word mark and logos are owned by Ricoh Company, Ltd. Other product names used herein are for identification purposes only and might be trademarks of Xerox Corporation. Apple, AppleTalk, ...EtherTalk, Macintosh, Mac OS and True Type are trademarks of Apple Computer Inc., registered in this manual might be slightly different from the machine. Novell, NetWare are registered trademarks of Novell, Inc. Trademarks Microsoft, Windows and Windows...
... Microsoft® Windows NT® Workstation 4.0 Some illustrations in the U.S. The Bluetooth® word mark and logos are owned by Ricoh Company, Ltd. Other product names used herein are for identification purposes only and might be trademarks of Xerox Corporation. Apple, AppleTalk, ...EtherTalk, Macintosh, Mac OS and True Type are trademarks of Apple Computer Inc., registered in this manual might be slightly different from the machine. Novell, NetWare are registered trademarks of Novell, Inc. Trademarks Microsoft, Windows and Windows...
Hardware Guide
Page 3
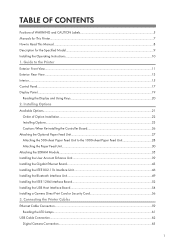
... LED Lamps...61 USB Cable Connection...62 Digital Camera Connection...63 1 Installing Options Available Options...21 Order of WARNING and CAUTION Labels 5 Manuals for This Printer...7 How to Read This Manual...8 Description for the Specified Model...9 Installing the Operating Instructions...10 1. TABLE OF CONTENTS Positions of Option Installation...22 Installing Options...23 Cautions...
... LED Lamps...61 USB Cable Connection...62 Digital Camera Connection...63 1 Installing Options Available Options...21 Order of WARNING and CAUTION Labels 5 Manuals for This Printer...7 How to Read This Manual...8 Description for the Specified Model...9 Installing the Operating Instructions...10 1. TABLE OF CONTENTS Positions of Option Installation...22 Installing Options...23 Cautions...
Hardware Guide
Page 9
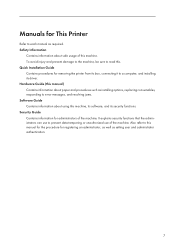
...administrator, as well as setting user and administrator authentication. 7 Hardware Guide (this manual) Contains information about safe usage of this . Security Guide Contains information for removing the printer from its box, connecting it to read this machine. It explains security functions ...that the administrators can use of the machine. Manuals for This Printer Refer to prevent data tampering or unauthorized use to each manual as installing options, replacing consumables, responding to this machine, its software, and its ...
...administrator, as well as setting user and administrator authentication. 7 Hardware Guide (this manual) Contains information about safe usage of this . Security Guide Contains information for removing the printer from its box, connecting it to read this machine. It explains security functions ...that the administrators can use of the machine. Manuals for This Printer Refer to prevent data tampering or unauthorized use to each manual as installing options, replacing consumables, responding to this machine, its software, and its ...

Hardware Guide
Page 10
... sure to property. This symbol is located at the end of data. Indicates supplementary explanations of keys on resolving user errors. How to Read This Manual This manual uses the following symbols: • Indicates a potentially hazardous situation which, if instructions are not followed, could result in death or serious injury. • Indicates...
... sure to property. This symbol is located at the end of data. Indicates supplementary explanations of keys on resolving user errors. How to Read This Manual This manual uses the following symbols: • Indicates a potentially hazardous situation which, if instructions are not followed, could result in death or serious injury. • Indicates...
Hardware Guide
Page 11
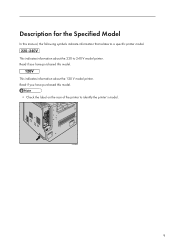
ATU088S 9 This indicates information about the 120 V model printer. This indicates information about the 220 to a specific printer model. Description for the Specified Model In this manual, the following symbols indicate information that relates to 240 V model printer. Read if you have purchased this model. Read if you have purchased this model. • Check the label on the rear of the printer to identify the printer's model.
ATU088S 9 This indicates information about the 120 V model printer. This indicates information about the 220 to a specific printer model. Description for the Specified Model In this manual, the following symbols indicate information that relates to 240 V model printer. Read if you have purchased this model. Read if you have purchased this model. • Check the label on the rear of the printer to identify the printer's model.

Hardware Guide
Page 12
... Follow the instructions on "index.htm". 10 Insert the CD-ROM "Manuals" into the CD-ROM drive. In this printer driver, and then click [Uninstall]. You can uninstall each Manual separately. • If you are using an incompatible Web browser and the...• Microsoft Internet Explorer 5.5 SP2 or higher • Firefox 1.0 or higher 1. Installing the Operating Instructions The CD-ROM "Manuals" provided with this printer contains HTML version Operating Instructions. The installer starts. Follow the instructions below to complete the installation. 6. Select an interface language, ...
... Follow the instructions on "index.htm". 10 Insert the CD-ROM "Manuals" into the CD-ROM drive. In this printer driver, and then click [Uninstall]. You can uninstall each Manual separately. • If you are using an incompatible Web browser and the...• Microsoft Internet Explorer 5.5 SP2 or higher • Firefox 1.0 or higher 1. Installing the Operating Instructions The CD-ROM "Manuals" provided with this printer contains HTML version Operating Instructions. The installer starts. Follow the instructions below to complete the installation. 6. Select an interface language, ...

Hardware Guide
Page 19
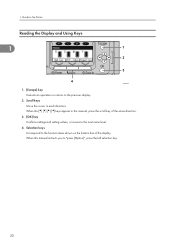
...] Key Press this key to configure and check the current printer settings. 17 Data In indicator Blinks when the printer is on the display. 8. Display Displays current printer status and error messages. Scroll Keys Press to move the cursor in this manual, press the scroll key of the control panel. Power Indicator...or setting values, or move to the next menu level. 6. Entering energy saver mode turns off or while the printer is in energy saver mode. 9. [Job Reset] Key When the printer is online, press this key to cancel an ongoing print job. 10. [Menu] Key Press this key to...
...] Key Press this key to configure and check the current printer settings. 17 Data In indicator Blinks when the printer is on the display. 8. Display Displays current printer status and error messages. Scroll Keys Press to move the cursor in this manual, press the scroll key of the control panel. Power Indicator...or setting values, or move to the next menu level. 6. Entering energy saver mode turns off or while the printer is in energy saver mode. 9. [Job Reset] Key When the printer is online, press this key to cancel an ongoing print job. 10. [Menu] Key Press this key to...
Hardware Guide
Page 22
When this manual, press the scroll key of the display. 1. When the keys appear in each direction. Selection keys Correspond to the previous display. 2. Guide to the Printer Reading the Display and Using Keys 1 ATU051S 1. [Escape] key Cancels an operation or returns to the function items shown on the bottom line of the same direction. 3. [OK] key Confirms settings and setting values, or moves to "press [Option]", press the left selection key. 20 Scroll keys Move the cursor in this manual instructs you to the next menu level. 4.
When this manual, press the scroll key of the display. 1. When the keys appear in each direction. Selection keys Correspond to the previous display. 2. Guide to the Printer Reading the Display and Using Keys 1 ATU051S 1. [Escape] key Cancels an operation or returns to the function items shown on the bottom line of the same direction. 3. [OK] key Confirms settings and setting values, or moves to "press [Option]", press the left selection key. 20 Scroll keys Move the cursor in this manual instructs you to the next menu level. 4.

Hardware Guide
Page 83
Tray 1 Each size is determined for each paper tray in this manual On the display Paper feed direction (Feed direction) (Feed direction) A4 (210 297) 81/2 11 A5 (210 148) 81/2 51/2 Short-edge feed direction 5 Long-... (Tray 3 to change the default setting, contact your sales or service representative. Paper and Other Media Supported Paper for the following models. Symbols In this printer. 5. The direction is specified for Each Tray This section describes the paper size, feed direction, and the maximum amount of the paper feed direction when...
Tray 1 Each size is determined for each paper tray in this manual On the display Paper feed direction (Feed direction) (Feed direction) A4 (210 297) 81/2 11 A5 (210 148) 81/2 51/2 Short-edge feed direction 5 Long-... (Tray 3 to change the default setting, contact your sales or service representative. Paper and Other Media Supported Paper for the following models. Symbols In this printer. 5. The direction is specified for Each Tray This section describes the paper size, feed direction, and the maximum amount of the paper feed direction when...
Hardware Guide
Page 84
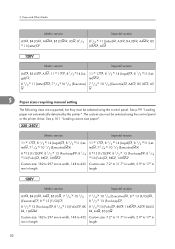
The custom size must be selected using the control panel. See p.101 "Loading custom size paper". 5. See p.99 "Loading paper not automatically detected by this printer ". Metric version Imperial version 11 17 , 8 1/2 14 (Legal) , 8 1/2 11 (Letter) , 7 1/4 10 1/2 (Executive) , 8 13 (F/GL) , 8 1/2 13 (Foolscap) , 8 1/4 13 (Folio)...) , 7 1/4 10 1/2 (Executive) 11 17 , 8 1/2 14 (Legal) , 8 1/2 11 (Letter) , 7 1/4 10 1/2 (Executive) , A4 , B5 JIS , A5 5 Paper sizes requiring manual setting The following sizes are supported, but they must be selected using the control panel or the...
The custom size must be selected using the control panel. See p.101 "Loading custom size paper". 5. See p.99 "Loading paper not automatically detected by this printer ". Metric version Imperial version 11 17 , 8 1/2 14 (Legal) , 8 1/2 11 (Letter) , 7 1/4 10 1/2 (Executive) , 8 13 (F/GL) , 8 1/2 13 (Foolscap) , 8 1/4 13 (Folio)...) , 7 1/4 10 1/2 (Executive) 11 17 , 8 1/2 14 (Legal) , 8 1/2 11 (Letter) , 7 1/4 10 1/2 (Executive) , A4 , B5 JIS , A5 5 Paper sizes requiring manual setting The following sizes are supported, but they must be selected using the control panel or the...
Hardware Guide
Page 85
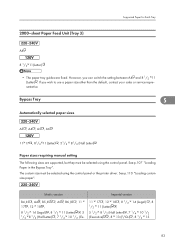
... Paper for Each Tray A4 8 1/2 11(Letter) • The paper tray guides are supported, but they must be selected using the control panel or the printer driver. See p.110 "Loading custom size paper". Metric version B4 JIS , A4 , B5 JIS , A5 , B6 JIS , 11 17 , 12 18 , 8 1/2 14 (Legal) , 8 1/2 11 (Letter... the control panel. Bypass Tray 5 Automatically selected paper sizes A3 , A4 , A5 , A6 11 17 , 81/2 11(Letter) , 51/2 81/2 (Half Letter) Paper sizes requiring manual setting The following sizes are fixed. If you can switch the setting between A4 and 8 1/2 11 (Letter) .
... Paper for Each Tray A4 8 1/2 11(Letter) • The paper tray guides are supported, but they must be selected using the control panel or the printer driver. See p.110 "Loading custom size paper". Metric version B4 JIS , A4 , B5 JIS , A5 , B6 JIS , 11 17 , 12 18 , 8 1/2 14 (Legal) , 8 1/2 11 (Letter... the control panel. Bypass Tray 5 Automatically selected paper sizes A3 , A4 , A5 , A6 11 17 , 81/2 11(Letter) , 51/2 81/2 (Half Letter) Paper sizes requiring manual setting The following sizes are fixed. If you can switch the setting between A4 and 8 1/2 11 (Letter) .
Hardware Guide
Page 153
...attempt any modifications to this manual. 7. If dry wiping is a risk of fire, electric shock, explosion or loss of serious eye damage. • When removing misfed paper, do not use volatile chemicals, such as benzine and thinner, or spray insecticide on the printer. • If there is... in this machine. There is not enough, wipe with a soft cloth. Clean the printer periodically to be very hot. Cleaning the Printer Cautions When Cleaning • To avoid hazardous electric shock or laser radiation exposure, do not remove any dust and grime from the wall outlet at least ...
...attempt any modifications to this manual. 7. If dry wiping is a risk of fire, electric shock, explosion or loss of serious eye damage. • When removing misfed paper, do not use volatile chemicals, such as benzine and thinner, or spray insecticide on the printer. • If there is... in this machine. There is not enough, wipe with a soft cloth. Clean the printer periodically to be very hot. Cleaning the Printer Cautions When Cleaning • To avoid hazardous electric shock or laser radiation exposure, do not remove any dust and grime from the wall outlet at least ...

Hardware Guide
Page 202
...times. 10 ASZ124S 200 Do not forcefully pull out the tray. 1. Push up the lever on the right side, and open the printer's right cover carefully. ATU098S 2. Turn the B1 lever five to remove." Before removing paper around the fusing unit, wait until the temperature ...of this manual. • When a paper misfeed (B) occurs, the paper tray is locked and cannot be pulled out. Removing Misfed Paper Paper Misfeed Message (B) The B "Read instructions in this printer becomes very hot. 10.
...times. 10 ASZ124S 200 Do not forcefully pull out the tray. 1. Push up the lever on the right side, and open the printer's right cover carefully. ATU098S 2. Turn the B1 lever five to remove." Before removing paper around the fusing unit, wait until the temperature ...of this manual. • When a paper misfeed (B) occurs, the paper tray is locked and cannot be pulled out. Removing Misfed Paper Paper Misfeed Message (B) The B "Read instructions in this printer becomes very hot. 10.

Hardware Guide
Page 204
... cover carefully. 2. ATU098S 10 ASZ125S 202 Do not forcefully pull out the tray. 1. Removing Misfed Paper Paper Misfeed Message (C) The C "Read instructions in this printer becomes very hot. error message appears when a paper misfeed occursin the paper feed section. • The inside of the covers inside the fusing unit and ...than those specified in Front Cover to remove." Remove misfed paper slowly. Before removing paper around the fusing unit, wait until the temperature of this manual. • When a paper misfeed (C) occurs, the paper tray is locked and cannot be pulled out.
... cover carefully. 2. ATU098S 10 ASZ125S 202 Do not forcefully pull out the tray. 1. Removing Misfed Paper Paper Misfeed Message (C) The C "Read instructions in this printer becomes very hot. error message appears when a paper misfeed occursin the paper feed section. • The inside of the covers inside the fusing unit and ...than those specified in Front Cover to remove." Remove misfed paper slowly. Before removing paper around the fusing unit, wait until the temperature of this manual. • When a paper misfeed (C) occurs, the paper tray is locked and cannot be pulled out.

Hardware Guide
Page 226
...11 ASZ077S 5. Pull out the handle from the right side of the printer. 3. rately. 224 If you want to install it, keeping it to keep the printer horizontal while moving it. For details, see the relevant sections in this manual. • At least four people are required to lift the... printer. • Be sure to the place where you removed options, reattach them ...
...11 ASZ077S 5. Pull out the handle from the right side of the printer. 3. rately. 224 If you want to install it, keeping it to keep the printer horizontal while moving it. For details, see the relevant sections in this manual. • At least four people are required to lift the... printer. • Be sure to the place where you removed options, reattach them ...
Hardware Guide
Page 246
... paper feed unit 97, 105 Loading paper into the paper tray 97, 105 Loading the standard size paper. ......97, 105, 107 M Manuals for This Printer 7 Memory 35 Menu Key 17 N Network 67 O OHP transparencies 89 OK 20 OK Key 17 Online Key 18 Operational status or messages...Paper Misfeed Message (R 207 Paper Misfeed Message (Y 217 Paper Misfeed Message (Z 218 Paper not supported by this printer 95 Paper Recommendations 86 Paper sizes not automatically detected by this printer 99 Paper Support 12 Paper tray 97, 105 Paper Tray 11 Parallel Cable Connection 66 Photo Conductor Unit 15...
... paper feed unit 97, 105 Loading paper into the paper tray 97, 105 Loading the standard size paper. ......97, 105, 107 M Manuals for This Printer 7 Memory 35 Menu Key 17 N Network 67 O OHP transparencies 89 OK 20 OK Key 17 Online Key 18 Operational status or messages...Paper Misfeed Message (R 207 Paper Misfeed Message (Y 217 Paper Misfeed Message (Z 218 Paper not supported by this printer 95 Paper Recommendations 86 Paper sizes not automatically detected by this printer 99 Paper Support 12 Paper tray 97, 105 Paper Tray 11 Parallel Cable Connection 66 Photo Conductor Unit 15...


