Network Guide
Page 12
...E-mail Size Specifies the [Max. Program / Change / Delete Subject Program, change, or delete the subject used when sending an Internet fax or scan file as the sender's address on a computer running Windows, or to an FTP server. Fax E-mail Account Specify [E-mail Address],[User Name]...shared folder on the POP3 or IMAP4 server. Default User Name / Password (Send) Specifies the user name and password required when sending scan file directly to the delivery server or mail server 4 Max. ❖ File Transfer Settings Menu Description SMTP Server Specifies the SMTP ...
...E-mail Size Specifies the [Max. Program / Change / Delete Subject Program, change, or delete the subject used when sending an Internet fax or scan file as the sender's address on a computer running Windows, or to an FTP server. Fax E-mail Account Specify [E-mail Address],[User Name]...shared folder on the POP3 or IMAP4 server. Default User Name / Password (Send) Specifies the user name and password required when sending scan file directly to the delivery server or mail server 4 Max. ❖ File Transfer Settings Menu Description SMTP Server Specifies the SMTP ...
Network Guide
Page 23
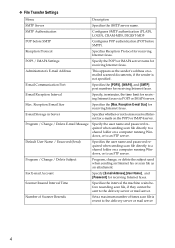
❖ Scan to Folder (IPv6 cannnot be used on this function.) Interface Ethernet IEEE 1394 (IPv4 over 1394) Interface Settings/ Network File Transfer Interface Settings/ IEEE 1394 ...
❖ Scan to Folder (IPv6 cannnot be used on this function.) Interface Ethernet IEEE 1394 (IPv4 over 1394) Interface Settings/ Network File Transfer Interface Settings/ IEEE 1394 ...
Network Guide
Page 50
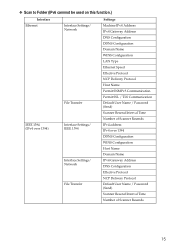
...NetWare Client32 for Windows NT IntraNetWare Client for Windows NT Novell Client for Windows • Allows selection of functions such as printing and scanning for each user code. • Fax numbers and e-mail addresses stored in the machine. ❖ Protocol stack provided with Operating ...from a computer. • Allows you can change the machine's network settings. Also, you to check job histories of printed, faxed (LANFax), scanned, and photocopied documents identified by computer. • You can check each fax job history entry. • You can make settings for Windows 95...
...NetWare Client32 for Windows NT IntraNetWare Client for Windows NT Novell Client for Windows • Allows selection of functions such as printing and scanning for each user code. • Fax numbers and e-mail addresses stored in the machine. ❖ Protocol stack provided with Operating ...from a computer. • Allows you can change the machine's network settings. Also, you to check job histories of printed, faxed (LANFax), scanned, and photocopied documents identified by computer. • You can check each fax job history entry. • You can make settings for Windows 95...
Network Guide
Page 51
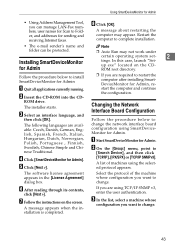
... [License Agreement] dialog box. Restart the computer to complete installation. • The e-mail sender's name and folder can manage LAN-Fax numbers, user names for Scan to Folder, and addresses for sending and receiving Internet faxes. Follow the procedure below to change. 43 The installer starts. A list of the machine whose...
... [License Agreement] dialog box. Restart the computer to complete installation. • The e-mail sender's name and folder can manage LAN-Fax numbers, user names for Scan to Folder, and addresses for sending and receiving Internet faxes. Follow the procedure below to change. 43 The installer starts. A list of the machine whose...
Network Guide
Page 98
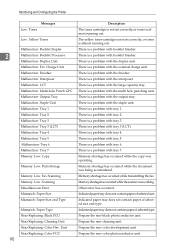
...: Tray 2 Malfunction: Tray 3 Malfunction: Tray 3 (LCT) Malfunction: Tray 4 Malfunction: Tray 5 Malfunction: Tray 6 Malfunction: Tray 7 Memory Low: Copy Memory Low: Data Storage Memory Low: Fax Scanning Memory Low: Scanning Miscellaneous Error Mismatch: Paper Size Mismatch: Paper Size and Type Mismatch: Paper Type Near Replacing: Black PCU Near Replacing: Cleaning Unit Near Replacing: Color...
...: Tray 2 Malfunction: Tray 3 Malfunction: Tray 3 (LCT) Malfunction: Tray 4 Malfunction: Tray 5 Malfunction: Tray 6 Malfunction: Tray 7 Memory Low: Copy Memory Low: Data Storage Memory Low: Fax Scanning Memory Low: Scanning Miscellaneous Error Mismatch: Paper Size Mismatch: Paper Size and Type Mismatch: Paper Type Near Replacing: Black PCU Near Replacing: Cleaning Unit Near Replacing: Color...
Copy/Document Server Reference
Page 16
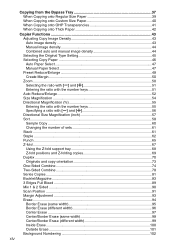
... and copy orientation 73 One-Sided Combine 74 Two-Sided Combine 78 Series Copies...81 Booklet/Magazine...83 3 Edges Full Bleed 89 Mix 1 & 2 Sided ...90 Scan Position ...91 Margin Adjustment 93 Erase ...94 Border Erase (same width 95 Border Erase (different width 96 Center Erase ...97 Center/Border Erase (same width...
... and copy orientation 73 One-Sided Combine 74 Two-Sided Combine 78 Series Copies...81 Booklet/Magazine...83 3 Edges Full Bleed 89 Mix 1 & 2 Sided ...90 Scan Position ...91 Margin Adjustment 93 Erase ...94 Border Erase (same width 95 Border Erase (different width 96 Center Erase ...97 Center/Border Erase (same width...

Copy/Document Server Reference
Page 21
... item on the display panel, it is highlighted like . quently used reduce/enlarge ratios other than the fixed reduce/enlarge ratios. Displays contents of originals scanned into memory, copies set, and copies made. Display Panel The function items displayed serve as cannot be used functions in these keys. You can register...
... item on the display panel, it is highlighted like . quently used reduce/enlarge ratios other than the fixed reduce/enlarge ratios. Displays contents of originals scanned into memory, copies set, and copies made. Display Panel The function items displayed serve as cannot be used functions in these keys. You can register...

Copy/Document Server Reference
Page 26
...continue copying when paper of the image. You can prevent unauthenticated users from 3 to print the stamp. When memory becomes full while scanning originals, the machine can specify where to 99 seconds in this time from changing the user tools. If you press [Special Original]....with higher priority for "Finishing Types" on the initial display. You can have page numbers printed in Bypass Mode Memory Full Auto Scan Restart Letterhead Setting Staple Position Punch Type Simplified Screen: Finishing Types Description You can specify how Stamp Text is displayed with priority....
...continue copying when paper of the image. You can prevent unauthenticated users from 3 to print the stamp. When memory becomes full while scanning originals, the machine can specify where to 99 seconds in this time from changing the user tools. If you press [Special Original]....with higher priority for "Finishing Types" on the initial display. You can have page numbers printed in Bypass Mode Memory Full Auto Scan Restart Letterhead Setting Staple Position Punch Type Simplified Screen: Finishing Types Description You can specify how Stamp Text is displayed with priority....

Copy/Document Server Reference
Page 35
... in ADF. A Adjust the guide to place originals or other objects on the bottom. Doing so may cause a malfunction. There are four types of the scanned image incorrectly or display a paper misfeed message. The last page should be on the top cover. Doing so may cause the machine to block the...
... in ADF. A Adjust the guide to place originals or other objects on the bottom. Doing so may cause a malfunction. There are four types of the scanned image incorrectly or display a paper misfeed message. The last page should be on the top cover. Doing so may cause the machine to block the...

Copy/Document Server Reference
Page 37
..., such as one . See "Input/Output", General Settings Guide. ❒ To copy subsequent originals in step B, set , press the {q} key after all originals have been scanned. Placing Originals Batch Mode In Batch mode, the machine copies an original of more than 100 pages as translucent paper, one by one document, even...
..., such as one . See "Input/Output", General Settings Guide. ❒ To copy subsequent originals in step B, set , press the {q} key after all originals have been scanned. Placing Originals Batch Mode In Batch mode, the machine copies an original of more than 100 pages as translucent paper, one by one document, even...

Copy/Document Server Reference
Page 38
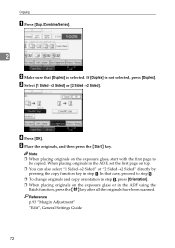
.... A Press [Special Original]. Note ❒ When the Sort, Combine or 1 Sided→2 Sided mode has been set, press the {q} key after all originals have been scanned. The second and subsequent pages will be fed automatically without pressing the {Start} key. See "Input/Output", General Settings Guide.
.... A Press [Special Original]. Note ❒ When the Sort, Combine or 1 Sided→2 Sided mode has been set, press the {q} key after all originals have been scanned. The second and subsequent pages will be fed automatically without pressing the {Start} key. See "Input/Output", General Settings Guide.

Copy/Document Server Reference
Page 44
B Remove the originals that were being scanned or the scanner function is Displayed", About This Machine "Administrator Tools", General Settings Guide Interrupt Copy Use this function to interrupt a long copy job to ... indicator lights. D Press the {Start} key. Important ❒ You cannot use the Interrupt Copy function when fax originals are scanned. A Press the {Interrupt} key. The machine starts making copies. 26 The machine stops scanning. The machine starts copying. Copying F Press the {Start} key. Note 2 ❒ Always log off when you want to...
B Remove the originals that were being scanned or the scanner function is Displayed", About This Machine "Administrator Tools", General Settings Guide Interrupt Copy Use this function to interrupt a long copy job to ... indicator lights. D Press the {Start} key. Important ❒ You cannot use the Interrupt Copy function when fax originals are scanned. A Press the {Interrupt} key. The machine starts making copies. 26 The machine stops scanning. The machine starts copying. Copying F Press the {Start} key. Note 2 ❒ Always log off when you want to...

Copy/Document Server Reference
Page 49
... Press [New Job] when "Copying..." C Place the originals, and then press the {Start} key. All originals are displayed alternately. are scanned. Job Preset You can switch the display to the copy screen. When the current copy job is displayed on the Reserved Job screen. 31 ... the next copy job will start automatically. Copying starts automatically once the machine is complete, a job preset confirmation dialog box appears. The machine scans the original. When the preset job is ready. After the current copy job, the next copy job starts automatically. B Place the original. ...
... Press [New Job] when "Copying..." C Place the originals, and then press the {Start} key. All originals are displayed alternately. are scanned. Job Preset You can switch the display to the copy screen. When the current copy job is displayed on the Reserved Job screen. 31 ... the next copy job will start automatically. Copying starts automatically once the machine is complete, a job preset confirmation dialog box appears. The machine scans the original. When the preset job is ready. After the current copy job, the next copy job starts automatically. B Place the original. ...

Copy/Document Server Reference
Page 56
... much paper as can result in misfeeds and skewed images. G When the copy job is selected, press the {q} key after all originals 38 have been scanned. The bypass tray is not flush against the copy paper, images might occur. D Select the size and type of the paper. Overloading the bypass tray...
... much paper as can result in misfeeds and skewed images. G When the copy job is selected, press the {q} key after all originals 38 have been scanned. The bypass tray is not flush against the copy paper, images might occur. D Select the size and type of the paper. Overloading the bypass tray...

Copy/Document Server Reference
Page 61
...Adjusts the density of an image only for dark texture originals. Auto image density The machine automatically adjusts the image density by scanning the densities of originals. A Make sure that background will not be reproduced. Adjusting Copy Image Density There are three types ...of adjustment available. 2 ❖ Auto image density The machine automatically adjusts the image density by scanning the densities of originals. Copier Functions Copier Functions This section describes the copy functions. Dark texture originals (such as newspaper or...
...Adjusts the density of an image only for dark texture originals. Auto image density The machine automatically adjusts the image density by scanning the densities of originals. A Make sure that background will not be reproduced. Adjusting Copy Image Density There are three types ...of adjustment available. 2 ❖ Auto image density The machine automatically adjusts the image density by scanning the densities of originals. Copier Functions Copier Functions This section describes the copy functions. Dark texture originals (such as newspaper or...

Copy/Document Server Reference
Page 67
... ADF, the bottom left corner will be the base point. Shown below are the resulting copy images that differ depending on how the original is scanned. B Select a ratio, and then press [OK]. Note ❒ To select a preset ratio on the exposure glass. B Base point when placed in step A, press the shortcut... the base point. When it is set on the exposure glass, the upper left corner of Reduce/Enlarge differs depending on how the original is scanned. 2 BFC034S A Base point when placed on the initial display in the ADF. C Place the originals, and then press the {Start} key...
... ADF, the bottom left corner will be the base point. Shown below are the resulting copy images that differ depending on how the original is scanned. B Select a ratio, and then press [OK]. Note ❒ To select a preset ratio on the exposure glass. B Base point when placed in step A, press the shortcut... the base point. When it is set on the exposure glass, the upper left corner of Reduce/Enlarge differs depending on how the original is scanned. 2 BFC034S A Base point when placed on the initial display in the ADF. C Place the originals, and then press the {Start} key...

Copy/Document Server Reference
Page 77
... originals in step D. Note ❒ To confirm the type of copy sets using the Batch function, press the {q} key after all the originals have been scanned. E Press the {Start} key. When a finisher is not installed: Copier Functions 2 When a finisher is installed: C Enter the number of finishing, press the {Sample Copy} key...
... originals in step D. Note ❒ To confirm the type of copy sets using the Batch function, press the {q} key after all the originals have been scanned. E Press the {Start} key. When a finisher is not installed: Copier Functions 2 When a finisher is installed: C Enter the number of finishing, press the {Sample Copy} key...

Copy/Document Server Reference
Page 82
... These tables show the stapling positions, not the orientation of copy sets using the Batch function, press the {q} key after all the originals have been scanned. ❒ If you specify Saddle Stitch, you select a stapling position, Sort mode is automatically selected. D Place the originals, and then press the {Start} key...
... These tables show the stapling positions, not the orientation of copy sets using the Batch function, press the {q} key after all the originals have been scanned. ❒ If you specify Saddle Stitch, you select a stapling position, Sort mode is automatically selected. D Place the originals, and then press the {Start} key...
Copy/Document Server Reference
Page 90
...→2 Sided" directly by pressing the copy function key in the ADF using the Batch function, press the {q} key after all the originals have been scanned. Copying A Press [Dup./Combine/Series]. 2 B Make sure that case, proceed to be copied. Reference p.93 "Margin Adjustment" "Edit", General Settings Guide 72 When placing originals...
...→2 Sided" directly by pressing the copy function key in the ADF using the Batch function, press the {q} key after all the originals have been scanned. Copying A Press [Dup./Combine/Series]. 2 B Make sure that case, proceed to be copied. Reference p.93 "Margin Adjustment" "Edit", General Settings Guide 72 When placing originals...
Copy/Document Server Reference
Page 100
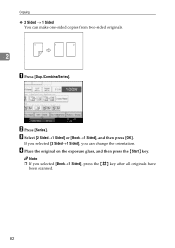
Copying ❖ 2 Sided → 1 Sided You can change the orientation. B Press [Series]. D Place the original on the exposure glass, and then press the {Start} key. C Select [2 Sided→1 Sided] or [Book→1 Sided], and then press [OK]. If you selected [2 Sided→1 Sided], you selected [Book→1 Sided], press the {q} key after all originals have been scanned. 82 Note ❒ If you can make one-sided copies from two-sided originals. 2 A Press [Dup./Combine/Series].
Copying ❖ 2 Sided → 1 Sided You can change the orientation. B Press [Series]. D Place the original on the exposure glass, and then press the {Start} key. C Select [2 Sided→1 Sided] or [Book→1 Sided], and then press [OK]. If you selected [2 Sided→1 Sided], you selected [Book→1 Sided], press the {q} key after all originals have been scanned. 82 Note ❒ If you can make one-sided copies from two-sided originals. 2 A Press [Dup./Combine/Series].


