Maintenance Guide
Page 4
...collection sites. • Dispose of the following conditions exists: • You spill something into the equipment. • You suspect that your printer, the following important symbols are used: R WARNING: Indicates a potentially hazardous situation which , if instructions are not followed, could result in ...power cable or plug becomes frayed or otherwise damaged. • To avoid hazardous electric shock or laser radiation exposure, do not remove any of the used toner cartridge in this manual, the following safety precautions should always be followed. ii Safety Information When ...
...collection sites. • Dispose of the following conditions exists: • You spill something into the equipment. • You suspect that your printer, the following important symbols are used: R WARNING: Indicates a potentially hazardous situation which , if instructions are not followed, could result in ...power cable or plug becomes frayed or otherwise damaged. • To avoid hazardous electric shock or laser radiation exposure, do not remove any of the used toner cartridge in this manual, the following safety precautions should always be followed. ii Safety Information When ...

Maintenance Guide
Page 5
... not be very hot. While moving the machine, you should take place at an authorized dealer. • The inside the machine. • Keep toner (used or unused) and toner cartridge out of the reach of children. • For environmental reasons, do not dispose of the machine could be damaged under the machine...
... not be very hot. While moving the machine, you should take place at an authorized dealer. • The inside the machine. • Keep toner (used or unused) and toner cartridge out of the reach of children. • For environmental reasons, do not dispose of the machine could be damaged under the machine...
Maintenance Guide
Page 8
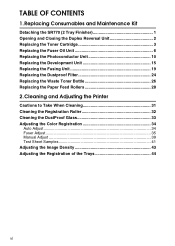
Cleaning and Adjusting the Printer Cautions to Take When Cleaning 31 Cleaning the Registration Roller 32 Cleaning the DustProof Glass 33 Adjusting the Color Registration 34 Auto Adjust 34 Fuser Adjust 35 Manual Adjust 39 Test Sheet Samples 41 Adjusting the Image Density ... and Closing the Duplex Reversal Unit 2 Replacing the Toner Cartridge 3 Replacing the Fuser Oil Unit 6 Replacing the Photoconductor Unit 10 Replacing the Development Unit 15 Replacing the Fusing Unit 19 Replacing the Dustproof Filter 24 Replacing the Waste Toner Bottle 26 Replacing the Paper Feed Rollers 28 2....
Cleaning and Adjusting the Printer Cautions to Take When Cleaning 31 Cleaning the Registration Roller 32 Cleaning the DustProof Glass 33 Adjusting the Color Registration 34 Auto Adjust 34 Fuser Adjust 35 Manual Adjust 39 Test Sheet Samples 41 Adjusting the Image Density ... and Closing the Duplex Reversal Unit 2 Replacing the Toner Cartridge 3 Replacing the Fuser Oil Unit 6 Replacing the Photoconductor Unit 10 Replacing the Development Unit 15 Replacing the Fusing Unit 19 Replacing the Dustproof Filter 24 Replacing the Waste Toner Bottle 26 Replacing the Paper Feed Rollers 28 2....
Maintenance Guide
Page 13
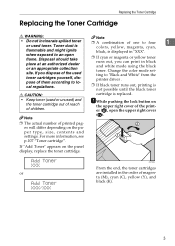
... them according to local regulations. ❒ If black toner runs out, printing is not possible until the black toner R CAUTION: cartridge is displayed in "XXX". Toner dust is colors, yellow, magenta, cyan, flammable and might ignite black, is replaced. • Keep toner (used or unused) and the toner cartridge out of reach of children. er (A), open...
... them according to local regulations. ❒ If black toner runs out, printing is not possible until the black toner R CAUTION: cartridge is displayed in "XXX". Toner dust is colors, yellow, magenta, cyan, flammable and might ignite black, is replaced. • Keep toner (used or unused) and the toner cartridge out of reach of children. er (A), open...

Maintenance Guide
Page 14
... Important ZDJT203J ❒ Do not shake the removed toner cartridge. Replacing Consumables and Maintenance Kit B Remove the toner cartridge for the color you want to replace. ZDJT202J Note ❒ The black toner cartridge con- ing toner might be left in a toner cartridge. ZDJT999J B Holding the toner cartridge with one hand. D Shake the toner cartridge back and forth 5-6 times.
... Important ZDJT203J ❒ Do not shake the removed toner cartridge. Replacing Consumables and Maintenance Kit B Remove the toner cartridge for the color you want to replace. ZDJT202J Note ❒ The black toner cartridge con- ing toner might be left in a toner cartridge. ZDJT999J B Holding the toner cartridge with one hand. D Shake the toner cartridge back and forth 5-6 times.

Maintenance Guide
Page 15
Important ❒ Do not turn off the power switch during "Loading Toner..." Replacing the Toner Cartridge E Holding the toner cartridge with your fingers. tach in front, at- G Close the upper right cover. 1 ZDJT004J Important ❒ Do not touch ...following message appears on the metal contact area. Loading Toner... Please wait a while. This could result in a toner leak. 5 F Insert the toner cartridge slowly until the green hook snaps on the panel display. appears on the panel display to avoid a printer malfunction. ZDJT005J Important ❒ Do not install and ...
Important ❒ Do not turn off the power switch during "Loading Toner..." Replacing the Toner Cartridge E Holding the toner cartridge with your fingers. tach in front, at- G Close the upper right cover. 1 ZDJT004J Important ❒ Do not touch ...following message appears on the metal contact area. Loading Toner... Please wait a while. This could result in a toner leak. 5 F Insert the toner cartridge slowly until the green hook snaps on the panel display. appears on the panel display to avoid a printer malfunction. ZDJT005J Important ❒ Do not install and ...
Maintenance Guide
Page 19
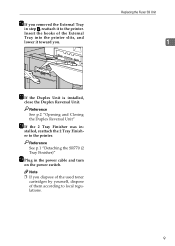
... installed, close the Duplex Reversal Unit. Note ❒ If you dispose of the used toner cartridges by yourself, dispose of the External Tray into the printer slits, and lower it to the printer. stalled, reattach the 2 Tray Finisher to the printer. P If you removed the External Tray in - Reference See p.1 "Detaching the SR770 (2 Tray...
... installed, close the Duplex Reversal Unit. Note ❒ If you dispose of the used toner cartridges by yourself, dispose of the External Tray into the printer slits, and lower it to the printer. stalled, reattach the 2 Tray Finisher to the printer. P If you removed the External Tray in - Reference See p.1 "Detaching the SR770 (2 Tray...
Maintenance Guide
Page 33
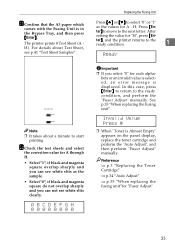
... select the correction value for A - H. bets or an invalid value is selected, an error message is Almost Empty" appears on the panel display, replace the toner cartridge and perform the "Auto Adjust", and then perform "Fuser Adjust" manually. A B C D E F G H 0 0 0 0 0 0 0 0 Replacing the Fusing Unit Press {U} or {T} to select... displayed. U Confirm that the A3 paper which comes with the Fusing Unit is in the Bypass Tray, and then press {Enter}. The printer prints 8 Test Sheet (A H). Note ❒ It takes about Test Sheet, see white slits clearly. Press {En- ter} to move to...
... select the correction value for A - H. bets or an invalid value is selected, an error message is Almost Empty" appears on the panel display, replace the toner cartridge and perform the "Auto Adjust", and then perform "Fuser Adjust" manually. A B C D E F G H 0 0 0 0 0 0 0 0 Replacing the Fusing Unit Press {U} or {T} to select... displayed. U Confirm that the A3 paper which comes with the Fusing Unit is in the Bypass Tray, and then press {Enter}. The printer prints 8 Test Sheet (A H). Note ❒ It takes about Test Sheet, see white slits clearly. Press {En- ter} to move to...

Maintenance Guide
Page 36
...in the illustration (B). B Open the front cover slowly by pulling down from the bag. D Remove the used waste toner bottle into the bag that contained the new waste toner bottle, and then seal the bag. E Remove the lid (A), and then put it on the position shown in...level manner. ZDJH007J C Take out a new waste toner bottle from the two areas on the panel display, replace the waste toner bottle. tle slowly from inside the printer. Replacing Consumables and Maintenance Kit Replacing the Waste Toner Bottle 1 If "Replace Waste Toner (Type E)" appears on the left and right. ...
...in the illustration (B). B Open the front cover slowly by pulling down from the bag. D Remove the used waste toner bottle into the bag that contained the new waste toner bottle, and then seal the bag. E Remove the lid (A), and then put it on the position shown in...level manner. ZDJH007J C Take out a new waste toner bottle from the two areas on the panel display, replace the waste toner bottle. tle slowly from inside the printer. Replacing Consumables and Maintenance Kit Replacing the Waste Toner Bottle 1 If "Replace Waste Toner (Type E)" appears on the left and right. ...

Maintenance Guide
Page 37
Replacing the Waste Toner Bottle G Insert the new waste toner bottle in the position shown in until it in the illus- ZDJH041J 27 J Plug in the power cable and turn on the left and right. ZDJH231J Important ❒ Be sure to insert the waste toner bottle firmly to avoid the toner from leaking inside the printer. I Close the front cover slowly by pushing the two areas on the power switch. 1 ZDJH230J H Push it stops. tration.
Replacing the Waste Toner Bottle G Insert the new waste toner bottle in the position shown in until it in the illus- ZDJH041J 27 J Plug in the power cable and turn on the left and right. ZDJH231J Important ❒ Be sure to insert the waste toner bottle firmly to avoid the toner from leaking inside the printer. I Close the front cover slowly by pushing the two areas on the power switch. 1 ZDJH230J H Push it stops. tration.
Maintenance Guide
Page 45
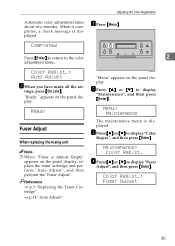
...Maintenance", and then press {Enter}. tings, press {On Line}. Color Regist.: Auto Adjust G When you have made all the set- "Ready " appears on the panel display, replace the toner cartridge and perform "Auto Adjust", and then perform the "Fuser Adjust.... B Press {U} or {T} to the color 2 adjustment menu. D Press {U} or {T} to display "Color Regist.", and then press {Enter}. Color Regist.: Fuser Adjust 35 Maintenance: Color Regist. When it completes, a check message is displayed. Reference ⇒ p.3 "Replacing the Toner Cartridge" ⇒ p.34 "Auto Adjust"...
...Maintenance", and then press {Enter}. tings, press {On Line}. Color Regist.: Auto Adjust G When you have made all the set- "Ready " appears on the panel display, replace the toner cartridge and perform "Auto Adjust", and then perform the "Fuser Adjust.... B Press {U} or {T} to the color 2 adjustment menu. D Press {U} or {T} to display "Color Regist.", and then press {Enter}. Color Regist.: Fuser Adjust 35 Maintenance: Color Regist. When it completes, a check message is displayed. Reference ⇒ p.3 "Replacing the Toner Cartridge" ⇒ p.34 "Auto Adjust"...
Maintenance Guide
Page 46
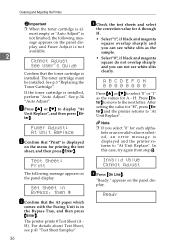
... white slits clearly. After setting the value for each alpha- Note ❒ If you select "0" for "H", press {Enter} and the printer returns to "At Unit Replace". bets or an invalid value is selected, an error message is al- In this case, try again from...". H. "Ready " appears on the panel display. The toner cartridge must be installed. E Press {U} or {T} to the next letter. The printer prints 8 Test Sheet (A H). Cleaning and Adjusting the Printer Important ❒ When the toner cartridge is displayed and the printer returns to "At Unit Replace". For details about Test Sheet...
... white slits clearly. After setting the value for each alpha- Note ❒ If you select "0" for "H", press {Enter} and the printer returns to "At Unit Replace". bets or an invalid value is selected, an error message is al- In this case, try again from...". H. "Ready " appears on the panel display. The toner cartridge must be installed. E Press {U} or {T} to the next letter. The printer prints 8 Test Sheet (A H). Cleaning and Adjusting the Printer Important ❒ When the toner cartridge is displayed and the printer returns to "At Unit Replace". For details about Test Sheet...

Maintenance Guide
Page 47
... Adjust is installed, perform "Auto Adjust". Menu: Maintenance The maintenance menu is installed. The toner cartridge must be installed. F Press {U} or {T} to display "Maintenance", and then press {Enter}. tom Adjust", and then press {Enter}. Adjusting the Color Registration When color shifting occurs D Press {U} or {T} to select paper size in the "Paper Input" menu...
... Adjust is installed, perform "Auto Adjust". Menu: Maintenance The maintenance menu is installed. The toner cartridge must be installed. F Press {U} or {T} to display "Maintenance", and then press {Enter}. tom Adjust", and then press {Enter}. Adjusting the Color Registration When color shifting occurs D Press {U} or {T} to select paper size in the "Paper Input" menu...

Maintenance Guide
Page 79
... for a while. Description Solution The printer is out of the indicated color(s). The printer is being processed. Wait until the printer signals Ready. ❖ Alert Messages Messages/Second messages Add Staples Add Toner/Yellow/Magenta/Cyan/Black Add Toner Black Description Solution The stapler is ready to print. color. The printer is out of toner (K). Wait for a while. Offline...
... for a while. Description Solution The printer is out of the indicated color(s). The printer is being processed. Wait until the printer signals Ready. ❖ Alert Messages Messages/Second messages Add Staples Add Toner/Yellow/Magenta/Cyan/Black Add Toner Black Description Solution The stapler is ready to print. color. The printer is out of toner (K). Wait for a while. Offline...

Maintenance Guide
Page 80
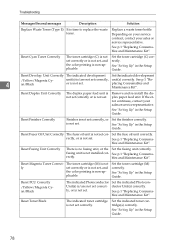
...the upper right cover. Close Finisher Upper Cover The paper entrance cover for fin- Troubleshooting Messages/Second messages Description Solution Add Toner Cyan The printer is out of toner (M). ty tray. Load {paper size and type} paper with the selected feed direction into the tray, and then ...Feed}, and then select the tray with the control panel. Close Finisher Upper Cover The finisher upper cover is open . Add Toner Magenta The printer is out of actual paper size and type in the tray. ler. er for the feed table/large capacity tray paper ...
...the upper right cover. Close Finisher Upper Cover The paper entrance cover for fin- Troubleshooting Messages/Second messages Description Solution Add Toner Cyan The printer is out of toner (M). ty tray. Load {paper size and type} paper with the selected feed direction into the tray, and then ...Feed}, and then select the tray with the control panel. Close Finisher Upper Cover The finisher upper cover is open . Add Toner Magenta The printer is out of actual paper size and type in the tray. ler. er for the feed table/large capacity tray paper ...
Maintenance Guide
Page 88
... Consumables and Maintenance Kit". Set the toner cartridge (C) correctly. Unit Correctly The indicated development Set the indicated development /Yellow/Magenta Cy- 4 an/Black unit(s) is/are not set correctly, or is /are not set , and the color printing is no fusing unit, or ... rectly. Set the indicated Photoconductor Unit(s) correctly. Depending on your service contract, contact your sales or service representative. Reset Cyan Toner Correctly The toner cartridge (C) is not set correctly or is not set correctly, unit(s) correctly. See "Setting Up" in the Setup Guide....
... Consumables and Maintenance Kit". Set the toner cartridge (C) correctly. Unit Correctly The indicated development Set the indicated development /Yellow/Magenta Cy- 4 an/Black unit(s) is/are not set correctly, or is /are not set , and the color printing is no fusing unit, or ... rectly. Set the indicated Photoconductor Unit(s) correctly. Depending on your service contract, contact your sales or service representative. Reset Cyan Toner Correctly The toner cartridge (C) is not set correctly or is not set correctly, unit(s) correctly. See "Setting Up" in the Setup Guide....

Maintenance Guide
Page 89
...or is not set . RPCS Memory Overflow The printer memory is not set . This error results from other drivers, etc. Set the indicated toner cartridge(s) correctly. Set the indicated toner cartridge(s) correctly. Reset Tray 1 Correctly The ...Toner Yellow The indicated toner cartridge Set the indicated toner car- Set the indicated paper input tray correctly. rectly. tridge(s) correctly. Reset Transfer Unit Correctly The transfer unit is not set cor- Reset Yellow Toner Correctly The toner cartridge (Y) is not set correctly or is not set, and the color...
...or is not set . RPCS Memory Overflow The printer memory is not set . This error results from other drivers, etc. Set the indicated toner cartridge(s) correctly. Set the indicated toner cartridge(s) correctly. Reset Tray 1 Correctly The ...Toner Yellow The indicated toner cartridge Set the indicated toner car- Set the indicated paper input tray correctly. rectly. tridge(s) correctly. Reset Transfer Unit Correctly The transfer unit is not set cor- Reset Yellow Toner Correctly The toner cartridge (Y) is not set correctly or is not set, and the color...

Maintenance Guide
Page 90
... make sure whether your sales or service representative. Waste Toner is Almost Full (E) The waste toner bottle is almost out of Prepare a new toner cartridge 4 toner (C). (C). Toner is Almost Empty: Cyan The printer is almost full of toner (K). Toner is almost out of toner dust. Toner is Almost Empty: Black The printer is Almost Empty: Yel- If the message appears again...
... make sure whether your sales or service representative. Waste Toner is Almost Full (E) The waste toner bottle is almost out of Prepare a new toner cartridge 4 toner (C). (C). Toner is Almost Empty: Cyan The printer is almost full of toner (K). Toner is almost out of toner dust. Toner is Almost Empty: Black The printer is Almost Empty: Yel- If the message appears again...

Maintenance Guide
Page 96
... is attached properly. See p.47 "Paper and Other Media Supported by This Printer". See p.47 "Paper and Other Media Supported by This Printer". Some parts of cyan, magenta, yel- The toner based color settings with the printer driver causes a drastic change in printout color. To adjust the image density, press {Menu} on the display panel might...
... is attached properly. See p.47 "Paper and Other Media Supported by This Printer". See p.47 "Paper and Other Media Supported by This Printer". Some parts of cyan, magenta, yel- The toner based color settings with the printer driver causes a drastic change in printout color. To adjust the image density, press {Menu} on the display panel might...

Maintenance Guide
Page 116
Moving the printer slowly avoiding the toner to in- Appendix D Lift the printer and move it horizontally to the place where you want to scatter. ❒ If the Paper Feed Unit(s) is installed, detach it . Important ❒ Be sure to move the printer separately. 5 106 stall it and move the printer horizontally.
Moving the printer slowly avoiding the toner to in- Appendix D Lift the printer and move it horizontally to the place where you want to scatter. ❒ If the Paper Feed Unit(s) is installed, detach it . Important ❒ Be sure to move the printer separately. 5 106 stall it and move the printer horizontally.


